When developing in C# with multiple projects in a large enterprise solutions, managing NuGet package versions across all projects can become a challenging task. If each project has to reference the same NuGet packages, but with different versions, you might run into compatibility issues or redundant updates. The Directory.Packages.props file simplifies this by allowing you to define package versions in one central location and reference them in all projects.

In this article, we’ll discuss how and when to use the Directory.Packages.props file in your C# solution. It explains the key concepts, steps, and benefits of using this approach to streamline NuGet package management in larger enterprise solution with multiple projects.


What is Directory.Packages.props?

Directory.Packages.props is an MSBuild file that provides a central place to define NuGet package versions that can be shared across all projects within a solution. This ensures version consistency across your projects and makes it easier to maintain and update package dependencies.

Why Use Directory.Packages.props?

Managing package versions becomes tedious as your solution grows. Each project may require the same NuGet package, but updating the version in every .csproj file is time-consuming and error-prone. By defining versions centrally, you can:

  • Ensure version consistency across all projects.
  • Simplify the maintenance of NuGet packages.
  • Eliminate redundant version management in individual project files.

How to Use Directory.Packages.props

1. Create the Directory.Packages.props File

At the root of your solution (where your .sln file is located), create a file named Directory.Packages.props.

2. Define Package Versions

In this file, you define package versions using MSBuild properties. Here’s an example:

<?xml version="1.0" encoding="utf-8"?>
<Project>
<PropertyGroup>
<NewtonsoftJsonVersion>13.0.1</NewtonsoftJsonVersion>
<SerilogVersion>2.10.0</SerilogVersion>
</PropertyGroup>
</Project>

In this example, we’ve defined two package versions:

  • Newtonsoft.Json version 13.0.1
  • Serilog version 2.10.0

3. Reference the Versions in Each Project

In your project’s .csproj file, you can reference the package versions defined in the Directory.Packages.props file using the properties you just created.

Here’s an example of how to reference these versions:

<ItemGroup>
<PackageReference Include="Newtonsoft.Json" Version="$(NewtonsoftJsonVersion)" />
<PackageReference Include="Serilog" Version="$(SerilogVersion)" />
</ItemGroup>

Now, instead of hardcoding the package version in every project, you are simply using the version defined in the Directory.Packages.props file.

4. Automatic Inheritance

The Directory.Packages.props file is automatically applied to all projects in the solution without the need to explicitly reference it in every .csproj file. This works because MSBuild automatically imports this file for all projects in the directory or subdirectories.


When to Use Directory.Packages.props

1. Multiple Projects in a Solution

If you’re working with a solution that contains multiple projects that share common NuGet packages, you’ll benefit from using Directory.Packages.props. Instead of managing package versions individually in each project file, you can manage them centrally.

2. Version Consistency Across Projects

When you want all projects to use the same version of a NuGet package, defining package versions in a single file ensures that every project is aligned. This helps avoid version mismatches or compatibility issues.

3. Simplifying Package Maintenance

As projects evolve, the need to upgrade NuGet packages arises. Instead of updating package versions in every project file, Directory.Packages.props allows you to update the version in one place, and it will propagate to all projects.

4. Avoid Redundant Package Versioning

By managing package versions centrally, you avoid redundancy and reduce the risk of human error when updating versions manually in different projects.


Example Directory Structure

Here’s what your directory structure might look like when using Directory.Packages.props:

/Solution
├── Directory.Packages.props
├── Project1/Project1.csproj
├── Project2/Project2.csproj
└── Project3/Project3.csproj

In this structure:

  • The Directory.Packages.props file resides in the root of the solution.
  • All project files (e.g., Project1.csproj, Project2.csproj, etc.) inherit package versions from this central file.

Benefits of Using Directory.Packages.props

  • Centralized Package Management: By defining versions in one file, you eliminate the need to specify them in each project.
  • Simplified Maintenance: Updating package versions is as simple as changing the version number in Directory.Packages.props.
  • Consistency Across Projects: All projects in your solution will use the same package versions, reducing compatibility issues.
  • Less Redundancy: You avoid repeating the same package version across multiple project files.

Conclusion

Using Directory.Packages.props in your C# solution is a powerful way to manage package versions centrally, ensuring consistency and making maintenance easier. As your solution grows and the number of projects increases, having a single point of truth for package versions will save time, reduce errors, and make your development process smoother.

By implementing this approach, you can focus more on coding and less on version management.

Happy coding!

1. Introduction

This article integrates Semantic Kernel (SK), Ollama, and Qdrant to build a local retrieval-augmented generation (RAG) system with function-calling capabilities. This chatbot is developed with custom plugins, including a RAG based plugin with PDF Search, LocalDateTime Plugin and a Weather Plugin, allowing it to answer queries beyond basic conversation, such as providing relevant answer from embedded content, getting the current local time and weather information. This article explains the architecture, tech stack, setup instructions, and a detailed code walkthrough.

Architecture Diagram

2. Tech Stack Summary

Semantic Kernel

Microsoft Semantic Kernel enables the integration of language models with external tools and plugins, allowing advanced interactions like embeddings, memory search, and plugin-based function calling.

Ollama

Ollama is used for generating text embeddings that are vector representations of text. These embeddings are critical for tasks like semantic search and information retrieval.

Qdrant

Qdrant is a vector database that stores embeddings generated by Ollama. It enables fast similarity search, which is essential for retrieving contextually relevant information based on user input.

3. Setup Instructions

Setting up Ollama

Download the Ollama software from the following URL https://ollama.com/download and follow the instructions to download and run the model locally.

ollama pull llama3.1
ollama pull snowflake-arctic-embed

Setting up Qdrant Using Docker

Download and Install the Docker Desktop from the official website.

  1. Pull the Qdrant Docker image:

    docker pull qdrant/qdrant

  2. Run Qdrant with Docker:

    docker run -p 6333:6333 qdrant/qdrant

  3. Verify if Qdrant is running:

    http://localhost:6333/dashboard

4. Code Walkthrough

Configuration Setup

var config = new ConfigurationBuilder()
.AddUserSecrets(Assembly.GetExecutingAssembly(), true)
.Build();`

This section loads secret keys and model configurations required to run the assistant.

{
"baseUrl": "",
"baseEmbeddingUrl": "",
"qdrantMemoryStoreUrl": "",
"weatherApiKey": "",
"modelId": "llama3.1:latest",
"embeddingModelId": "snowflake-arctic-embed",
"domainName": "Solar System",
"domainGuide": "Assets/solar_system.pdf"
}

Replace "baseUrl" and "baseEmbeddingUrl" with ollama base url , "qdrantMemoryStoreUrl" with your qdrant server url, and "weatherApiKey" with your api keys from weatherapi.com

Memory Setup

var memory = new MemoryBuilder()
.WithOllamaTextEmbeddingGeneration(embeddingModelId,
new Uri(baseEmbeddingUrl!))
.WithQdrantMemoryStore(httpClient, 1024, qdrantMemoryStoreUrl)
.WithHttpClient(httpClient)
.Build();`

This creates a memory builder using Ollama for text embeddings and Qdrant to store them.

Kernel Initialization

var builder = Kernel.CreateBuilder()
.AddOpenAIChatCompletion(modelId: modelId, apiKey: null,
endpoint: new Uri(baseUrl), httpClient: httpClient);
var kernel = builder.Build();

The kernel integrates the OpenAI chat completion interface for generating chat responses and manages plugin execution for custom functionalities.

Prompt Instructions

In the context of the Semantic Kernel, prompt instructions serve as a guiding light for the LLM, influencing its decision-making process when choosing the appropriate plugin to execute. Well-crafted prompt instructions have a profound impact on the LLM’s ability to choose the correct plugin and deliver accurate results. They bridge the gap between human intent and machine understanding, enabling seamless function calling and a more natural user experience. So, always ensure clear, specific, and comprehensive prompt instructions to unlock the full potential of your LLM.

string HostInstructions = $@"You are an Assistant to search content from the {domainName} guide to help users to answer the question. 

You can answer general questions like greetings, good bye with your response without using any plugins.
For all other questions, use the list of available plugin below to get the answer.

List of Available Plugins:
Local Time Plugin : Retrieve the current date and time
Weather Plugin : Calculate the weather for the given location.
Memory Plugin: Search answers from memory for questions related to {domainName}.

If any one of the plugin can not be used for the give query ,
even if you know the answer, you should not provide the answer outside of the {domainName} context. respond back with ""I dont have the answer for your question""
Be precise with the response. Do not add what plugin you have used to get the answers in the response.
";

Agent and Plugins Setup

ChatCompletionAgent agent = new()
{
Instructions = HostInstructions,
Name = HostName,
Kernel = kernel,
Arguments = new(settings),
};
var memoryPlugin = new TextMemoryPlugin(memory);
agent.Kernel.ImportPluginFromObject(memoryPlugin);

KernelPlugin localDateTimePlugin = KernelPluginFactory.CreateFromType<LocalDateTimePlugin>();
agent.Kernel.Plugins.Add(localDateTimePlugin);

KernelPlugin weatherPlugin = KernelPluginFactory.CreateFromObject(new WeatherPlugin(weatherApiKey!));
agent.Kernel.Plugins.Add(weatherPlugin);

Here, the ChatCompletionAgent is initialized with specific instructions. Plugins such as TextMemoryPlugin, LocalDateTimePlugin, and WeatherPlugin are registered to extend the assistant’s functionality.

Initialize Chat Loop

while (true)
{
Console.Write("User: ");
string question = Console.ReadLine()!;
await InvokeAgentAsync(question);
}

This loop continuously prompts the user for input and invokes the agent to process the queries using memory and plugins.

Embedding Data

async Task EmbedData()
{
FileContent content = new(MimeTypes.PlainText);
var pdfDecoder = new PdfDecoder();
content = await pdfDecoder.DecodeAsync(domainGuide);

int pageIndex = 1;
foreach (FileSection section in content.Sections)
{
await memory.SaveInformationAsync(domainName, id: $"page{pageIndex}", text: section.Content);
pageIndex++;
}
}

The function uses the PDF Loader from Kernel Memory Library and pass every page content to ollama embedding API to embed the data and store it into Qdrant vector database for later retrieval.

LocalDateTimePlugin

public sealed class LocalDateTimePlugin
{
[KernelFunction, Description("Retrieves the current date and time in Local Time.")]
public static String GetCurrentLocalDateTime()
{
return DateTime.Now.ToLocalTime().ToString();
}
}

This plugin retrieves the current local time and can be invoked by the assistant to answer time-related queries.

WeatherPlugin

public sealed class WeatherPlugin(string apiKey)
{
HttpClient client = new HttpClient();

[KernelFunction, Description("Gets the weather details of a given location")]
public async Task<string> GetWeatherAsync(string locationName)
{
string url = $"http://api.weatherapi.com/v1/current.json?key={apiKey}&q={locationName}&aqi=no";
HttpResponseMessage response = await client.GetAsync(url);
response.EnsureSuccessStatusCode();
string responseBody = await response.Content.ReadAsStringAsync();
return responseBody;
}
}

The WeatherPlugin interacts with an external API to fetch weather details for a given location. The user can ask the assistant about the weather, and it will utilize this plugin.

Ollama TextEmbedding Generation

public class OllamaTextEmbeddingGeneration : ITextEmbeddingGenerationService
{
public async Task<IList<ReadOnlyMemory<float>>> GenerateEmbeddingsAsync(IList<string> data, Kernel? kernel = null,
CancellationToken cancellationToken = new())
{
var result = new List<ReadOnlyMemory<float>>(data.Count);
foreach (var text in data)
{
var request = new { model = Attributes["model_id"], prompt = text };
var response = await httpClient.PostAsJsonAsync($"{Attributes["base_url"]}api/embeddings", request, cancellationToken);
var json = JsonSerializer.Deserialize<JsonNode>(await response.Content.ReadAsStringAsync());
var embedding = new ReadOnlyMemory<float>(json!["embedding"]?.AsArray().GetValues<float>().ToArray());
result.Add(embedding);
}
return result;
}
}

This service generates embeddings for input text using Ollama and stores the embeddings in Qdrant for efficient search and retrieval.

Memory Builder Extensions

public static class OllamaMemoryBuilderExtensions
{
public static MemoryBuilder WithOllamaTextEmbeddingGeneration(this MemoryBuilder builder, string modelId, Uri baseUrl)
{
builder.WithTextEmbeddingGeneration((logger, httpclient) => new OllamaTextEmbeddingGeneration(modelId, baseUrl.AbsoluteUri, httpclient, logger));
return builder;
}
}

This extension method simplifies the integration of Ollama into the memory building process.

5. Final Output

This article demonstrates the power of combining local LLMs function calling and RAG with the Semantic Kernel framework. By leveraging Ollama for embeddings and Qdrant for efficient vector storage, you can create a chatbot that understands your domain-specific knowledge and interacts with external services. The ability to run LLMs locally enhances data privacy and control, making it a compelling solution for various enterprise applications. The entire source code is available here in the following github url.

https://github.com/vavjeeva/SKOllamaLocalRAGSearchWithFunctionCalling

Disclaimer: Please note that the code is based on the current version of the Semantic Kernel. Future updates to the framework may introduce changes that could impact the compatibility or functionality of this code. It’s always recommended to refer to the official Semantic Kernel documentation and stay updated with the latest releases.

Introduction

The usage of large language models (LLMs) has revolutionized the way we approach complex tasks in AI, providing powerful tools for natural language understanding, generation, and more. Among the collection of LLMs available, Meta's Latest Llama 3.1 stands out as a robust model for various natural language processing (NLP) applications. Coupled with Microsoft's Semantic Kernel, developers now have a flexible framework to integrate these models into a wide range of applications, from chatbots to data analysis tools etc..

In this article, we'll explore the exciting capabilities of function calling using a local instance of Llama 3.1 hosted in ollama with Semantic Kernel. By leveraging this combination, developers can harness the full potential of Llama 3.1 while maintaining control over their data and computational resources with out using any cloud services. We’ll walk through the process of setting up a local LLM environment, integrating it with Semantic Kernel, and implementing function calling to perform specific tasks.

Why Use a Local LLM with C# Semantic Kernel?

Running LLMs locally brings several key advantages:

  1. Data Security: Your data remains within your local environment, ensuring privacy and compliance with data protection regulations.
  2. Customization: You can select various open source models that better suit specific use cases. SLM model like PHI3 for simple use case like summarization.
  3. Cost Savings: Avoiding the need for external APIs reduces ongoing costs.
  4. Low Latency: Local execution minimizes response times, improving performance for real-time applications.

The C# Semantic Kernel library provides a structured framework for integrating LLMs into your applications. It simplifies the process of calling functions, managing context, and orchestrating complex workflows, making it easier to deploy Llama 3.1 in real-world scenarios.

Setting Up Llama 3.1 Locally with Ollama

To begin function calling with a local instance of Llama 3.1 using C# Semantic Kernel, you'll need to follow a few setup steps. 

First, you’ll need to set up the Llama 3.1 model from Ollama on your local machine. This involves:

  • Hardware Preparation: Ensure your machine has the necessary computational power, preferably a GPU.
  • Environment Configuration: Install the required software and dependencies. Follow the instructions provided by Ollama to download and run Llama 3.1 locally.

Step-by-Step Guide: Implementing Function Calling with Llama 3.1 Using C# Semantic Kernel

Step 1: Setup Your Project

  1. Create a New C# Console Application:

    • Open your preferred IDE (like Visual Studio or Visual Studio Code).
    • Create a new Console Application project.
  2. Install Required NuGet Packages:

    • Install the following NuGet packages via the NuGet Package Manager or using the .NET CLI:
      dotnet add package Microsoft.Extensions.Configuration
      dotnet add package Microsoft.SemanticKernel
      dotnet add package Microsoft.SemanticKernel.Connectors.OpenAI
  3. Configure User Secrets:

    • Set up user secrets to securely store your model ID, base URL, and weather API key. This can be done via the .NET CLI:
dotnet user-secrets init
dotnet user-secrets set "modelId" "your-model-id"
dotnet user-secrets set "baseUrl" "your-base-url"
dotnet user-secrets set"weatherApiKey" "your-weather-api-key"
  • Replace "your-model-id", "your-base-url", and "your-weather-api-key" with your actual values. you can download free weather api key from weatherapi.com

Step 2: Configure the Application

  1. Load Configuration:
    • Start by loading the configuration values from user secrets:
      var config = new ConfigurationBuilder() .AddUserSecrets(Assembly.GetExecutingAssembly(), true) .Build();
      var modelId = config["modelId"];
      var baseUrl = config["baseUrl"];
      var weatherApiKey = config["weatherApiKey"];
  2. Set Up the HTTP Client:
    • Initialize an HttpClient with a timeout setting to manage the requests to your local Llama 3.1 model:
      var httpClient = new HttpClient { Timeout = TimeSpan.FromMinutes(2) };
  3. Build the Semantic Kernel:
    • Create and configure the Semantic Kernel using the KernelBuilder:

      var builder = Kernel.CreateBuilder()
      .AddOpenAIChatCompletion(modelId: modelId!, apiKey: null, endpoint: new Uri(baseUrl!), httpClient: httpClient);
      var kernel = builder.Build();

Step 3: Set Up the Chat Agent and Add Plugins

  1. Define Agent Instructions (Prompt) and Settings:

    var HostName = "AI Assistant"; 
    var HostInstructions = @"You are a helpful Assistant to answer their queries. Be respectful and precise in answering the queries.
    If the queries are related to getting the time or weather, Use the available plugin functions to get the answer.";

    var settings = new OpenAIPromptExecutionSettings() { Temperature = 0.0,
    ToolCallBehavior = ToolCallBehavior.AutoInvokeKernelFunctions };

    ChatCompletionAgent agent = new()
    { Instructions = HostInstructions, Name = HostName, Kernel = kernel, Arguments = new(settings), };
  2. Add Plugins to the Agent:

In this section, we will dive into the functionality of two key plugins used in our application: the WeatherPlugin and the LocalTimePlugin. These plugins are designed to handle specific tasks—retrieving weather details and getting the current local time—and they are integrated into the Semantic Kernel to be invoked when needed by the AI Assistant.

  1. WeatherPlugin

The WeatherPlugin is a class that interfaces with a weather API to fetch and return weather details for a specified location. Here’s a breakdown of how it works:

Functionality:

  • The plugin takes in a location name as input from the prompt and queries a weather API to retrieve the current weather conditions for that location.
  • It uses an HTTP client to send a GET request to the API, incorporating the provided location and the API key (which is securely stored using user secrets).

Code Explanation:

public sealed class WeatherPlugin(string apiKey)
{
HttpClient client = new HttpClient();

[KernelFunction, Description("Gets the weather details of a given location")]
[return: Description("Weather details")]
public async Task<string> GetWeatherAsync([Description("name of the location")] string locationName)
{
string url = $"http://api.weatherapi.com/v1/current.json?key={apiKey}&q={locationName}&aqi=no";

HttpResponseMessage response = await client.GetAsync(url);
response.EnsureSuccessStatusCode();
string responseBody = await response.Content.ReadAsStringAsync();

return responseBody;
}
}
  • Constructor (WeatherPlugin): Takes an API key as a parameter, which is used to authenticate requests to the weather API.

  • HttpClient: An instance of HttpClient is created to manage HTTP requests and responses.

  • GetWeatherAsync Method: This is the core method of the plugin, decorated with [KernelFunction], indicating that it can be called by the Semantic Kernel:

    • It constructs the API request URL using the provided location name and API key.
    • The method then sends an asynchronous GET request to the weather API.
    • Upon receiving a successful response, it reads the content (which contains the weather details) and returns it as a string.
    • This plugin is designed to be easily invoked by the Semantic Kernel whenever a user query involves weather information, making it a valuable tool for real-time weather data retrieval.
  1. LocalTimePlugin

The LocalTimePlugin is a simpler plugin compared to the WeatherPlugin. Its sole purpose is to retrieve and return the current local time on the machine where the application is running.

Functionality:

  • The plugin provides the current local time in the format "HH:mm:ss".
  • It does not require any external API calls, making it fast and lightweight.

Code Explanation:

public sealed class LocalTimePlugin
{
[KernelFunction, Description("Retrieves the current time in Local Time.")]
public static String GetCurrentLocalTime()
{
return "The current local time now is :" + DateTime.Now.ToString("HH:mm:ss");
}
}
  • GetCurrentLocalTime Method: This static method is also decorated with [KernelFunction]:
    • It simply fetches the current local time using DateTime.Now and formats it as a string in "HH:mm:ss" format.
    • The method then returns this formatted string, which the AI Assistant can use to respond to user queries about the time.
    • This plugin is straightforward for any queries related to getting the current local time.

Integrating Plugins into Semantic Kernel

Both plugins are integrated into the Semantic Kernel by being registered as KernelPlugin instances. This allows the AI Assistant to automatically invoke these functions when responding to user queries related to weather or local time.

KernelPlugin localTimePlugin = KernelPluginFactory.CreateFromType<LocalTimePlugin>();
agent.Kernel.Plugins.Add(localTimePlugin);

KernelPlugin weatherPlugin = KernelPluginFactory.CreateFromObject(new WeatherPlugin(weatherApiKey!));
agent.Kernel.Plugins.Add(weatherPlugin);
* **`localTimePlugin`**: This plugin is created using `KernelPluginFactory.CreateFromType<LocalTimePlugin>()`, which registers the `LocalTimePlugin` with the Semantic Kernel. * **`weatherPlugin`**: This plugin is created by passing a new instance of `WeatherPlugin` (with the API key) to the factory, enabling it to fetch weather data dynamically.

Step 4: Implement the Chat Loop

  1. Initialize the Chat Interface:

    • Create an instance of AgentGroupChat to manage the conversation between the user and the agent:
AgentGroupChat chat = new(); 
  1. Create a Function to Handle User Input:

    • Implement a local function that invokes the agent and handles the conversation flow:

      async Task InvokeAgentAsync(string question) 
      {
      chat.AddChatMessage(new ChatMessageContent(AuthorRole.User, question));
      Console.ForegroundColor = ConsoleColor.Green;
      await foreach (ChatMessageContent content in chat.InvokeAsync(agent))
      {
      Console.WriteLine(content.Content);
      }
      }
  2. Run the Chat Loop:

    • In the main loop, continuously read user input and process it using the InvokeAgentAsync function:
      Console.WriteLine("Assistant: Hello, I am your Assistant. How may I help you?");
      while (true)
      {
      Console.ForegroundColor = ConsoleColor.White;
      Console.Write("User: ");
      await InvokeAgentAsync(Console.ReadLine()!);
      }

Step 5: Run Your Application

  • Build and Run the Application:
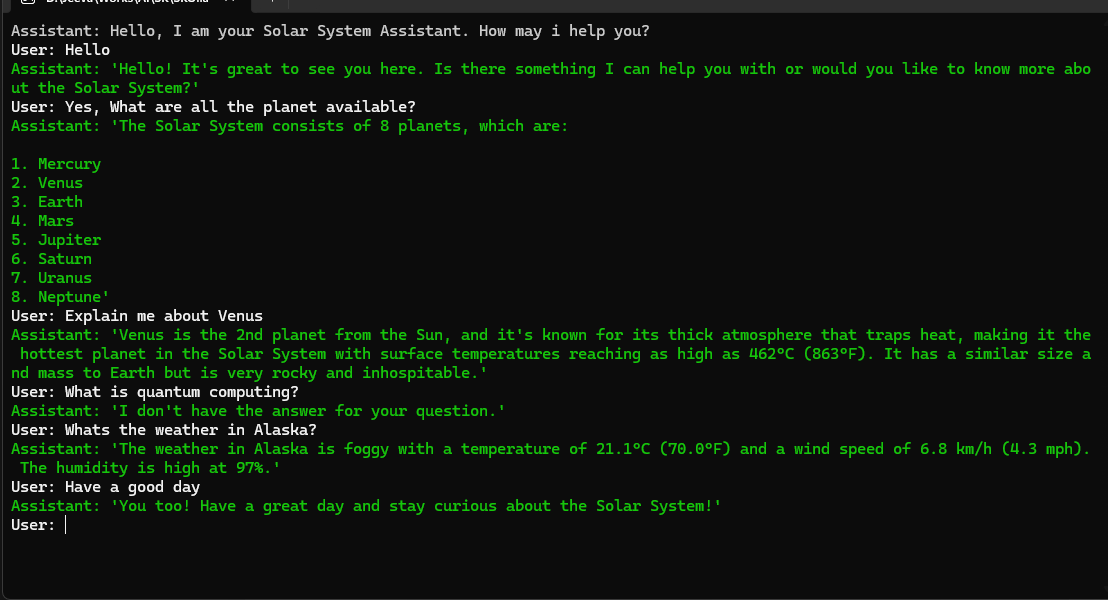
    • Compile the application and run it. You should see the AI Assistant prompt, and you can interact with it by asking questions related to time or weather. *

Conclusion

With the steps above, we have successfully implemented a C# Application that uses the Semantic Kernel library with a local instance of the Llama 3.1 model using Ollama that leverages function calling to handle specific tasks like retrieving the local time or weather information, showcasing the flexibility and power of combining local LLMs with function calling using C# Semantic Kernel. The entire source code is available here in the following github url.
https://github.com/vavjeeva/SKAgentLocalFunctionCalling?tab=readme-ov-file

Introduction

In this article, we will see how to create simple screen sharing app using signalR streaming. SignalR supports both server to client and client to server streaming. In my previous article , I have done server to client streaming with ChannelReader and ChannelWriter for streaming support. This may look very complex to implement asynchronous streaming just like writing the asynchronous method without async and await keyword. IAsyncEnumerable is the latest addition to .Net Core 3.0 and C# 8 feature for asynchronous streaming. It is now super easy to implement asynchronous streaming with few lines of clean code. In this example, we will use client to server streaming to stream the desktop content to all the connected remote client viewers using signalR stream with the support of IAsyncEnumerable API.

Disclaimer

The sample code for this article is just an experimental project for testing signalR streaming with IAsyncEnumerable. In Real world scenarios, You may consider using peer to peer connection using WebRTC or other socket libraries for building effective screen sharing tool.

Read more »

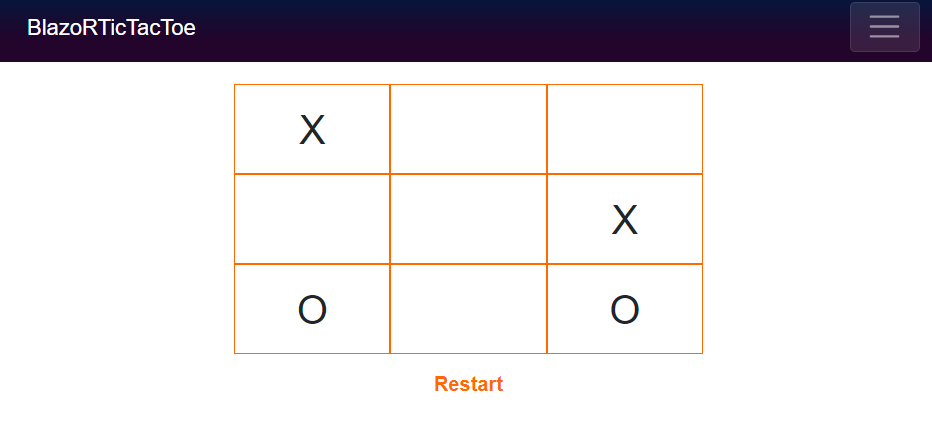
In this article, we will see how to create a bot vs. multiplayer tic-tac-toe game in blazor. Blazor is an open source .NET web front-end framework that allows us to create client-side applications using C# and HTML. This is a simple asp.net core hosted server-side blazor front-end application with Game UI razor component and signalR game hub to connect players with the bot to play the game. The Game Bot is created with .Net Core Background Service with core game engine to identify the best move against a player using minimax recursive algorithm. The entire source code is uploaded in my github repository.

Read more »

img

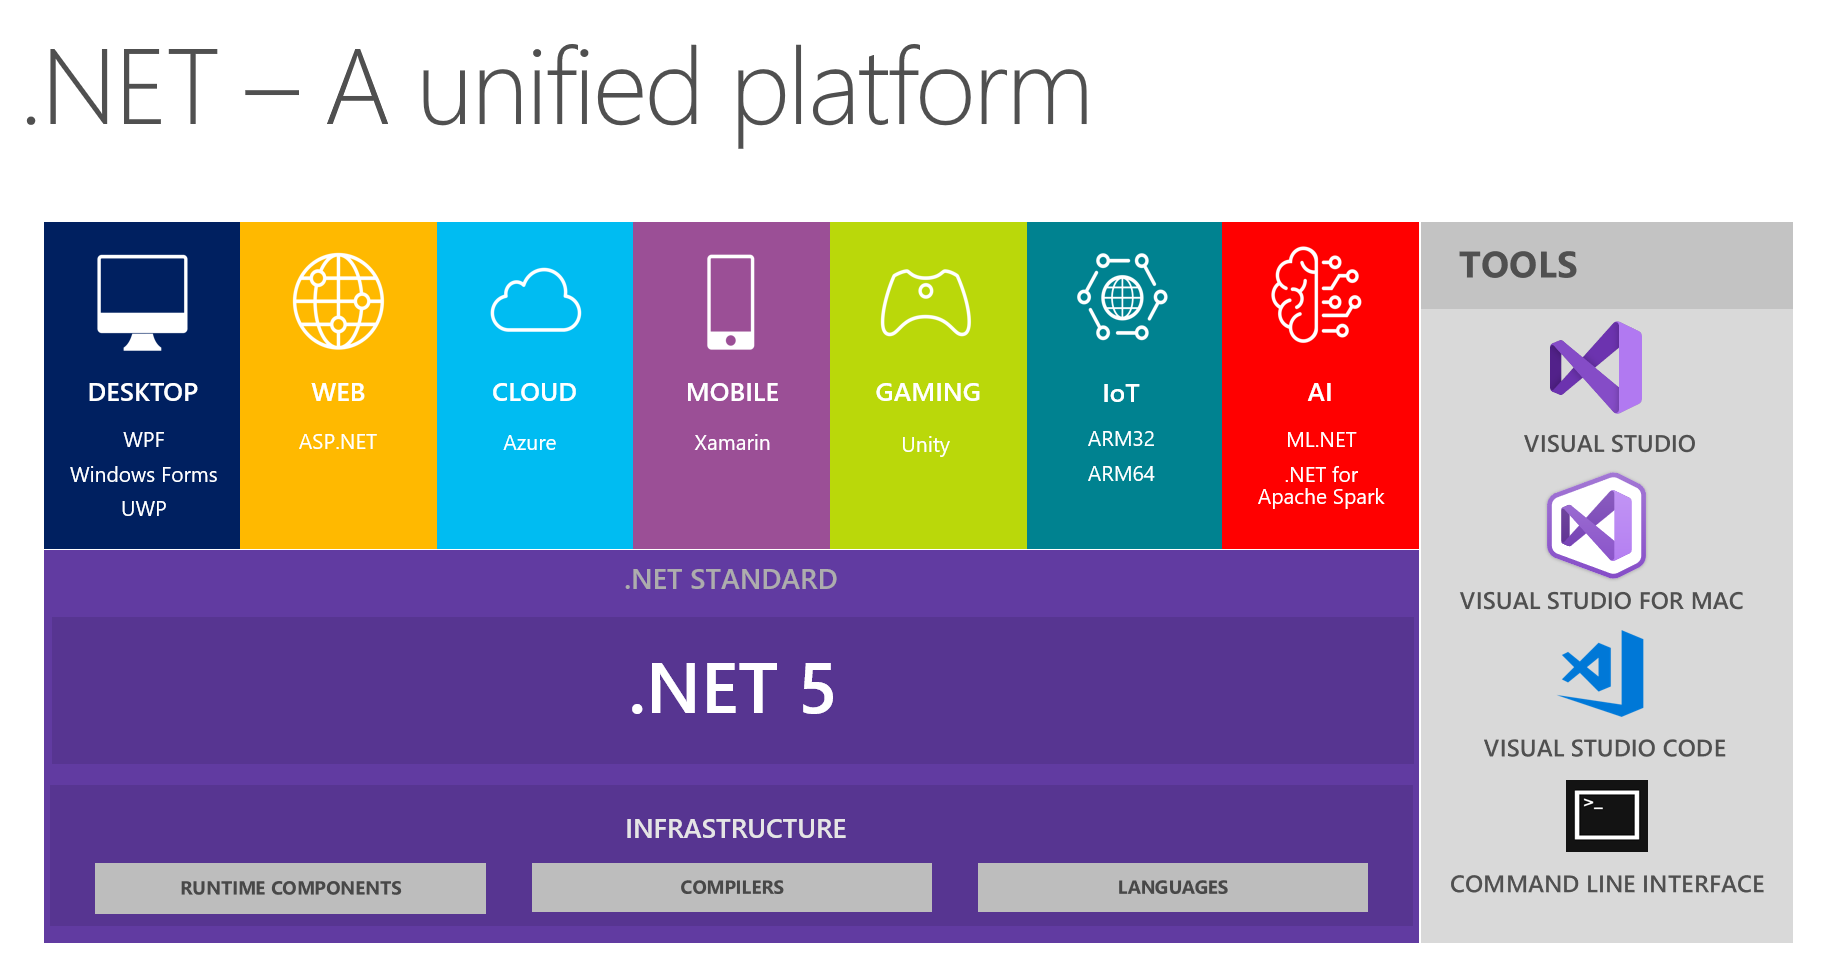
Microsoft announced the new .NET 5 (future of .NET) in Build 2019 conference. .NET 5 will be the single unified platform for building applications that runs on all platforms(Windows, Linux) and devices (IoT, Mobile).

If you are .NET developer currently supporting enterprise applications developed in .NET framework, you need to know how the .NET 5 is going to affect your current enterprise application in the long run. .Net 5 is based on .Net Standard which means not every .Net framework features will be available in .Net 5. Also, there are some technology stacks like web forms, WCF and WWF is not porting into .Net 5. We will look into the details of what is not covered in .Net 5 and what are the alternatives.

Read more »

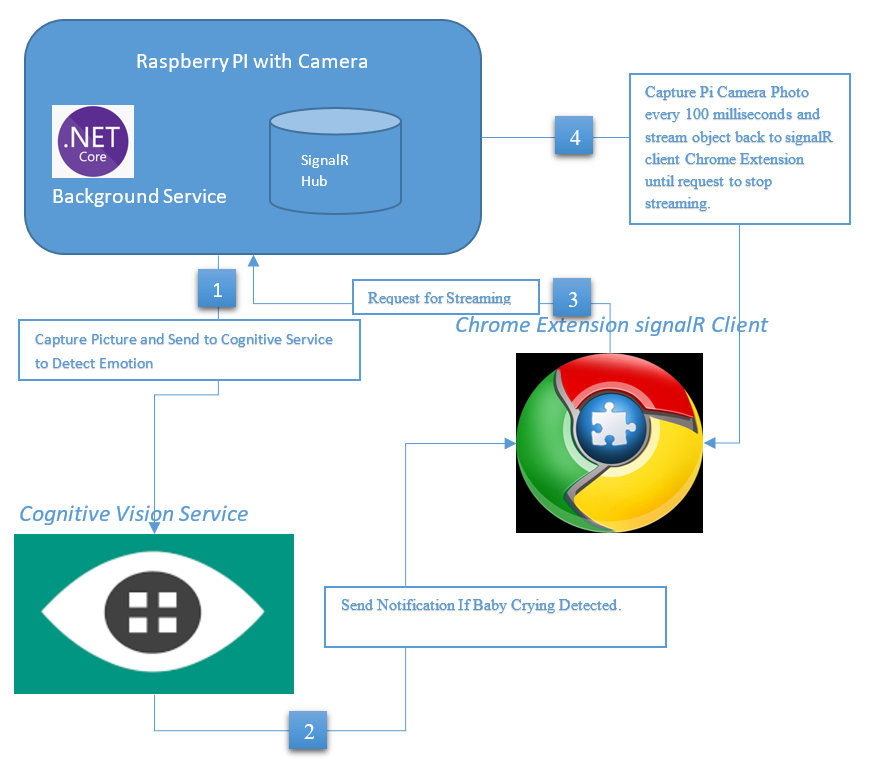
SignalR Streaming is a latest addition to SignalR library and it supports sending fragments of data to clients as soon as it becomes available instead of waiting for all the data to become available. In this article, we will build a small app for baby monitoring to stream camera content from Raspberry PI using SignalR streaming. This tool also sends the notification to connected clients whenever it detects baby cry using Cognitive Vision Service.

Overview

This tool consists of following modules.

  • SignalR Streaming Hub which will holds the methods for streaming data and notification service.

  • .Net core based worker service that runs in the background thread to detect baby cry by capturing a photo in frequent interval and pass it to cognitive vision service.

  • Azure based cognitive Vision Service will take the image input and detect if any human face exists and then analyze the face attributes and sends the response back with face attributes values such smile, sadness, anger etc..

  • SignalR Client is a Javascript based chrome extension runs in chrome browser background. When SignalR Hub sends the notification messages, this will show the popup notification to the user. User will also have the option to view the live streaming from client Popup Window.

Read more »

Recently, I moved my blog from blogger to hexo blog framework hosted in Netlify. The main reason i moved my blog to hexo because its simple yet powerful blog framework for static html generator with markdown support for articles and so many themes and plugins available for blogging platform. When my blog was hosted in blogger, I faced lot of difficulties in formatting the content and code blocks for almost all the articles. I spend more time in formatting the article instead of focusing on content of the article. I wanted to move to some blog framework that must support markdown and ability to host the content free of charge with continuous deployment enabled. There are various popular static html generator framework available in the market such as hugo, jeykill and hexo. After my initial research, i decided to go with hexo framework and use Netlify for hosting my blog since its free and supports continuous deployment.

Read more »

This will be one of my series of multiple blog posts to explore some of the hidden gems of C# features. Hidden gems are surprisingly useful feature but not being used much by common developers.

From version 7.0, C# introduced the new feature called discards to create dummy variable defined by underscore character _. Discards are equal to unassigned variables. The purpose of this feature is to use this variable when you want to intentionally skip the value by not creating variable explicitly.

Read more »


Microservice Architecture and Containerization using docker are the latest buzzword in the software industry. But, Many people including me in the software industry developing big monolithic enterprise applications using .Net Framework for many years have very limited scope of applying these concepts into existing applications. Because, its not easy to break enterprise monolithic application into micro service architecture without redesigning the application. Also, .Net Core framework would be the de facto choice for micro service architecture because it supports cross platform so it can be hosted in linux container or windows container. As of today, Windows Docker container do not support GUI application such as winforms, wpf etc.. However, we can still consider modernizing .Net Framework monolithic application by packaging into docker image for automated end to end testing or security testing.

Read more »
0%