Real time Language Translation chat using SignalR and Azure Cognitive Services and TypedHttpClient - .Net Core 2.1
In this article, I will discuss about how to do real-time translation chat using any language of choice in two way communication using SignalR and Cognitive Services Translate API and one of the new feature .Net Core 2.1 HttpClientFactory – TypedHttpClient to make API calls.
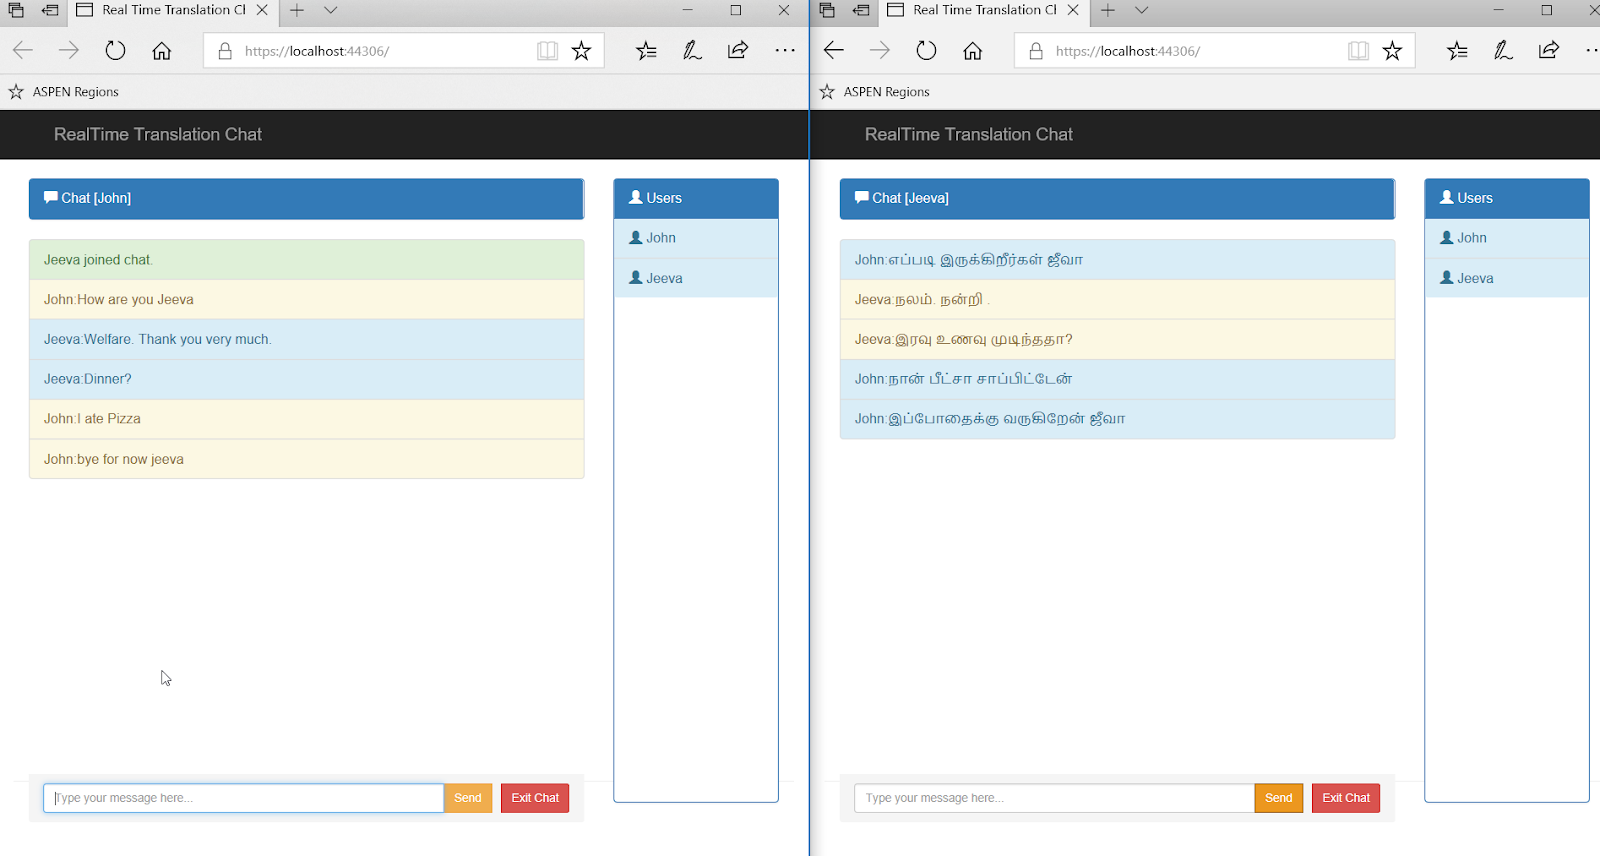
This is a simple chat application for user to login with name and choice of language to send and receive the message. When the user sends the message, signalR hub receives the message and send the API request to Azure Cognitive Translate API Library and receives the translated text and send it back to user in real time. SignalR Hub creates the group of users based on language so that when the translated text comes back from API, it broadcast back to the group based on the language.
 ](
](Video Demo
Architecture & How it Works?

Realtime Chat application is developed in .Net Core Web App using Razor Pages with Bootstrap layout and .Net Core SignalR Library .
When the user login with the name and choice of language they selected, system is establishing the connection with SignalRHub and put the user into the selected language group. It also notifies all the other users that new user is joined.
When the user sends the message, SignalRHub makes the Web API call with Cognitive Services API to get the translated message and sending the translated message to other members in their selected languages real-time.
When the user exits the chat, it removes from the group and also notifies the other users.
Steps- Create a New Razor Web App with Login and Chat Pages and Adding SignalR Libraries
- Create a SignalR Hub and Register with Web App
- Create and Consume Cognitive Services in Azure (Free Tier)
Prerequisites
- Visual Studio 2017 v 15.7.3 or above
- .Net Core SDK 2.1
Creating a New Razor Web App & Adding SignalR Libraries
- Launch the Visual Studio and use the File > New Project menu option and choose ASP.NET Core Web Application. Name the project RealTimeTranslationChat.
- Select the Web Application and make sure Asp.Net Core 2.1 is selected.
-
By default, the Microsoft.AspNetCore.SignalR package containing its server libraries as part of its ASP.NET Core Web Application template. However, the JavaScript client library for SignalR must be installed using npm. Use the following commands from Node Package Manager Console to install it and copy the signalr.js file from node_modules@aspnet\signalr\dist\browser to wwwroot\lib\signalr\signalr.js. (Create a SignalR Folder under Lib Directory)
npm init -y |
Create the SignalRHub and Register with Web App
- Create a New folder called Models and add a User model class.This model class holds the Name and the Language preference selected by user and the SignalR Connection ID.
public class User
    {
        public string Name { get; set; }
        public string LanguagePreference { get; set; }
        public string ConnectionId { get; set; }
} - Create a New Folder called Hubs and add a new class called ChatHub.csThis is the main signalr hub that will communicate with all the clients and also make the API calls to Translation Library to translate the text. The constructor based dependency injection loads the TypedHttpClient object that are configured in Startup.cs to make the http API calls.
public class ChatHub : Hub
    {
        private CognitiveServiceClient _client;
        public ChatHub(CognitiveServiceClient client)
        {
            _client = client;
        }

        static List<user> ConnectedUsers = new List<user>();

        public User CurrentUser
        {
            get
            {
                return ConnectedUsers.FirstOrDefault(i => i.ConnectionId == Context.ConnectionId);
            }
        }

        public string LanguageFormatted
        {
            get
            {
                string result = "";
                var items = ConnectedUsers.Select(i => i.LanguagePreference).Distinct();
                foreach (var language in items)
                {
                    result += $"to={language}&";
                }

                if (result.Length > 1)
                    result = result.Substring(0, result.Length - 1);
                return result;
            }
        }

        public async Task SendMessage(string user, string message)
        {
            var results = _client.Translate(message, LanguageFormatted);
            var translationResult = results.Result.FirstOrDefault();
            if (translationResult != null)
            {
                foreach (var translation in translationResult.translations)
                {
                    await Clients.GroupExcept(translation.to, Context.ConnectionId).SendAsync("ReceiveMessage", user, translation.text);
                    //await Clients.AllExcept(Context.ConnectionId).SendAsync("ReceiveMessage", user, message);
                }
            }
        }

        public async Task Connect(string name, string language)
        {
            var id = Context.ConnectionId;
            if (ConnectedUsers.Count(x => x.ConnectionId == id) == 0)
            {
                ConnectedUsers.Add(new User() { Name = name, ConnectionId = id, LanguagePreference = language });

                await Groups.AddToGroupAsync(id, language);
                await Clients.Caller.SendAsync("onConnected", ConnectedUsers, name, id);
                await Clients.AllExcept(id).SendAsync("onNewUserConnected", name);
            }

        }

        public async Task Disconnect()
        {
            var item = ConnectedUsers.FirstOrDefault(x => x.ConnectionId == Context.ConnectionId);
            if (item != null)
            {
                ConnectedUsers.Remove(item);
                await Clients.AllExcept(item.ConnectionId).SendAsync("onDisconnected", item.Name);
            }
        }

    }
Connect Method will be called when ever the new user is connected and its adds the users into the static list (Preferably to store in concurrent dictionary to avoid multi thread locking issues) and also add to the signalr group based the launguage the user is selected. It also sends the message back to caller with the list of users so that it will be populating user panel on the UI side. It also sends the notification to all the other users that new user is joined the chat.Disconnect Method gets called when the user exits the chats. It removes the user from the list and also notifies all the other users.await Groups.AddToGroupAsync(id, language);
await Clients.Caller.SendAsync("onConnected", ConnectedUsers, name, id);
await Clients.AllExcept(id).SendAsync("onNewUserConnected", name);SendMessage Method will be called whenever user enters the message and it makes the API calls to translation service to get the translated text in each languages and sends the associated translated text to each group.ConnectedUsers.Remove(item);
await Clients.AllExcept(item.ConnectionId).SendAsync("onDisconnected", item.Name);
Create and Consume Cognitive Services in Azure (Free Tier)
- Login to Azure Portal and Search for cognitive service and select Cognitive Services.

- Click Add Button and Search for Translator Text and Select it and click the Create Button.

You can select the Free Tier for Development purpose. It allows upto 2Million characters to translate per month in Free Tier.
After the Cognitive Service is created, you can obtain the Subscription Keys from the Quick Start Menu.


- By default , two keys will be provided. you can copy the key1 value and put it in usersecrets.json for the application to access it.
Now that, we have completed setting up the Translator Service in Azure, we will switch back to code to consume the API Service. We will be using TypedHttpClient to consume the web service. Typed clients are custom classes with HttpClient injected in the constructor. This will be wired up within the DI system by adding generic AddHttpClient method in Startup.cs with the custom type. Another advantage of having typed client is that we can encapsulate the all the HTTP calls inside specific business methods like SendMessage, GetSupportedLanguages.

public class CognitiveServiceClient |
GetSupportedLanguages method will make the API calls to get the list of supported languages.
Translate method takes the message and list of languages to translate and return the json output translation text array all the requested languages.
Additional Points
- In Startup.cs, make sure to add the below code in ConfigureServices method.
services.AddSignalR();
services.AddHttpClient<cognitiveserviceclient>(); - In the Configure method, add the following,In the IndexModel.cs , we will have the implementation for GET method to return the list of supported languages.
app.UseSignalR(routes =>
            {
                routes.MapHub<chathub>("/chathub");
});private CognitiveServiceClient _client;
public IndexModel(CognitiveServiceClient Client)
{
_client = Client;
}
[]
public User user { get; set; }
public SelectList LanguageSL { get; set; }
public async Task OnGetAsync()
{
await GetLanguages();
}
private async Task GetLanguages()
{
LanguageSL = new SelectList(await _client.GetSupportedLanguages(),nameof(Language.Code),nameof(Language.Name));
}
Conclusion
Finally, this can be tested by running the application in multiple window with different username and languages are selected so that both window can send and receives the message in their selected language in realtime. The same application can be hosted in Azure as a web app with our local signalR hub or use the Azure SignalR service.
In future, it is very much possible to see this realtime translation feature in every apps including the most popular messaging apps like whatsapp when the group chat is having people who speak different region languages and enabling automatic translation settings would help a lot.
I have posted entire source code in my github library.
Happy Coding!!!