In this article, we will see how to create simple screen sharing app using signalR streaming. SignalR supports both server to client and client to server streaming. In my previous article , I have done server to client streaming with ChannelReader and ChannelWriter for streaming support. This may look very complex to implement asynchronous streaming just like writing the asynchronous method without async and await keyword. IAsyncEnumerable is the latest addition to .Net Core 3.0 and C# 8 feature for asynchronous streaming. It is now super easy to implement asynchronous streaming with few lines of clean code. In this example, we will use client to server streaming to stream the desktop content to all the connected remote client viewers using signalR stream with the support of IAsyncEnumerable API.
Disclaimer
The sample code for this article is just an experimental project for testing signalR streaming with IAsyncEnumerable. In Real world scenarios, You may consider using peer to peer connection using WebRTC or other socket libraries for building effective screen sharing tool.
Architecture
How it Works
ScreencastR Agent
Steps
ScreencastR agent is a Electron based desktop application. Electron is a framework for creating native applications with web technologies like JavaScript, HTML, and CSS. It allows you to create desktop applications with pure JavaScript by providing a runtime with rich native (operating system) APIs. In our example, I have used desktopCapturer API to capture the desktop content. if you are new to electron, you can follow this official docs to create your first electron application.
A simple electron application will have following files which is similar to nodejs application.
The starting point is the package.json which will have entry point javascript (main.js) and main.js will create a basic electron shell with default menu option and load the main html page. (index.html). In this package.json, i have added the dependency of latest SignalR client.
When we run the npm build, which will bring all the dependencies under node_modules folder including signalR client. Copy the signalr.js file from node_modules\@microsoft\signalr\dist\browserfolder into the root folder.
In the renderer.js javascript, initializeSignalR method would initialize the signalR connection when the application gets loaded and listens to NewViewer and NoViewer hub methods. The NewViewer method gets called whenever the new remote viewer joining to view the stream. The agent will not stream the content until atleast one viewer exists. When NoViewer method called, it will stop the stream.
CaptureScreen method will use the desktopCapturer API to get the list of available screen and window sources and filter to get the “Entire screen“ source only. After the source is identified, screen thumbnail data can be generated from source based on the thumbnail size is defined. CaptureScreen method is based on the promise API and will returns the image data in string as part of the resolve method. We will call the CaptureScreen method in timer (setInterval method) based on the frame per second defined and the output will be streamed via signalR subject class.
ScreenCastR Remote Viewer
ScreenCastR Remote Viewer is a server side blazor app with signalR hub hosted in it. This app also has the interface for signalR client to receive the stream data from hub. Whenever the New Agent joined, it will show the details of agent in the dashboard page with the name of agent and View and Stop Cast button. When the user clicks on the View Cast button, it will start receiving the streaming from hub and render the output on the screen. In the above video, the left side is the agent streaming data to signalR hub and the right side is the viewer rendering the streaming data from the signalR hub.
ScreenCastHub class is the streaming hub with all methods to communicate between agent and remote viewer.
StreamCastData is the main streaming method which will take IAsyncEnumerable Items and stream the chunk of data that it receives to all the connected remote viewers.
AddScreenCastAgent method will send the notification to all the connected remote viewer whenever the new agent join the hub.
RemoveScreenCastAgent method will send the notification to all the connected remote viewer whenever the agent disconnects from the hub.
AddScreenCastViewer method will send the notification to agent if the new viewer joined to view the screen cast.
RemoveScreenCastViewer method will send the notification to agent if the all the viewer disconnected from viewing the screen cast.
ScreenCastManager
publicclassScreenCastManager { private List<Viewer> viewers = new List<Viewer>();
This class will holds number of viewers connected per agent. This class is injected to hub via dependency injection in singleton scope.
services.AddSingleton<ScreenCastManager>();
Startup.cs
In startup.cs, increase the default message size from 32KB to bigger range based on the quality of stream output. Otherwise hub will fail to transmit the data.
In this component, as part of OnInitializedAsync method, initialize the signalR client connection with hub and subscribe to streaming method. When the stream data is arrived from hub, it update the image source DOM element and render the screen with the changes.
Demo
Summary
IAsyncEnumerable is a very nice feature added to .Net Core 3.0 and C# 8 for asynchronous streaming with cleaner and readable code. With this new feature and SignalR streaming, we can do many cool projects like Real Time App health monitor dashboard, Real Time multiplayer games etc… I have uploaded the entire source code for this article in the github repository.
Happy Coding!!!
]]>
<h2 id="Introduction"><a href="#Introduction" class="headerlink" title="Introduction"></a>Introduction</h2><p>In this article, we will see how to create simple screen sharing app using signalR streaming. SignalR supports both server to client and client to server streaming. In my <a href="https://jeevasubburaj.com/2019/03/30/real-time-baby-monitor-chrome-extension-streaming-from-raspberry-pi-using-signalr-and-cognitive-vision-service/">previous article</a> , I have done server to client streaming with <strong>ChannelReader</strong> and <strong>ChannelWriter</strong> for streaming support. This may look very complex to implement asynchronous streaming just like writing the asynchronous method without <strong>async</strong> and <strong>await</strong> keyword. <strong>IAsyncEnumerable</strong> is the latest addition to .Net Core 3.0 and C# 8 feature for asynchronous streaming. It is now super easy to implement asynchronous streaming with few lines of clean code. In this example, we will use client to server streaming to stream the desktop content to all the connected remote client viewers using signalR stream with the support of <strong>IAsyncEnumerable</strong> API.</p>
<blockquote>
<h5 id="Disclaimer"><a href="#Disclaimer" class="headerlink" title="Disclaimer"></a><em>Disclaimer</em></h5><p><em>The sample code for this article is just an experimental project for testing signalR streaming with IAsyncEnumerable. In Real world scenarios, You may consider using peer to peer connection using WebRTC or other socket libraries for building effective screen sharing tool.</em></p>
</blockquote>
Realtime Blazor Tic-Tac-Toe game - Bot vs Multiplayer using signalRhttps://jeevasubburaj.com/2019/07/15/realtime-tic-tac-toe-blazor-game-with-bot-vs-multiplayer-using-signalR/2019-07-15T13:51:14.000Z2019-08-26T19:14:28.366Z
In this article, we will see how to create a bot vs. multiplayer tic-tac-toe game in blazor. Blazor is an open source .NET web front-end framework that allows us to create client-side applications using C# and HTML. This is a simple asp.net core hosted server-side blazor front-end application with Game UI razor component and signalR game hub to connect players with the bot to play the game. The Game Bot is created with .Net Core Background Service with core game engine to identify the best move against a player using minimax recursive algorithm. The entire source code is uploaded in my github repository.
Architecture
Tic-Tac-Toe Blazor App - This is a server-side Blazor App with Tic-Tac-Toe UI razor component. The razor component will have the game board design and its logic.
SignalR Game Hub - This hub holds the signalR methods to send messages between player and bot.
Tic-Tac-Toe Bot Client - Bot client is based on .Net Core background service and contains the core game engine using the minimax algorithm. Whenever the player sends the move details to signalR hub, it will send it to bot with the current board state and bot will get the next best spot available using core game engine and send it back to hub with the bot move. The hub will send back to the caller, and the player UI will get updated the move details in real time.
How It Works - Demo
Steps
TicTacToe Blazor App
As a first step, Launch the Latest Visual Studio 2019 and create a new blazor project by selecting Asp.net Core web application and select the Blazor Server App.
I used the Blazor Server Side app for this example, but you can use client-side Blazor as well. Right now, client-side blazor app doesn’t have any official blazor signalR client due to the dependency of web socket support in the runtime. However, there are community version of the blazor signalR client is available.
In the solution explorer, add a new Razor component called TicTacToe.razor file and put the Tic-Tac-Toe board design and logic in the component. It also initializes the signalR hub client.
In this component, we have three layouts. The main layout will render the tic-tac-toe board. The other two layouts will show the result of the winner or draw panel. The main layout is using the bootstrap container to design the board, and each cell is associated with onclick event method to notify the hub with the selected cell value.
privatevoidRestartGame() { playerWon = null; isDraw = false; for (var i = 0; i < 9; i++) { board[i] = i.ToString(); } StateHasChanged(); }
}
In OnInitAsync Method, We initialize the board with the default index values. By default, the player will use X symbol and the bot will use O symbol to play.
We will also initialize signalR hub in OnInitAsync method. On click of the Cell, OnSelect method gets executed, and board item array will now have the data with the player move and send the entire board array as a parameter to hub method OnUserMoveReceived. It also listens to NotifyUser Hub method which is invoked by a bot with its move.
This hub class will hold the following signalR methods.
OnBotConnected - This method gets executed when the bot connected to signalR hub. It also adds the bot client into BOT group. This group is used to communicate with BOT only to send the message with the latest move from the player.
OnBotDisconnected - This method gets executed when the bot disconnected from signalR hub. It also removes the bot from BOT group.
OnBotMoveReceived - This method is used to notify the player (caller) after bot finish with the move and ready for the player to respond.
OnUserMoveReceived - This method is used to notify the bot after the player finish with the move and ready for a bot to respond.
async Task NotifyBot(string[] board, string connectionID) { GameEngine engine = new GameEngine(); _logger.LogInformation($"Move received from {connectionID}"); Move move = engine.GetBestSpot(board, engine.botPlayer); board[int.Parse(move.index)] = engine.botPlayer; _logger.LogInformation($"Bot Move with the index of {move.index} send to {connectionID}"); await connection.InvokeAsync("OnBotMoveReceived", board, connectionID); }
protectedoverrideasync Task ExecuteAsync(CancellationToken stoppingToken) { connection = new HubConnectionBuilder() .WithUrl("https://localhost:5001/gamehub") .Build(); connection.On<string[], string>("NotifyBot", NotifyBot); await connection.StartAsync(); // Start the connection.
//Add to BOT Group When Bot Connected await connection.InvokeAsync("OnBotConnected"); _logger.LogInformation("Bot connected");
The game bot is developed using .Net Core background service; when it started, it will connect to signalR hub. When it joins, it invokes OnBotConnected method to add it into the BOT signalR group. When it receives the message from hub with the board array data, it calculates the next best move by calling GetBestSpot method from the game engine and sends it back to the caller with its move.
When the background service is stopped, it disposes the signalR connection and remove it from BOT group.
Core Game Engine
publicclassGameEngine { publicreadonlystring botPlayer = "O"; publicreadonlystring humanPlayer = "X"; public Move GetBestSpot(string[] board, string player) { Move bestMove = null; var availableSpots = GetAvailableSpots(board); foreach (var spot in availableSpots) { string[] newboard = (string[])board.Clone(); var newMove = new Move(); newMove.index = spot; newboard[int.Parse(spot)] = player;
if (!IsWon(newboard, player) && GetAvailableSpots(newboard).Length > 0) { if (player == botPlayer) { var result = GetBestSpot(newboard, humanPlayer); newMove.index = result.index; newMove.score = result.score; } else { var result = GetBestSpot(newboard, botPlayer); newMove.index = result.index; newMove.score = result.score; } } else { if (IsWon(newboard, botPlayer)) newMove.score = 1; elseif (IsWon(newboard, humanPlayer)) newMove.score = -1; else newMove.score = 0; }
I used minimax algorithm in the game engine to find the best available spot. Minimax algorithm is a recursive algorithm which will play all possible movement by itself and as opponent until it reaches the terminal state (win or draw) and then decides the best move from those all possible iteration. You can refer this article to understand more details about minimax algorithm.
Conclusion
Blazor is super useful for .NET developers who are not interested in learning javascript for front-end development. This article shows how easy to develop real time blazor application with signalR. I have used minimax algorithm to identify the best spot available. It will be more interesting to use reinforcement machine learning algorithm for AI to learn and identify based on rewards instead of recursive minimax algorithm. This will be a good use case to try when ML.NET introduce reinforcement learning library.
The entire source code is uploaded in my github repository. Happy Coding.
]]>
<p><img src="/images/realtime-tic-tac-toe-blazor-game-with-bot-vs-multiplayer-using-signalR/BlazoRTicTacToe_Game.png" alt></p>
<p>In this article, we will see how to create a bot vs. multiplayer tic-tac-toe game in blazor. Blazor is an open source .NET web front-end framework that allows us to create client-side applications using C# and HTML. This is a simple asp.net core hosted server-side blazor front-end application with Game UI razor component and signalR game hub to connect players with the bot to play the game. The Game Bot is created with .Net Core Background Service with core game engine to identify the best move against a player using minimax recursive algorithm. The entire source code is uploaded in my <a href="https://github.com/vavjeeva/BlazoRTicTacToe" target="_blank" rel="noopener">github</a> repository.</p>
.NET 5 is the Future of .Net - What every .Net developers must knowhttps://jeevasubburaj.com/2019/05/09/future_of_dotnet_5_what_every_dotnet_framework_developers_must_know/2019-05-09T15:06:27.000Z2019-08-26T19:14:28.365Z
Microsoft announced the new .NET 5 (future of .NET) in Build 2019 conference. .NET 5 will be the single unified platform for building applications that runs on all platforms(Windows, Linux) and devices (IoT, Mobile).
If you are .NET developer currently supporting enterprise applications developed in .NET framework, you need to know how the .NET 5 is going to affect your current enterprise application in the long run. .Net 5 is based on .Net Standard which means not every .Net framework features will be available in .Net 5. Also, there are some technology stacks like web forms, WCF and WWF is not porting into .Net 5. We will look into the details of what is not covered in .Net 5 and what are the alternatives.
Technology stacks not coming to .NET 5
Asp.net Web Forms
Asp.net Web Forms will not be coming to .NET 5 and Microsoft is currently recommending to move to Blazor which is an experimental project got promoted to official recently. The other alternatives choices are Angular, React and Vue SPA framework if you are good at JavaScript.
If you are currently using Asp.net MVC as full stack web app, you can continue to use the same stack by using Asp.net Core MVC or the new Razor Pages introduced in .net core 2.0 which may look similar to asp.net web forms to build web form application without views and controllers quickly. However, if you are developing modern web applications for enterprise, its better to consider single page application such as blazor, angular or react instead of a traditional web app for providing rich client-side functionality.
WCF (Windows Communication Foundation)
The announcement of WCF going to miss the .NET 5 train surprised many including me. There has been a lot of discussion in GitHub to bring back WCF into the .NET core, but Microsoft decided not to bring it because their initial estimation porting WCF into.NET core would take three years. (source : DotNetRocks Podcast)
Microsoft is recommending to use gRPC as an alternative which is a modern open-source high-performance RPC framework that can run in any environment. However, unlike WCF, gRPC cannot be hosted in IIS as of today because of HTTP/2 implementation of Http.Sys does not support HTTP response trailing headers which gRPC relies on.
WWF (Windows Workflow Foundation)
Workflow Foundation is not getting ported into .Net Core. Every enterprise application will have some workflow or BPM tools integrated with it. If you used WWF in your application, Microsoft is recommending to look at the unofficial fork of WF runtime for porting into .Net Core.
Technology stacks that are coming to .NET 5
Winforms, WPF & UWP
Microsoft is bringing Windows Desktop Packs (winforms , WPF and UWP) to support desktop applications which only works on windows. I wouldn’t expect anyone to use winforms for any new development however this will help to port legacy winforms applications into .NET 5. This doesn’t mean that .Net core architecture is changing. It will still be cross platform framework but when you are adding desktop packs, it target to work only on windows. However, porting existing windows desktop application into .Net core will give the additional benefit of Core Runtime and API performance improvements and deployment flexibility.
What’s Replaced
EF Core - Entity Framework Core is replacing EF 6 in .Net Core Framework.
Asp.net Core - Asp.net is replaced by Asp.net Core. Check the migration guide for porting asp.net application in to asp.net core
ASP.NET Core MVC - ASP.NET Core MVC unified ASP.NET MVC and Web API. Check the migration guide for porting asp.net mvc app into asp.net core mvc.
MSIX - Microsoft new packaging tool which replaces the old MSI package installer for desktop applications.
JsonDocument - New Json Document library from System.Text.Json.JsonDocument API to replace json.net. It is 2-3x times faster than old json.net.
Few other important things to highlight
The latest version of C# 8.0 introduced a lot of new language features including Async Stream, Ranges, Nullable Reference Types, and Pattern Matching, etc.. However, they are going to be available only on .Net Core 3.0 and above which means it is not coming to Legacy .Net Framework, or .Net Core 2.2 , 2.1, 1.0. It clearly indicates that “.Net Framework is dead and .Net Core is the future”.
If you are planning to port .Net Framework application into .Net Core, you will have to analyze your APIs used in your project to see what is compatible or not. .Net Portability Analyzer is a tool that helps to analyze and determine how flexible your application is across .NET platforms.
Conclusion
As a .Net Developer, I am happy to see the future of .Net and the direction it goes. I no longer need to learn Javascript for SPA framework because Blazor will do that. I no longer need to learn python for machine learning because ML.NET will do that. I no longer need to learn android/swift because Xamarin will do that. If you know c#, now you can develop an application that can run anywhere from IOT to Cloud. However, this change is going to affect a lot of enterprise customers who have the product/framework based on WCF and Web Forms.
]]>
<p><img src="https://devblogs.microsoft.com/dotnet/wp-content/uploads/sites/10/2019/05/dotnet5_platform.png" alt="img"></p>
<p>Microsoft announced the new <a href="https://devblogs.microsoft.com/dotnet/introducing-net-5/" target="_blank" rel="noopener">.NET 5</a> (future of .NET) in Build 2019 conference. .NET 5 will be the single unified platform for building applications that runs on all platforms(Windows, Linux) and devices (IoT, Mobile). </p>
<p>If you are .NET developer currently supporting enterprise applications developed in .NET framework, you need to know how the .NET 5 is going to affect your current enterprise application in the long run. .Net 5 is based on .Net Standard which means not every .Net framework features will be available in .Net 5. Also, there are some technology stacks like web forms, WCF and WWF is not porting into .Net 5. We will look into the details of what is not covered in .Net 5 and what are the alternatives.</p>
Real Time Baby Monitor Chrome Extension - Streaming from Raspberry PI using SignalR and Cognitive Vision Servicehttps://jeevasubburaj.com/2019/03/30/real-time-baby-monitor-chrome-extension-streaming-from-raspberry-pi-using-signalr-and-cognitive-vision-service/2019-03-30T02:43:02.000Z2019-08-26T19:14:28.365Z
SignalR Streaming is a latest addition to SignalR library and it supports sending fragments of data to clients as soon as it becomes available instead of waiting for all the data to become available. In this article, we will build a small app for baby monitoring to stream camera content from Raspberry PI using SignalR streaming. This tool also sends the notification to connected clients whenever it detects baby cry using Cognitive Vision Service.
Overview
This tool consists of following modules.
SignalR Streaming Hub which will holds the methods for streaming data and notification service.
.Net core based worker service that runs in the background thread to detect baby cry by capturing a photo in frequent interval and pass it to cognitive vision service.
Azure based cognitive Vision Service will take the image input and detect if any human face exists and then analyze the face attributes and sends the response back with face attributes values such smile, sadness, anger etc..
SignalR Client is a Javascript based chrome extension runs in chrome browser background. When SignalR Hub sends the notification messages, this will show the popup notification to the user. User will also have the option to view the live streaming from client Popup Window.
Demo
Prerequisites and Dependencies
Raspberry PI 3 with Camera Module (Any Version with camera module port)
Azure Portal Account - Cognitive Vision Service (Free tier)
PiMonitRHub is streaming hub which holds streaming methods startstream and stopstream. When the SignalR client invokes the startstream method, it calls the camera service to capture the photo and send it to client by writing into channelwriter. Whenever an object is written to the ChannelWriter that object is immediately sent to the client. At the end, the ChannelWriter is completed to tell the client the stream is closed by writer.TryComplete Method.
PiMonitRWorker is a worker service inheriting from background service. It starts the new thread whenever application is started and execute the logic inside the ExecuteAsync method in frequent interval until cancellationtoken is requested.
protectedoverrideasync Task ExecuteAsync(CancellationToken stoppingToken) { while (!stoppingToken.IsCancellationRequested) { if (!PiMonitRHub._isStreamRunning) { var stream = await _piCameraService.CapturePictureAsStream(); if (await _faceClientCognitiveService.IsCryingDetected(stream)) { await _piMonitRHub.Clients.All.SendAsync("ReceiveNotification", "Baby Crying Detected! You want to start streaming?"); } } //Run the background service for every 10 seconds await Task.Delay(10000); } } }
In this worker service, it capture the photo using camera service and sends it to cognitive service API to detect the baby cry. If the baby cry is detected, notification hub method will broadcast the notification message to all connected clients. If the client is already watching the stream, this background service will not detect the baby cry until the user stopped watching the stream to avoid duplicate notification to the users.
Cognitive Vision Service
Microsoft Cognitive Service API is very powerful API to provides the power of AI in few lines of code. There are various Cognitive Service APIs are available. In this app, I will be using the Cognitive Vision API to detect the face emotion to see if the baby is crying or not. This API will analyze the given photo to detect, recognize the human face and analyze the emotion face attributes such smile, sadness etc.. Best of all, this service have free tier which allows 20 calls per minute so we can get started without paying for anything.
After you register the cognitive service in Azure Portal, you will get the API end point and the Keys from the portal.
You can store the Keys and EndPointURL in to UserSecrets / AppSettings / Azure Key Vault so that we can access it from configuration API.
publicasync Task<bool> IsCryingDetected(Stream stream) { IList<FaceAttributeType> faceAttributes = new FaceAttributeType[] { FaceAttributeType.Emotion }; // Call the Face API. try { IList<DetectedFace> faceList = await faceClient.Face.DetectWithStreamAsync(stream, false, false, faceAttributes); if (faceList.Count > 0) { var face = faceList[0]; if (face.FaceAttributes.Emotion.Sadness >= scoreLimit || face.FaceAttributes.Emotion.Anger >= scoreLimit || face.FaceAttributes.Emotion.Fear >= scoreLimit) { _logger.LogInformation($"Crying Detected with the score of {face.FaceAttributes.Emotion.Sadness}"); returntrue; } else { _logger.LogInformation($"Crying Not Detected with the score of {face.FaceAttributes.Emotion.Sadness}"); } } else { _logger.LogInformation("No Face Detected"); } } catch (Exception e) { _logger.LogError(e.Message); }
returnfalse; } }
Install the Microsoft.Azure.CognitiveServices.Vision.Face nuget package to install the FaceClient.
Before, making the API call, set the face attributes parameters to return only emotion attribute to avoid returning all the data.
Face API has got so many face attributes for the identified face. But, for our app, we use the emotion attributes of Sadness, Anger, Fear .
If any one of above mentioned attributes are higher than 0.5 limit, this method will return true.
I came up with 0.5 as a limit for these attributes. However, you can change the value or attributes that works for your use case. I have tested with few crying images and my limit works fine for all those cases.
PiMonitR Camera Service
I am running my Rasperry PI with Raspian OS which is based on Linux ARM architecture. The camera module has built in command line tool called raspistill to take the picture. however, i wanted to use some C# wrapper library to capture picture from PI and found out this wonderful open source project called MMALSharp which is an Unofficial C# API for the Raspberry Pi camera and it supports Mono 4.x and .NET Standard 2.0.
I installed the nuget package of MMALSharp and initiated the singleton object in the constructor so that it can be reused while streaming the continuous shots of pictures. I have also set the resolution to 640 * 480 for the picture because the default resolution is very high and file size is huge as well.
publicclassPiCameraService { public MMALCamera MMALCamera; privatereadonlystring picStoragePath = "/home/pi/images/"; privatereadonlystring picExtension = "jpg"; publicPiCameraService() { MMALCamera = MMALCamera.Instance; //Setting the Average resolution for reducing the file size MMALCameraConfig.StillResolution = new Resolution(640, 480); }
publicasync Task<byte[]> CapturePictureAsByteArray() { var fileName = await CapturePictureAndGetFileName();
Now, that we are done with server side app coding for, our next step is to deploy it into Raspberry PI. In order to publish the app into PI, there are two different ways to publish it.
Framework Dependent - It relies on the presence of a shared system-wide version of .NET Core on the target system.
Self Contained - It doesn’t rely on the presence of shared components on the target system. All components, including both the .NET Core libraries and the .NET Core runtime, are included with the application and are isolated from other .NET Core applications
I used to self containment deploy so that all the dependencies are part of the deployment. The following publish command will generate the final output with all the dependenices.
dotnet publish -r linux-arm
You will find the final output in the linux-arm/publish folder under bin folder. I used Network file sharing to copy files into raspberry PI.
After all the files are copied, i connected my raspberry PI through remote connection and run the app with the following command in the terminal.
PiMonitR Chrome Extension SignalR Client
I decided to go with chrome extension as my signalR client because it supports real time notification and also it doesn’t need any server to host the app. In this client app, i have background script which will initialize signalR connection with hub and runs in background to receive any notification from hub. It also has Popup window which will have start and stop streaming button to invoke the streaming and view the streaming output.
manifest.json
manifest.json will define the background scripts, icons and permissions that are needed for this extension.
// The following sample code uses modern ECMAScript 6 features // that aren't supported in Internet Explorer 11. // To convert the sample for environments that do not support ECMAScript 6, // such as Internet Explorer 11, use a transpiler such as // Babel at http://babeljs.io/. var __awaiter = (this && this.__awaiter) || function (thisArg, _arguments, P, generator) { returnnew (P || (P = Promise))(function (resolve, reject) { functionfulfilled(value) { try { step(generator.next(value)); } catch (e) { reject(e); } } functionrejected(value) { try { step(generator["throw"](value)); } catch (e) { reject(e); } } functionstep(result) { result.done ? resolve(result.value) : new P(function (resolve) { resolve(result.value); }).then(fulfilled, rejected); } step((generator = generator.apply(thisArg, _arguments || [])).next()); }); };
const hubUrl = "http://pi:5000/hubs/piMonitR"
var connection = new signalR.HubConnectionBuilder() .withUrl(hubUrl, { logger: signalR.LogLevel.Information }) .build();
// We need an async function in order to use await, but we want this code to run immediately, // so we use an "immediately-executed async function" (() => __awaiter(this, void0, void0, function* () { try { yield connection.start(); } catch (e) { console.error(e.toString()); } }))();
background.js will initiate the signalR connection with hub with the URL defined. We also need signalr.js in the same folder. In order to get the signalr.js file, we need to install signalr npm package and copy the signalr.js from node_modules\@aspnet\signalr\dist\browser folder.
npm install @aspnet/signalr
This background script will keep our signalR client active and when it receives the notification from hub, it will show as chrome notification like below.
popup html will show the stream content when the start streaming button is clicked. it will complete the stream when the stop streaming button is clicked.
popup.js
var __awaiter = chrome.extension.getBackgroundPage().__awaiter; var connection = chrome.extension.getBackgroundPage().connection;
connection.on("StopStream", () => { var li = document.createElement("li"); li.textContent = "stream closed"; logContent.appendChild(li); streamStopButton.setAttribute("disabled", "disabled"); streamStartButton.removeAttribute("disabled"); }); });
When the user clicks the start streaming button, it will invoke the stream hub method (StartStream) and subscribe to it. Whenever hub sends the data, it receives the content and setting that value directly to Image src attribute.
when the user clicks the stop streaming button, client invoke the StopStream hub method which will set the _isStreamRunning Property to false which will complete the stream.
Conclusion
This is a fun project, i wanted to experiment with signalR streaming and it worked as i expected. Soon, We are going to have lot more new stuffs coming in SignalR (IAsyncEnumerable) which will make even better for many other real time scenarios. I have uploaded the source code in my github repository.
Happy Coding.
i am a huge fan of signalR. Today, David Fowler, the creator of signalR mentioned my tweet in his timeline and i am so happy for that. This made my day. :)
]]>
<p><img src="/images/real-time-baby-monitor-chrome-extension-streaming-from-raspberry-pi-using-signalr-and-cognitive-vision-service/1553923113489.png" alt></p>
<p><strong>SignalR Streaming</strong> is a latest addition to SignalR library and it supports sending fragments of data to clients as soon as it becomes available instead of waiting for all the data to become available. In this article, we will build a small app for baby monitoring to stream camera content from <strong>Raspberry PI</strong> using SignalR streaming. This tool also sends the notification to connected clients whenever it detects baby cry using <strong>Cognitive Vision Service</strong>.</p>
<h3 id="Overview"><a href="#Overview" class="headerlink" title="Overview"></a>Overview</h3><p>This tool consists of following modules.</p>
<ul>
<li><strong>SignalR Streaming Hub</strong> which will holds the methods for streaming data and notification service.</li>
<li>.Net core based <strong>worker service</strong> that runs in the background thread to detect baby cry by capturing a photo in frequent interval and pass it to <strong>cognitive vision service</strong>. </li>
<li><p>Azure based <strong>cognitive Vision Service</strong> will take the image input and detect if any human face exists and then analyze the face attributes and sends the response back with face attributes values such smile, sadness, anger etc..</p>
</li>
<li><p><strong>SignalR Client</strong> is a Javascript based <strong>chrome extension</strong> runs in chrome browser background. When SignalR Hub sends the notification messages, this will show the popup notification to the user. User will also have the option to view the live streaming from client Popup Window.</p>
</li>
</ul>
<p><img src="/images/real-time-baby-monitor-chrome-extension-streaming-from-raspberry-pi-using-signalr-and-cognitive-vision-service/1553933080399.png" alt></p>
How to Create Personal Blog using Hexo and Netlify With Continuous Deploymenthttps://jeevasubburaj.com/2019/03/21/how-to-create-personal-blog-using-hexo-and-netlify-continuous-deployment/2019-03-21T04:00:00.000Z2019-08-26T19:14:28.365ZRecently, I moved my blog from blogger to hexo blog framework hosted in Netlify. The main reason i moved my blog to hexo because its simple yet powerful blog framework for static html generator with markdown support for articles and so many themes and plugins available for blogging platform. When my blog was hosted in blogger, I faced lot of difficulties in formatting the content and code blocks for almost all the articles. I spend more time in formatting the article instead of focusing on content of the article. I wanted to move to some blog framework that must support markdown and ability to host the content free of charge with continuous deployment enabled. There are various popular static html generator framework available in the market such as hugo, jeykill and hexo. After my initial research, i decided to go with hexo framework and use Netlify for hosting my blog since its free and supports continuous deployment.
Steps
Installing and Configuring Hexo Blog Framework
To Setup the hexo blog framework in your machine, you have to first install the latest nodejs and Git on your machine. Run the following command to install the hexo framework.
npm install -g hexo-cli
After the hexo installed on your machine, run the following command to initialize the hexo.
$hexoinit<folder> $cd<folder> $npminstall
After the installation is done, the basic project folder will be created with the following structure.
_config.yml will hold all the configuration related data for your blog. You can modify the blog title, description , keywords etc.. This also holds the details the current theme, additional plugin details installed in your website.
Setup and Configure Hexo Theme - Next
There are plenty of themes available for Hexo and i decided to go with one of most popular theme called Next. I also liked icarus theme but since it has three column layout, i decided to go with Next theme. It has four different theme layout to customize and also light and dark mode for code blocks. To install the theme, just navigate to the site root directory and clone the git repository using the following command.
Once the theme is installed, change the theme name to Next in _config.yml in the site root directory.
You can customize the theme settings by changing the _config.yml inside the themes\next directory. All the customization details are available in https://theme-next.org/docs/theme-settings/.
Install and Configure Additional Plugins
I have installed the hexo sitemap plugin to generate the sitemap.xml file automatically. There are lot other good plugins available in the official site.
Create a New Post and Run Locally
To create a new post or a new page, you can run the following command:
$ hexo new [layout] <title>
post is the default layout, but you can put page if you want to create a new page. You can also change the default layout by editing the default_layout setting in _config.yml.
Once the new post is created, markdown (.md) file will be created under source\_posts folder with the default front matter. you can use any markdown editor to start creating articles. Here are some of the online and offline markdown editor which are most popular among users.
After we create the article, we can generate the static html by running the following command.
hexo generate
This command will generate the static html files and all the necessary supporting files (javascript, css) in the public folder. We can run it locally to verify the page by running the following command.
hexo server
This will run the nodejs server in default 4000 port. You can verify your blog by running http://localhost:4000 in the browser.
Setup Automatic Deployment to Netlify
We have successfully created our website in local, it is time to deploy our website into Netlify hosting. I choose Netlify instead of github pages because it supports CI/CD pipeline to deploy the site automatically whenever i commit the changes into my github repository. Also, Netlify free account features are sufficient for running any personal blog.
Signing up with Netlify is pretty straightforward. You just have to link with your github account to sign up the account.
After you signup with Netlify, create a new repository in github to push the code base into github. Once the repository is created, copy the remote repository URL to setup the remote origin branch from local.
Navigate the local root directory and Initialize as a Git repository.
git init
Add all the files from your local repository and commit it locally
git add .
git commit -m 'Initial commit'
Now, setup the remote origin with the following command.
git remote add origin Git_Repository_URL
Now, you can push your local changes to git repository with the following command.
git push -u origin master
Now. login to Netlify and click create new site by clicking New Site from Git button.
Link your github repository from the next page for continuous deployment.
You have to authorize Netlify to access your github repository. After you authorize it, you have to choose our website repository and the branch. As part of last step in the wizard, netlify automatically identifies hexo blog and put the hexo generate build command and the default publish directory.
Click Deploy site to finish creating automatic deployment setup.
This will start deployment process and publish the blog in netlify with some random subdomain URL. You can change the random name with meaningful subdomain name in Netlify account if needed.
Every time when we push the changes to github repository, it triggers the build automatically to deploy it. Very Cool!!
Set up the custom domain name for the blog
We have now successfully completed setting up the static web site using hexo and netlify, its time to set up our custom domain for our blog. I purchased my domain with google domains and it costs 12$ per year. You can go with any domain service that works well for you.
In my google domain account, i have to create A record with Netlify load balance IP and CNAME record with Netlify alias name. That’s it.
We are done with all the steps and my blog is now ready to serve.
Conclusion
This articles covers the basics of how to create a personal blog site using hexo static html generator framework and deploy it to netlify automatically using continuous deployment. I created this blog entry using typora editor and its so easy to create article with no hassle. Overall, i am happy with the decision of moving my blog from blogger to hexo. What are your thoughts?
]]>
<p>Recently, I moved my blog from <a href="https://www.blogger.com" target="_blank" rel="noopener">blogger</a> to <a href="https://hexo.io/" target="_blank" rel="noopener">hexo blog framework</a> hosted in <a href="https://www.netlify.com" target="_blank" rel="noopener">Netlify</a>. The main reason i moved my blog to hexo because its simple yet powerful blog framework for static html generator with markdown support for articles and so many themes and plugins available for blogging platform. When my blog was hosted in blogger, I faced lot of difficulties in formatting the content and code blocks for almost all the articles. I spend more time in formatting the article instead of focusing on content of the article. I wanted to move to some blog framework that must support <strong>markdown</strong> and ability to host the content free of charge with continuous deployment enabled. There are various popular static html generator framework available in the market such as hugo, jeykill and hexo. After my initial research, i decided to go with hexo framework and use Netlify for hosting my blog since its free and supports continuous deployment.<br>
C# Hidden Gems – Discards Variable ( _ )https://jeevasubburaj.com/2019/01/25/c-hidden-gems-discards-variable/2019-01-25T02:22:00.001Z2019-08-26T19:14:28.364Z
This will be one of my series of multiple blog posts to explore some of the hidden gems of C# features. Hidden gems are surprisingly useful feature but not being used much by common developers.
From version 7.0, C# introduced the new feature called discards to create dummy variable defined by underscore character _. Discards are equal to unassigned variables. The purpose of this feature is to use this variable when you want to intentionally skip the value by not creating variable explicitly.
For example, if you are calling the method and it returns the object but caller is only interested in calling the method but not interested in the return object. In such case, we can use discards variable so that it can reduce in terms of memory allocation and make your code clear as well.
How to use
Every developer would have come across the scenarios like checking the given string is valid datetime object or not by using tryparse method. However, tryparse method expects the out parameter to produce the datetime result in addtion to returing the boolean result so we must declare datetime result variable to use it in out parameter even if we dont use it. This would be ideal situation to use discards variable if we are not going to use the result object.
Without Discards Variable
DateTime result;
if (DateTime.TryParse("02/29/2019", out result))
{
    Console.WriteLine("Date is valid");
}
else
{
    Console.WriteLine("Date is not valid");
}
In the example above, we never used result object. we are just checking the given string is valid datetime or not.
With discards
if (DateTime.TryParse("02/29/2019", out _))
{
    Console.WriteLine("Date is valid");
}
else
{
    Console.WriteLine("Date is not valid");
}
With discards variable, we can completely ignore the result variable.
If we want to ignore the return result and interested in actual result object only, we can do the above example as below.
_ = DateTime.TryParse("02/29/2019", out result);
Additional Points
Discards variable introduced in C# 7. So, it will work only on version 7 and above.
If you have value tuple that expects multiple values and you are interested in one or two values, you can use discards without creating other variables. For example, var (a, _, _) = (1, 2, 3)
In Async programming if we use Task.Run method to call some methods and not interested in return result. For example, _ = Task.Run(() => { }
Conclusion
The discards in C# provides a way to ignore local variables if not used instead of creating it. I think this is a very nice hidden feature of c# that people may not be using it very often. I will keep sharing more of hidden gems in my upcoming blogs. If you have something to share, please do post it in comments section.
]]>
<p><img src="https://2.bp.blogspot.com/-rqQnFUnKWBI/XEot77TvMRI/AAAAAAAHHu8/igGZty5vX5kFIHGTyzLC-O2-ZqqQR8CbACLcBGAs/s640/hidden_gem_discards_featured.png" alt></p>
<p>This will be one of my series of multiple blog posts to explore some of the hidden gems of C# features. Hidden gems are surprisingly useful feature but not being used much by common developers. </p>
<p>From version 7.0, C# introduced the new feature called <a href="https://docs.microsoft.com/en-us/dotnet/csharp/discards" target="_blank" rel="noopener">discards</a> to create dummy variable defined by underscore character _. Discards are equal to unassigned variables. The purpose of this feature is to use this variable when you want to intentionally skip the value by not creating variable explicitly. </p>
Containerizing N-Tier MVC .Net Framework Application with Dockerhttps://jeevasubburaj.com/2018/12/06/containerizing-n-tier-mvc-net-framework/2018-12-06T00:29:00.002Z2019-08-26T19:14:28.365Z Microservice Architecture and Containerization using docker are the latest buzzword in the software industry. But, Many people including me in the software industry developing big monolithic enterprise applications using .Net Framework for many years have very limited scope of applying these concepts into existing applications. Because, its not easy to break enterprise monolithic application into micro service architecture without redesigning the application. Also, .Net Core framework would be the de facto choice for micro service architecture because it supports cross platform so it can be hosted in linux container or windows container. As of today, Windows Docker container do not support GUI application such as winforms, wpf etc.. However, we can still consider modernizing .Net Framework monolithic application by packaging into docker image for automated end to end testing or security testing.
In this article, i will explain how to containerize a simple N-Tier CRUD MVC application using docker. We will create a separate app server and database server container images and deploy and run the simple N-Tier MVC application. If you are new to docker, i would recommend first to read Sahil Malik article about docker for developers and watch the awesome pluralsight course of Modernizing .NET Apps with Docker by Elton Stoneman.
How it works
I took the N-Tier Application on ASP.NET MVC - A Complete Solution from MSDN Code web site that runs on full .Net Framework. This sample application does the basic CRUD operation for maintaining Employees data using Model-View-Controller Patter with Repository Pattern and N-Tiers Deployment Architecture Pattern. We will modernize this application by containerizing into docker image. This application will have separate database and application server instances. The database server will be based Docker version of SQL Server Developer Edition and application server is based on microsoft/aspnet:latest docker image. Every time, when new container instance is created, new database will be created and all the data that were created in prior container instance will be destroyed when container instance is stopped which perfectly works for automated testing scenarios.
Steps
Now, i am going to explain about docker-compose file to orchestrate how to build and deploy .Net Framework application into docker container. Visual Studio provides the default container orchestration support for .Net Web Projects. You can add it by right click on the web project and select Container Orchestration Support as below.
However, i am not using the built-in container orchestration support feature for creating docker-compose file. I created it manually from scratch using visual studio code editor.
docker-compose
In the root folder of the project, create a new file called docker-compose.yml with the below code. I used visual studio code as my editor and it has great support for yaml file with intellisense.
Lets talk about each line in the above docker-compose file to understand what is going on. Before we take a deep dive into that, i would recommend you to read the official docker-compose guide from docker website.
version: '3'
This is the version of the docker-compose format that we use in this example.
Services definition contains configuration applied to each container started for that service. In our example, we will be creating application and db server services.
Before we go into services in detail, we will discuss about how to create environment variables in docker-compose using .env file and custom env file. we are going to create some custom environment variable such as hostname, sql server login password etc to access it from docker-compose file.
by default, you can set your environment variables using a .env file which docker-compose automatically looks for. if you want to create a custom environment file, you can also do that and reference that file inside the docker-compose file. In this example, i used both. In addition to that, you can also create the environment variable inside the docker-compose file without creating environment file.
.env file
APP_UUID=Demo_App_ServerDB_UUID=Demo_Db_Server
i have created the custom host name for both app and db server and i will be using these variables inside the docker-compose file. The same value is also configured in web.config so that app server will be connecting to db server.
db_dev.env
SA_PASSWORD=P@ssw0rdACCEPT_EULA=Y
In this custom environment file, i have defined the default sa account password and accept EULA flag for the sql server to start inside the container.
In the first line, i defined the name of the image with version number.
Before we jump into build section, let us look at other references in that section. I mapped the default sql port 1433 from container into 14333 on host port using ports configuration so that you can connect the database from your host server with servername as localhost,14333. This step is optional only.
we have also defined the hostname and container_name using environment variable. This will be needed to configure the database server name in our web.config, before we deploy the application in to the container.
Build configurations are applied at docker build time. The context configuration defines the path to a directory containing the DockerFile. I created a new folder Database and placed the DockerFile and Database_Setup.sql file and pointing the context to that folder. When we build the docker image using docker-compose, it runs the DockerFile inside the Database Folder and build the database image. By Default, it will look for the file with name of DockerFile. if you want to create a custom DockerFile Name, you have to add dockerfile configuration to specify the custom docker file name.
DockerFile
FROM microsoft/mssql-server-windows-developer:latestCOPY ./Database_Setup.sql .RUN sqlcmd -i Database_Setup.sql
This dockerfile gets the base image from sql server developer edition and copy the Database_Setup.sql into the image and execute the sql using sqlcmd command which will create the database and the tables defined in the sql file.
Database_Setup.sql
USE [master] GO CREATEDATABASE [NtierMvcDB] GO USE [NtierMvcDB] GO CREATESCHEMA [HR] GO CREATETABLE [HR].[Employees] ( [Id] [int] NOTNULL, [Name] [nvarchar](50) NOTNULL, [Age] [int] NOTNULL, [HiringDate] [datetime] NULL, [GrossSalary] [decimal](10, 2) NOTNULL, [ModifiedDate] [datetime] NOTNULL, CONSTRAINT [PK_Employees] PRIMARY KEY CLUSTERED ([Id] ASC) ON [PRIMARY] ) ON [PRIMARY] GO ALTERTABLE [HR].[Employees] ADDCONSTRAINT [DF_Employees_ModifiedDate] DEFAULT (GETDATE()) FOR [ModifiedDate] GO
In the networks configuration section, we can define any custom network properties that are needed. if we don’t define any networks configuration, docker will create a default network with bridge mode enabled. In the above example, i created custom network with default subnet range so that i can configure the custom ip address for my app and db server. This will be useful for scenarios like when you have some enterprise application with licensing tool installed based on certain device parameter such as mac address, ip address so that you will have the container instances created with same ip address, mac address every time it created with out installing the license for every instance.
In the App Server Services Configuration, we define the name of the image and in the build context, configure the published folder output path. We will create a publish profile from visual studio to deploy the build output in the above mentioned folder along with the DockerFile. The DockerFile must be added in the project and set the build action as content so that it will also get deployed to publish folder.
dockerfile
FROM microsoft/aspnet:latestCOPY . /inetpub/wwwroot/
In this dockerfile, we are taking the base image of microsoft aspnet docker image and copy the build output directly into wwwroot folder inside the container image. we can also put the build output into different folder and create IIS web site using powershell command.
depends_on configuration defines the dependency between services. In this example, app server is dependent on database server so when we run the service , docker will start the database service first and then it will start the app service based on the order we defined.
Demo
We are now done with the orchestration configuration of deploying our application into docker container using docker compose, we can now build the image and bring up the container instances to test it. Before we start, we must create the publish profile to deploy the build output into publish folder. Make sure dockerfile in the web project has build action as content.
Also, change the database server name matching with db server name defined in env file in web.config file.
Launch the powershell window from the root folder and run the docker images command to show the list of images. I have already downloaded aspnet and sql server images from docker hub.
Lets build the docker image using docker-compose build command. This will first create the database image using base sql server developer edison and create the database and tables based on the SQL we provided and then it will create app server based on aspnet framework docker image and copy the build output from publish folder and put it into wwwroot folder inside the container image.
Now, that we have successfully created the docker images, we can verify that by running docker images command.
Let us now bring up new container instance from our image using docker-compose up command. This command will create a database container instance first and then app server instance and attach it with the database server. Once the container instances are we can verify the instance by testing our application from the browser.
Verify the application by launching the browser and put the ip address of app server container instance.
Now, home page is up and running, let try adding new employee into our table.
Lets also verify the data in sql server by connecting with localhost:14333 port from host.
Great. If we stop the container now, all the data that we created will be gone and it will start from clean slate for next instance. Let us test that by running docker-compose down command. you can also verify if all the running instances are down by running docker ps command.
If we create a new instance now, it will start from clean slate and the employee record that we created should not be exists. Let us run docker-compose up command to bring up the new instance.
We have successfully deployed the complete .N-Tier CRUD MVC application into docker container. As i mentioned earlier, we can use the containerization for automated end to end or security testing for monolithic application. We can also integrate with CI / CD pipeline to run all the test scenarios before merging the pull request from the feature branch.
Additional Notes
In the above example, we did not store the state changes as part of the container instances. All the changes are gone when the container instance is stopped. However, if we want to store the state of the application and database changes, docker provides the functionality of creating volumes which will mount the folder from host to docker container so that all the state changes will be persisted. This will be useful in the scenario like automated testing to store the results.
In order to create volume in docker, we should use volumes configuration section in docker-compose file. In the example below, i created the directory called DB on my host server and put the MDF and LDF database file inside the folder and then mount that folder to container.
volumes: - ./DB/:c:\db
Next step is to attach the database instead of creating database by adding attach_dbs command in env file. This will create a database called NtierMvcDB and attach the existing MDF and LDF file into that every time when the container instance is created. Also, this will store all the DB state changes even after the container is stopped. When we initiate the new container instance, it will show the data from the previous instance as well.
Some of monolithic core application engine may run on windows service. The good thing with docker on windows, it supports windows service since there is no GUI involved. If you want to install your application engine windows service as part of docker image build and run the windows service, use the below powershell commands in DockerFile.
I hope this article helps you understand how to containerize .net framework monolithic application. Docker containerization is not just only for breaking monolithic application into micro service architecture. It can also be considered to modernize monolithic application packaging into docker image and ship it very frequently for various scenarios like automated end to end testing, security testing.
I have uploaded the entire source code in my github repository.
Happy Coding!!
]]>
<p><img src="https://4.bp.blogspot.com/-ZUK-MZx0Kes/XAf7Cs4YGZI/AAAAAAAHA-s/O_Tr_UuqCwcuO_apmJX6af08u6qrqaaKgCLcBGAs/s640/title_image.png" alt><br>Microservice Architecture and Containerization using docker are the latest buzzword in the software industry. But, Many people including me in the software industry developing big monolithic enterprise applications using .Net Framework for many years have very limited scope of applying these concepts into existing applications. Because, its not easy to break enterprise monolithic application into micro service architecture without redesigning the application. Also, .Net Core framework would be the de facto choice for micro service architecture because it supports cross platform so it can be hosted in linux container or windows container. As of today, Windows Docker container do not support GUI application such as winforms, wpf etc.. However, we can still consider modernizing .Net Framework monolithic application by packaging into docker image for automated end to end testing or security testing. </p>
Real Time Cricket Score Chrome Extension using Azure Functions and SignalRhttps://jeevasubburaj.com/2018/09/12/real-time-cricket-score-chrome/2018-09-12T21:05:00.000Z2019-08-26T19:14:28.366Z
In this article, I will discuss about how to show real time cricket score notification from chrome extension using serverless Azure Functions and Azure SignalR. I have used cricapi.com free API service to get the live cricket score updates. The purpose of this article is to show the power of serverless architecture using azure functions and broadcasting to connected clients in realtime using Azure SignalR. The demo source code I attached with this article is for personal educational purpose only and not production use.
Steps
Register Cricket Services API
As a first step, to consume the API Service from cricapi.com, register the account with the details to get the API Key. They allow 100 free hits per day for testing purpose.
Creating Azure SignalR Service
Log into your Azure Portal (https://portal.azure.com/) and create a new resource of type SignalR Service. After the service is created, copy the connection string from the Keys section.
Creating Azure Function App
Prerequisites
Visual Studio 2017 Latest Version
Azure Portal Account
Launch the Visual Studio and Create a New Azure Function Project
Select the Azure Function v2 Preview and the Http trigger template.
For this demo, we will be creating two azure functions.
NegotiateFunction (HttpTrigger)
This function will get the JWT token for the client so that SignalR client can connect to Azure Signalr Service Hub.
BroadcastFunction (TimerTrigger)
This function runs every 1 min (configurable) and call the CricAPI Service to get the latest score for defined match id and broadcast it to all connected clients.
In order to use Azure SignalR Service in Azure Functions, I have used Anthony Chu“AzureAdvocates.WebJobs.Extensions.SignalRService” library.
publicstaticclassBroadcastFunction { privatestatic HttpClient httpClient = new HttpClient(); [FunctionName("broadcast")] publicstaticasyncvoidRun([TimerTrigger("0 */1 * * * *")]TimerInfo myTimer, [SignalR(HubName = "broadcasthub")]IAsyncCollector<signalrmessage> signalRMessages, ILogger log) { httpClient.DefaultRequestHeaders.Accept.Clear(); httpClient.DefaultRequestHeaders.Accept.Add(new MediaTypeWithQualityHeaderValue("application/json")); //TODO: API key should be stored in Azure Key Vault . //For Demo purpose, i hard coded the value here. var values = new Dictionary<stringstring=""> { //Hard coded Cricket Match Unique ID. You can change the Match id based on ongoing matchers {"apikey", "_API_KEY_HERE"},{"unique_id", "1119553"} }; using (var response = httpClient.PostAsJsonAsync(new Uri("http://cricapi.com/api/cricketScore/"), values).Result) { var resultObj = response.Content.ReadAsStringAsync().Result; dynamic result = JsonConvert.DeserializeObject(resultObj); await signalRMessages.AddAsync(new SignalRMessage() { Target = "broadcastData", Arguments = newobject[] { result.score } }); } } }
We have to create Appsettings Key called AzureSignalRConnectionString in order to connect to Azure SignalR Service from our Azure Functions. We will have to add the settings in local.settings.json for local testing and add it into Application Settings in Azure after we deploy it.
We are now done with the coding for the Azure functions, we can start testing it locally first before deploy into Azure Portal. In the local.settings.json, we have defined the localhttpport 7071 and allowed cross domains request by putting CORS : *
Run the Application by pressing F5 which will create the host and deploy the functions in localhost.
As you see above, Azure Functions are now hosted in local, we can run the negotiate function using the following URL which will return the JWT Token to connect to SignalR Service.
Now that it worked in localhost, we can deploy the Azure Functions into Azure Portal.
Publishing Azure Function App
In Visual Studio, Right click on the solution and Select the Publish option from the Menu.
Check the Run from ZIP checkbox and click the Publish button.
Click on the Create button to create azure hosting plan, storage account under your azure subscription. After the account is created, by clicking the publish button any time will ship the files into portal and deploy the Azure Functions.
You can login to Azure Portal to check the deployed Azure Functions.
We also need to add the AzureSignalRConnectionString key in Application Settings.
We have completed publishing Azure Functions in the Portal. Let us now create a chrome extension signalr client to receive the cricket score in real time. The timer trigger broadcast function will run every minute and push the cricket score to all connected clients.
In the manifest.json, we defined the list of scripts to load (axios, signalr and signalrclient).
{
  "name": "Real Time Cricket Score Demo",
  "version": "1.0",
  "description":
    "Real time Cricket Score Update from Serverless Azure Functions pop up on the desktop.",
  "icons": {"16": "16.png", "48": "48.png", "128": "128.png"},
  "permissions": [
    "background",
   "tabs",
    "notifications",
    "http://*/*",
    "https://*/*"
  ],
  "background": {
    "persistent": true,
    "scripts": ["axios.min.js","signalr.js","signalrclient.js"] },
  "manifest_version": 2,

  "web_accessible_resources": [
    "48.png"
  ]
}
To install the chrome extension in your local machine, launch chrome and open the extensions from the menu. Click the load unpacked extension and select the folder that chrome extension is placed.
After the extension is installed, broadcast azure function will execute based on the schedule and broadcast the latest score to the new connected client as below.
Conclusion
With the few lines of code, we have created the serverless azure functions, which will fetch the data from API endpoint and broadcast the messages to all connected clients in real time using Azure SignalR. In this article, I have hard coded the API key in the program but ideally, it should be stored in Azure Key Vault and read it from there. I hope this article helps you get started with Azure Functions. I have uploaded the entire source code in my github repository.
Happy Coding!
]]>
<p><img src="https://3.bp.blogspot.com/-NC2Tx0NGF2U/W5k88g2Tz0I/AAAAAAAG3hA/Azqp8bW2FOAVqINAas-1lhvpA3tagYC2QCLcBGAs/s640/title_image.png" alt></p>
<p>In this article, I will discuss about how to show real time cricket score notification from chrome extension using serverless Azure Functions and Azure SignalR. I have used cricapi.com free API service to get the live cricket score updates. The purpose of this article is to show the power of serverless architecture using azure functions and broadcasting to connected clients in realtime using Azure SignalR. The demo source code I attached with this article is for personal educational purpose only and not production use. </p>
Azure SignalR Messaging with .Net Core Console App Server and Clienthttps://jeevasubburaj.com/2018/08/14/azure-signalr-messaging-with-net-core/2018-08-14T22:17:00.000Z2019-08-26T19:14:28.364Z
Real-time technologies are now part of every modern applications and SignalR is the most popular .net library to create real time scenarios. Recently Microsoft announced the public preview of Azure SignalR, a cloud based fully managed service to build real time application without worrying about capacity provisioning, scaling, or persistent connections. In this article, we are going to discuss about how to create .Net Core SignalR server console app to broadcast the messages to all the connected clients in real-time without using Asp.net Core SignalR Web App.
Deeper dive Azure SignalR Service
In the enterprise world, SignalR applications often comes with high volume data flows and large number of concurrent connections between app and client. To handle that scenario, we have to setup the web farms with sticky sessions and a backplane like Redis to make sure messages are distributed to the right client. If we use Azure SignalR service, it will handle all those issues and we can focus only on business logic.
In addition to that, Azure SignalR Service works well with existing Asp.net Core SignalR Hub with very less changes. We have to add reference to Azure SignalR SDK and configure the Azure connection string in the application and then adding few lines of code services.AddSignalR().AddAzureSignalR() and app.UseAzureSignalR in Startup.cs.
As of today, if you want to implement duplex communication between SignalR client and server using Azure SignalR Service, you must need ASP.net Core SignalR Server Hub(Web App). However, If you just want to push the messages from server to clients (oneway), you can use Azure SignalR Service without having Asp.net Core SignalR Hub (Web App).
In the diagram above, we have two endpoints called Server Endpoint and Client End Point. With those End Points, SignalR Server and Client can connect to Azure SignalR Service without the need of Asp.net Core Web App.
Azure SignalR Service exposed set of REST APIs to send messages to all clients from anywhere using any programming language or any REST client such as Postman. The Server REST API swagger documentation is in the following link.
REST APIs are only exposed on port 5002. In each HTTP request, an authorization header with a JSON Web Token (JWT) is required to authenticate with Azure SignalR Service. You should use the AccessKey in Azure SignalR Service instance’s connection string to sign the generated JWT token.
Rest API URL
POST _https://<service_endpoint>:5002/api/v1-preview/hub/<hub_name>_
The body of the request is a JSON object with two properties:
Target: The target method you want to call in clients. Arguments: an array of arguments you want to send to clients.
The API service authenticates REST call using JWT token, when you are generating the JWT token, use the access key in SignalR service connection string as a Secret Key and put it in authentication header.
Client Endpoint
_https://<service_endpoint>:5001/client/?hub=_
Clients also connect to Azure SignalR service using JWT token same as described above and each client will use some unique user id and the Client Endpoint URL to generate the token.
With all the details above, let us build a simple .Net Core Console App to broadcast messages using Azure SignalR Service.
Architecture
In this demo, we will see how the SignalR Console App server connect to Azure SignalR Service with REST API call to broadcast the messages to all connected console app clients in real time.
AzureSignalRConsoleApp.Utils - .Net Core Class Library
AzureSignalRConsoleApp.Utils
This class library holds the logic to generate the JWT token based on the access key from Azure Connection string. It also holds the method to parse the Azure SignalR Connection String to get the endpoint and access key.
Nuget Packages Required
System.IdentityModel.Tokens.Jwt
publicclassServiceUtils { privatestaticreadonly JwtSecurityTokenHandler JwtTokenHandler = new JwtSecurityTokenHandler(); publicstring Endpoint { get; } publicstring AccessKey { get; } publicServiceUtils(string connectionString) { (Endpoint, AccessKey) = ParseConnectionString(connectionString); } publicstringGenerateAccessToken(string audience, string userId, TimeSpan? lifetime = null) { IEnumerable<claim> claims = null; if (userId != null) { claims = new[] { new Claim(ClaimTypes.NameIdentifier, userId) }; } return GenerateAccessTokenInternal(audience, claims, lifetime ?? TimeSpan.FromHours(1)); } publicstringGenerateAccessTokenInternal(string audience, IEnumerable<claim> claims, TimeSpan lifetime) { var expire = DateTime.UtcNow.Add(lifetime); var securityKey = new SymmetricSecurityKey(Encoding.UTF8.GetBytes(AccessKey)); var credentials = new SigningCredentials(securityKey, SecurityAlgorithms.HmacSha256); var token = JwtTokenHandler.CreateJwtSecurityToken( issuer: null, audience: audience, subject: claims == null ? null : new ClaimsIdentity(claims), expires: expire, signingCredentials: credentials); return JwtTokenHandler.WriteToken(token); } privatestaticreadonlychar[] PropertySeparator = { ';' }; privatestaticreadonlychar[] KeyValueSeparator = { '=' }; privateconststring EndpointProperty = "endpoint"; privateconststring AccessKeyProperty = "accesskey"; internalstatic (string, string) ParseConnectionString(string connectionString) { var properties = connectionString.Split(PropertySeparator, StringSplitOptions.RemoveEmptyEntries); if (properties.Length > 1) { var dict = new Dictionary<stringstring=""<(StringComparer.OrdinalIgnoreCase); foreach (var property in properties) { var kvp = property.Split(KeyValueSeparator, 2); if (kvp.Length != 2) continue; var key = kvp[0].Trim(); if (dict.ContainsKey(key)) { thrownew ArgumentException($"Duplicate properties found in connection string: {key}."); } dict.Add(key, kvp[1].Trim()); } if (dict.ContainsKey(EndpointProperty) && dict.ContainsKey(AccessKeyProperty)) { return (dict[EndpointProperty].TrimEnd('/'), dict[AccessKeyProperty]); } } thrownew ArgumentException($"Connection string missing required properties {EndpointProperty} and {AccessKeyProperty}."); } }
AzureSignalRConsoleApp.Server
This is the .net core SignalR Server console app to broadcast the messages via REST API call.
Nuget Packages Required
Microsoft.Extensions.Configuration.UserSecrets
Steps
Login to Azure Portal and get the Azure SignalR Service Connection String and store it in UserSecrets.json.
Visual Studio does not provide the built-in support to manage User Secrets for .Net Core Console App. We have to manually create UserSecretsID element under PropertyGroup in the .csproj file and put the randomly generated GUID as below.
Open the command window from the root project location and run the following command to create secrets.json file with the configuration data
dotnet user-secrets set key value
Goto %APPDATA%\Microsoft\UserSecrets Folder to verify the new folder exists in the same GUID and the secrets.json file is created with configuration data.
After the above setup configured successfully, we can load the configuration object with the following code.
var configuration = new ConfigurationBuilder()
               .SetBasePath(Directory.GetCurrentDirectory())
               .AddUserSecrets<program>()
               .Build();
Broadcast method will take the input message from console window, build the httprequest along with generated JWT token in authorization header and make the REST API call to push the messages.
amespace AzureSignalRConsoleApp.Server { classProgram { privatestaticreadonly HttpClient httpClient = new HttpClient(); privatestaticreadonlystring hubName = "ConsoleAppBroadcaster"; privatestaticreadonlystring serverName = "Azure_SignalR_Server_1"; privatestatic ServiceUtils serviceUtils; staticvoidMain(string[] args) { //Loading the Configuration Objects from UserSecrets var configuration = new ConfigurationBuilder() .SetBasePath(Directory.GetCurrentDirectory()) .AddUserSecrets<program>() .Build(); serviceUtils = new ServiceUtils(configuration["Azure:SignalR:ConnectionString"]); Console.WriteLine(" Azure SignalR Server Started.\n " + "Start typing and press enter to broadcast messages to all the connected clients.\n " + "Type quit to shut down the server!"); while (true) { var data = Console.ReadLine(); if (data.ToLower() == "quit") break; Broadcast(data); } Console.WriteLine("SignalR Server is shutting down"); } privatestaticasyncvoidBroadcast(string message) { var url = $"{serviceUtils.Endpoint}:5002/api/v1-preview/hub/{hubName.ToLower()}"; var request = new HttpRequestMessage(HttpMethod.Post, new UriBuilder(url).Uri); request.Headers.Authorization = new AuthenticationHeaderValue("Bearer", serviceUtils.GenerateAccessToken(url, serverName)); request.Headers.Accept.Add(new MediaTypeWithQualityHeaderValue("application/json")); var messageContent = new MessageContent() { Target = "SendMessage", Arguments = new[] { serverName, message } }; request.Content = new StringContent(JsonConvert.SerializeObject(messageContent), Encoding.UTF8, "application/json"); var response = await httpClient.SendAsync(request); if (response.StatusCode != HttpStatusCode.Accepted) { Console.WriteLine($"Sent error: {response.StatusCode}"); } } } publicclassMessageContent { publicstring Target { get; set; } publicobject[] Arguments { get; set; } } }
AzureSignalRConsoleApp.Client
This is the .net core SignalR Client console app to receive the messages from Azure SignalR Service.
Nuget Packages Required
Microsoft.Extensions.Configuration.UserSecrets
Microsoft.AspNetCore.SignalR.Client
Steps
In order to load the configuration object from User Secrets to load the Azure Connection String, we must follow the same steps as above.
var configuration = new ConfigurationBuilder()
               .SetBasePath(Directory.GetCurrentDirectory())
               .AddUserSecrets<program>()
               .Build();
Generate the JWT access token using client endpoint URL and create hub connection with the client hub URL and the access token to establish the connection with Azure SignalR Service. In the Hub connection ON event, wire up with the same Target method to receive the message.
namespaceAzureSignalRConsoleApp.Client { classProgram { privatestaticreadonlystring userId = $"User {new Random().Next(1, 99)}"; privatestatic ServiceUtils serviceUtils; privatestaticreadonlystring hubName = "ConsoleAppBroadcaster"; privatestatic HubConnection hubConnection; asyncstatic Task Main(string[] args) { var configuration = new ConfigurationBuilder() .SetBasePath(Directory.GetCurrentDirectory()) .AddUserSecrets<program>() .Build(); serviceUtils = new ServiceUtils(configuration["Azure:SignalR:ConnectionString"]); var url = $"{serviceUtils.Endpoint}:5001/client/?hub={hubName}"; hubConnection = new HubConnectionBuilder() .WithUrl(url, option => { option.AccessTokenProvider = () => { return Task.FromResult(serviceUtils.GenerateAccessToken(url, userId)); }; }).Build(); hubConnection.On<stringstring="">("SendMessage", (string server, string message) => { Console.WriteLine($"Message from server {server}: {message}"); }); await hubConnection.StartAsync(); Console.WriteLine("Client started... Press any key to close the connection"); Console.ReadLine(); await hubConnection.DisposeAsync(); Console.WriteLine("Client is shutting down..."); } } }
How it works
Now that, we have completed the code, let us run the application to see the demo. First, launch the server and then launch more than one client app in multiple command window. After that, start typing in server command window to send messages to all the clients in real-time.
Conclusion
In this article, we discussed how to use Azure SignalR Service in .net core console app without using Asp.net Core Web App. In Real World, Azure SignalR Service can be integrated with other Azure services like serverless computing (Azure Functions) to push notification messages to all the connected clients in real time based on some trigger without hosting Asp.net Core Web App and managing the connection with clients. I have uploaded the entire source code in my GitHub repository.
Happy Coding!
]]>
<p><img src="https://2.bp.blogspot.com/-CkqyHBfVka0/W3MecQh3mTI/AAAAAAAGycw/VksPWJI4r8sNNnyDGit-3hvIgGWjPFwyACLcBGAs/s640/Article%2BTitle.png" alt></p>
<p>Real-time technologies are now part of every modern applications and SignalR is the most popular .net library to create real time scenarios. Recently Microsoft announced the <a href="https://azure.microsoft.com/en-us/blog/azure-signalr-service-a-fully-managed-service-to-add-real-time-functionality/" target="_blank" rel="noopener">public preview of Azure SignalR</a>, a cloud based fully managed service to build real time application without worrying about capacity provisioning, scaling, or persistent connections. In this article, we are going to discuss about how to create .Net Core SignalR server console app to broadcast the messages to all the connected clients in real-time without using Asp.net Core SignalR Web App. </p>
Asp.Net Core Basics- Accessing Configuration Settings from Multiple Sourceshttps://jeevasubburaj.com/2018/07/28/aspnet-core-basics-accessing/2018-07-28T22:57:00.000Z2019-08-26T19:14:28.364Z In older Asp.Net Version, we typically store the configuration settings in web.config and access it using ConfigurationManager Class. This worked well in the past however it is not good enough for modern technologies like hosting in cloud or container based solutions. Moreover, storing the sensitive data in web.config poses security risk if the file is check in to source control by accident.
In Asp.Net Core , Configuration API was introduced to access the key value pair data from various sources in the order they are configured which allows you to access the configuration keys using Configuration Class regardless of where the keys are stored. If the same key value pair is stored in more than one places, the latest in order of precedence will overwrite the other values. Let’s dive into the demo to see how it works.
Order of Precedence
By default, ASP.Net Core version 2.0, the configuration providers order of precedence is hidden in Program.cs behind the method call CreateDefaultBuilder(). If you look at source code from github, you will see that it loads the data in following order.
appsettings.json file
appsettings.{env.EnvironmentName}.json file
The local User Secrets File (local development environment only)
Environment Variables
Command Line Arguments
In Addition to that, you can also create custom providers by implementing IConfigurationSource interface and add it into the processing pipeline. Asp.net core also supports reading from xml file in addition to json file.
How it Works – Demo
In this Demo, we will see how to read and display the configuration key that are available from various sources and what value is displaying based on order of precedence. Launch the visual studio and create a new Asp.net Core Empty Web Application.
After the empty project is created, add the AppSettings.json item into the project.
Add the new key value pair item called DemoConfigKey in the AppSettings.json and set the value as “Value from AppSettings.json”
In order to access the value from configuration object we need to use Startup constructor as shown below.
After we added the Startup constructor with the parameter of type IConfiguration, we can store the injected IConfiguration object into local variable and then use it anywhere within ConfigureServices() and Configure() and also we can access it from other controller via dependency injection passing the IConfiguration object in Controller Constructor.
In order to print the config value, I have just modified the default Configure method like below. This will print the value reading from configuration sources defined in the order.
When I run the application, you will see the result below reading from AppSettings.json.
Appsettings.{env.EnvironmentName}.json File
This file is used to override the keys in appsettings.json with deployment environment specific settings. For Example a file named appsettings.production.json would contain values specific to production.
By Default, Asp.net Core Environment is Development. You can modify it in Visual Studio by changing it in Project Properties if needed.
Let’s add the environment specific AppSettings.Development.json file into the project.
Add the value for DemoConfigKey as “Value from AppSettings.Development.json”
Let’s run the application and see the result. We should get the value from AppSettings.Development.json by overwriting the value from AppSettings.json based on the order of precedence.
User Secrets
The User Secrets file is a JSON file stored on the local developer machine. This file is unencrypted and stored outside of the solution directory (under user profile directory) and, therefore, is not checked into source control by accident. The user secrets file is used only for local development overrides like connecting to a local database server or development server API key values etc. These configuration values are only relevant to the local developer and any other developer / machine cannot access those values.
To add the UserSecrects.json file, right click on the project file and select Manage User Secrets.
Add the Same key and set the different value as below.
Lets run the application and it should override all the other key values and put the value from Secrets.json
Environment Variables
Environment variables used mostly in container-based solutions like Docker Compose and Kubernetes. Docker allows environment variables to be configured in a Docker file using the ENV instruction. For example:
ENV DemoConfigKey: Value from Docker Environment Variable
See the Docker reference documentation for more details.
Command Line Variables
Command line arguments allow you to modify the configuration keys when running your application without modifying any files using the command line syntax of key=value.
In this demo, we run the application in command line window as below.
When running the application, you will see the result as below
Conclusion
Asp.net Core allows you to have same configuration key value pair in multiple places and allowing us to write the same code to access those values with the order of precedence regardless of it’s source. It also allows you to have multiple config file with different set of keys and load them all in one configuration object. It is very useful when you want to split the configuration settings into different file by module (Eg: All Database Related Key Value Pairs in one file) or any other category that suitable for your application. For the Cloud based solution, you should also consider using Azure Key vault for storing your sensitive secrets data.
As mentioned above, the default order of precedence was hidden behind the method CreateDefaultBuilder(args) . If you want to create a custom configuration provider, you can do that by implementing IConfigurationSource Interface. I hope this article helps you to understand how configuration data is getting accessed at runtime from various sources.
Happy Coding!
]]>
<p><img src="https://4.bp.blogspot.com/-iMhZ2a58f3E/W1zDPLQFqTI/AAAAAAAGvtw/9UfNHLxQ1IIvoVQmFOgKED9_DiMKHYhKwCLcBGAs/s400/Title%2BImage_Accessing%2BConfiguration%2BSettings%2Bfrom%2BMultiple%2BSources.png" alt> In older Asp.Net Version, we typically store the configuration settings in web.config and access it using <strong>ConfigurationManager</strong> Class. This worked well in the past however it is not good enough for modern technologies like hosting in cloud or container based solutions. Moreover, storing the sensitive data in web.config poses security risk if the file is check in to source control by accident.</p>
Real Time Communication to Cross Platform Devices using Azure SignalR Servicehttps://jeevasubburaj.com/2018/07/11/magic-paste-universal-paste-data-to-web/2018-07-11T22:16:00.003Z2019-08-26T19:14:28.365ZIn this article, i will discuss about how to do real time communication between cross platform devices such as .net core web app runs in Azure, xamarin based android app and Full .Net Framework based Windows Forms app running in Windows Operating System by sending and receiving data using Azure SignalR Service. In this two part of article series, i will create a tool called MagicPaste which will transfer the text content from one device to another in real time.
This article provides an overview of architecture of Magic Paste tool and how to setup the SignalR Service in Azure SignalR Portal. It also provides the overview of how to develop SignalR Client Web , Android and Windows Forms App to communicate each other in real time using Azure SignalR Service.
Architecture
Demo
Setting up Azure SignalR Service
Microsoft recently released the preview version Azure SignalR service which is a fully-managed service that allows developers to focus on building real-time web experiences without worrying about capacity provisioning, reliable connections, scaling, encryption or authentication. In this example, I setup the Azure SignalR Service with the Free Tier which allows the maximum of single unit with 100 connections. This would be suffcient for this demo.
Steps
Login to Azure Portal and Click Create a Resource and Search for SignalR Service in Market Place and click the Create button.
Enter the resource name, Select the Subscription , Resource Group and the Free Pricing Tier and then click the Create Button.
We have now created the Azure SignalR Service succesfully. Navigate to the dashboard page of SignalR Service that we created just now and copy the EndPoint URL with the accesskeys under the Keys Section. User Access Keys are used to authenticate SignalR clients when making request to Azure SignalR Service. It is very important to keep these keys securely. During the development time, you can store the keys in usersecrets.json file so that it will not get checked in into source control by accident. When you deploy the SignalR Web Client App, you can deploy the keys into Azure Key Vault or AppSettings in Azure Web App Service.
Client Apps
We will develop the SignalR client applications to connect to Azure SignalR Service to do real time communication between cross platform devices. We are going to develop the following applications.
Net Core We App to send and receive the data from the browser.
Net Framework (v4.6.1) based windows forms application that running in system tray with the global hot key registered (CTRL + SHIFT + C) to push the clipboard content to other devices whenever the hotkey is pressed.
Xamarin based Android App to receive the data from SignalR Hub in Local Notification Window.
Web App SignalR Client App
This is an Asp.net Core Web Application with layout defined using bootstrap library. In the landing page, we will be adding DIV container to show all the incoming messages from SignalR Hub and in the bottom of the page, we will place the text box and button to publish the text message to other clients. We will use the SignalR Javascript Client library to connect to SignalR Hub.
Steps
Launch the Visual Studio and Create a New Project (.Net Core -> Asp.net Core Web Application) . You must have the latest .Net Core SDK (2.1) installed on your machine.
Install the Microsoft.Azure.SignalR Nuget Package for your project.
By default, the Microsoft.AspNetCore.SignalR package containing its server libraries as part of its ASP.NET Core Web Application template. However, the JavaScript client library for SignalR must be installed using npm. Use the following commands from Node Package Manager Console to install it and copy the signalr.js file from node_modules\@aspnet\signalr\dist\browser to wwwroot\lib\signalr\signalr.js. (Create a SignalR Folder under Lib Directory)
npm init -y
npm install @aspnet/signalr
We will create a new hub called MagicPasteHub that internally connects to Azure Service. Right click on the Project in Solution Explorer and Create a New Folder called Hub and then add a new file called MagicPasteHub.cs and paste the following code.
In the Startup.cs, add the following code in ConfigureServices method. SignalREndPoint Key will hold the Azure Endpoint Value. During Development time, you can store the Azure Endpoint Values in UserSecrets.json. The method AddAzureSignalR will establish the link between Web App and Azure SignalR library using the EndPoint URL.
In the site.js, add the following code to setup the signalR client to connect to hub and wire up the button click event to send the message and wire up the ReceiveData event to append the incoming data into DIV container.
The entire source of web client app is uploaded here in github.
Windows Forms App SignalR Client
This is a full .net framework based windows forms app that will be running in the system tray with the registered global hotkey CTRL + SHIFT + C. Whenever hot key is pressed anywhere in the desktop, app will check and publish the content of the clipboard to other clients. I used NHotKey open source library for registering the hotkey in Windows Forms.
Steps
Launch the Visual Studio and Click on File -> New Project and Select Windows Forms Application under Windows Desktop Section.
After creating the application, Install the NuGet Package of Microsoft.AspNetCore.SignalR.Client Library for the signalr support..
In the MainForm.cs add the following code. The code below will register the global hotkey (CTRL + SHIFT + C) and also initialize the connection with SignalR hub
When the form gets loaded, it initialize the connection to SignalRHub and whenever the hot key is pressed, it will send the data to Azure Hub.
Xamarin SignalR Client Android App
This is a xamarin based android app which connects to SignalR hub to receive the messages and show as notification to the user and then when the user is clicking the notification, it opens the application with the list of content shared so far in the list view.
Steps
Launch the visual studio and select the Android -> Android App (Xamarin) from the Menu.
From the Solution Explorer, Select Manage NuGet Packages and Select Microsoft.AspNetCore.SignalR.Client Library and Install it.
In MainActivity.cs, Initialize the SignalR Connection as part of OnCreate Method and wire up the SignalR Receive Data event to send the Notification with the received message. I used SharedPreferences to store all the incoming data as Json and display it in the List Activity.
public class MainActivity : ListActivity { protected override voidOnCreate(Bundle savedInstanceState) { base.OnCreate(savedInstanceState); ListAdapter = new ArrayAdapter<string>(this, Android.Resource.Layout.SimpleListItem1, GetItemsFromPreferences()); InitializeSignalRClient(); } private async voidInitializeSignalRClient() { var connection = new HubConnectionBuilder() .WithUrl("https://magicpaste.azurewebsites.net/MagicPaste") .Build(); connection.On<string>("ReceiveData", (msg) => { SaveData(msg); ShowNotification(msg); }); try { await connection.StartAsync(); } catch (Exception e) { Log.Error("MagicPaste", e.Message); } } private List<string> GetItemsFromPreferences() { // get shared preferences ISharedPreferences pref = Application.Context.GetSharedPreferences("MagicPaste", FileCreationMode.Private); // read exisiting value var itemsFromSP = pref.GetString("Items", null); // if preferences return null, initialize listOfCustomers if (itemsFromSP == null) returnnew List<string>(); var items = JsonConvert.DeserializeObject<List<string>>(itemsFromSP); if (items == null) returnnew List<string>(); return items; } privatevoidSaveData(string msg) { // get shared preferences ISharedPreferences pref = Application.Context.GetSharedPreferences("MagicPaste", FileCreationMode.Private); // read exisiting value var itemsFromSP = pref.GetString("Items", null); IList<string> items; // if preferences return null, initialize listOfCustomers if (itemsFromSP == null) items = new List<string>(); else items = JsonConvert.DeserializeObject<List<string>>(itemsFromSP); // add your object to list of customers items.Add(msg); // convert the list to json var itemsAsJson = JsonConvert.SerializeObject(items); ISharedPreferencesEditor editor = pref.Edit(); // set the value to Customers key editor.PutString("Items", itemsAsJson); // commit the changes editor.Commit(); } privatevoidShowNotification(string msg) { Intent intent = new Intent(this, typeof(MainActivity)); // Create a PendingIntent; we're only using one PendingIntent (ID = 0): constint pendingIntentId = 0; PendingIntent pendingIntent = PendingIntent.GetActivity(this, pendingIntentId, intent, PendingIntentFlags.CancelCurrent); Notification.Builder builder = new Notification.Builder(this) .SetContentIntent(pendingIntent) .SetContentTitle("MagicPaste") .SetContentText(msg) .SetAutoCancel(true) .SetSmallIcon(Resource.Drawable.notification_tile_bg); // Build the notification: Notification notification = builder.Build(); // Get the notification manager: NotificationManager notificationManager = GetSystemService(NotificationService) as NotificationManager; // Publish the notification: constint notificationId = 0; notificationManager.Notify(notificationId, notification); } }
Conclusion
SignalR services are mainly used for Apps with Real-Time technologies with high-frequency data flows and large quantities of concurrent connections between the client and server. Now with Azure SignalR Service, it allows you to use ASP.NET Core SignalR to build real-time experiences such as chat, live dashboards, colloboration editor and more, all without worrying about capacity provisioning, scaling, or persistent connections. This article explains the basic idea of how to use Azure SignalR Service However, for the real world implementation, we need to look at the fact of application performance and battery optimization for mobile apps before implementing SignalR services.
I have uploaded the entire source code of Web, Android and WinForms in my github repository.
Happy Coding.
]]>
<p>In this article, i will discuss about how to do real time communication between cross platform devices such as .net core web app runs in Azure, xamarin based android app and Full .Net Framework based Windows Forms app running in Windows Operating System by sending and receiving data using Azure SignalR Service. In this two part of article series, i will create a tool called MagicPaste which will transfer the text content from one device to another in real time. </p>
<p>This article provides an overview of architecture of Magic Paste tool and how to setup the SignalR Service in Azure SignalR Portal. It also provides the overview of how to develop SignalR Client Web , Android and Windows Forms App to communicate each other in real time using Azure SignalR Service. </p>
Real time Language Translation chat using SignalR and Azure Cognitive Services and TypedHttpClient - .Net Core 2.1https://jeevasubburaj.com/2018/06/06/real-time-language-translation-chat/2018-06-06T23:38:00.003Z2019-08-26T19:14:28.366ZIn this article, I will discuss about how to do real-time translation chat using any language of choice in two way communication using SignalR and Cognitive Services Translate API and one of the new feature .Net Core 2.1 HttpClientFactory – TypedHttpClient to make API calls.
This is a simple chat application for user to login with name and choice of language to send and receive the message. When the user sends the message, signalR hub receives the message and send the API request to Azure Cognitive Translate API Library and receives the translated text and send it back to user in real time. SignalR Hub creates the group of users based on language so that when the translated text comes back from API, it broadcast back to the group based on the language.
Realtime Chat application is developed in .Net Core Web App using Razor Pages with Bootstrap layout and .Net Core SignalR Library .
When the user login with the name and choice of language they selected, system is establishing the connection with SignalRHub and put the user into the selected language group. It also notifies all the other users that new user is joined.
When the user sends the message, SignalRHub makes the Web API call with Cognitive Services API to get the translated message and sending the translated message to other members in their selected languages real-time.
When the user exits the chat, it removes from the group and also notifies the other users.
Steps- Create a New Razor Web App with Login and Chat Pages and Adding SignalR Libraries
Create a SignalR Hub and Register with Web App
Create and Consume Cognitive Services in Azure (Free Tier)
Prerequisites
Visual Studio 2017 v 15.7.3 or above
.Net Core SDK 2.1
Creating a New Razor Web App & Adding SignalR Libraries
Launch the Visual Studio and use the File > New Project menu option and choose ASP.NET Core Web Application. Name the project RealTimeTranslationChat. - Select the Web Application and make sure Asp.Net Core 2.1 is selected. -
By default, the Microsoft.AspNetCore.SignalR package containing its server libraries as part of its ASP.NET Core Web Application template. However, the JavaScript client library for SignalR must be installed using npm. Use the following commands from Node Package Manager Console to install it and copy the signalr.js file from node_modules\@aspnet\signalr\dist\browser to wwwroot\lib\signalr\signalr.js. (Create a SignalR Folder under Lib Directory)
npm init -y
npm install @aspnet/signalr
Create the SignalRHub and Register with Web App
Create a New folder called Models and add a User model class.
public classUser { public string Name { get; set; } public string LanguagePreference { get; set; } public string ConnectionId { get; set; } }
This model class holds the Name and the Language preference selected by user and the SignalR Connection ID.
Create a New Folder called Hubs and add a new class called ChatHub.cs
publicclassChatHub : Hub { private CognitiveServiceClient _client; publicChatHub(CognitiveServiceClient client) { _client = client; } static List<user> ConnectedUsers = new List<user>(); public User CurrentUser { get { return ConnectedUsers.FirstOrDefault(i => i.ConnectionId == Context.ConnectionId); } } publicstring LanguageFormatted { get { string result = ""; var items = ConnectedUsers.Select(i => i.LanguagePreference).Distinct(); foreach (var language in items) { result += $"to={language}&"; } if (result.Length > 1) result = result.Substring(0, result.Length - 1); return result; } } publicasync Task SendMessage(string user, string message) { var results = _client.Translate(message, LanguageFormatted); var translationResult = results.Result.FirstOrDefault(); if (translationResult != null) { foreach (var translation in translationResult.translations) { await Clients.GroupExcept(translation.to, Context.ConnectionId).SendAsync("ReceiveMessage", user, translation.text); //await Clients.AllExcept(Context.ConnectionId).SendAsync("ReceiveMessage", user, message); } } } publicasync Task Connect(string name, string language) { var id = Context.ConnectionId; if (ConnectedUsers.Count(x => x.ConnectionId == id) == 0) { ConnectedUsers.Add(new User() { Name = name, ConnectionId = id, LanguagePreference = language }); await Groups.AddToGroupAsync(id, language); await Clients.Caller.SendAsync("onConnected", ConnectedUsers, name, id); await Clients.AllExcept(id).SendAsync("onNewUserConnected", name); } } publicasync Task Disconnect() { var item = ConnectedUsers.FirstOrDefault(x => x.ConnectionId == Context.ConnectionId); if (item != null) { ConnectedUsers.Remove(item); await Clients.AllExcept(item.ConnectionId).SendAsync("onDisconnected", item.Name); } } }
This is the main signalr hub that will communicate with all the clients and also make the API calls to Translation Library to translate the text. The constructor based dependency injection loads the TypedHttpClient object that are configured in Startup.cs to make the http API calls. Connect Method will be called when ever the new user is connected and its adds the users into the static list (Preferably to store in concurrent dictionary to avoid multi thread locking issues) and also add to the signalr group based the launguage the user is selected. It also sends the message back to caller with the list of users so that it will be populating user panel on the UI side. It also sends the notification to all the other users that new user is joined the chat.
SendMessage Method will be called whenever user enters the message and it makes the API calls to translation service to get the translated text in each languages and sends the associated translated text to each group.
Create and Consume Cognitive Services in Azure (Free Tier)
Login to Azure Portal and Search for cognitive service and select Cognitive Services.
Click Add Button and Search for Translator Text and Select it and click the Create Button.
You can select the Free Tier for Development purpose. It allows upto 2Million characters to translate per month in Free Tier.
After the Cognitive Service is created, you can obtain the Subscription Keys from the Quick Start Menu.
By default , two keys will be provided. you can copy the key1 value and put it in usersecrets.json for the application to access it.
Now that, we have completed setting up the Translator Service in Azure, we will switch back to code to consume the API Service. We will be using TypedHttpClient to consume the web service. Typed clients are custom classes with HttpClient injected in the constructor. This will be wired up within the DI system by adding generic AddHttpClient method in Startup.cs with the custom type. Another advantage of having typed client is that we can encapsulate the all the HTTP calls inside specific business methods like SendMessage, GetSupportedLanguages.
publicclassCognitiveServiceClient { private HttpClient _client; privatereadonlystring _apiKey; privatereadonlystring _apiVersion; private ILogger<cognitiveserviceclient> _logger; publicCognitiveServiceClient(HttpClient client, ILogger<cognitiveserviceclient> logger, IConfiguration config) { _client = client; _client.BaseAddress = new Uri(config["AppSettings:APIBaseURL"]); _apiVersion = config["AppSettings:APIVersion"]; _apiKey = config["AppSettings:SubscriptionKey"]; _logger = logger; } publicasync Task<List Language> GetSupportedLanguages() { var languages = new List<Language>(); try { var languagesUrl = new Uri($"/languages?api-version={_apiVersion}", UriKind.Relative); var res = await _client.GetAsync(languagesUrl); res.EnsureSuccessStatusCode(); var jsonResults = await res.Content.ReadAsStringAsync(); dynamic entity = JObject.Parse(jsonResults); foreach (JProperty property in entity.translation.Properties()) { dynamic langDetail = JObject.Parse(property.Value.ToString()); var language = new Language(); language.Code = property.Name; language.Name = langDetail.name; languages.Add(language); } return languages; } catch (HttpRequestException ex) { _logger.LogError($"An error occurred connecting to CognitiveService API {ex.ToString()}"); throw; } } publicasync Task<List TranslationResult> Translate(string message, string languages) { try { System.Object[] body = new System.Object[] { new { Text = message } }; var requestBody = JsonConvert.SerializeObject(body); var translateUrl = new Uri($"/translate?api-version={_apiVersion}&{languages}", UriKind.Relative); string jsonResults = null; using (var request = new HttpRequestMessage()) { request.Method = HttpMethod.Post; request.RequestUri = translateUrl; request.Content = new StringContent(requestBody, Encoding.UTF8, "application/json"); request.Headers.Add("Ocp-Apim-Subscription-Key", _apiKey); var res = await _client.SendAsync(request); jsonResults = await res.Content.ReadAsStringAsync(); } return JsonConvert.DeserializeObject<list TranslationResult>(jsonResults); } catch (HttpRequestException ex) { _logger.LogError($"An error occurred connecting to CognitiveService API {ex.ToString()}"); throw; } } }
GetSupportedLanguages method will make the API calls to get the list of supported languages. Translate method takes the message and list of languages to translate and return the json output translation text array all the requested languages.
Additional Points
In Startup.cs, make sure to add the below code in ConfigureServices method.
In the IndexModel.cs , we will have the implementation for GET method to return the list of supported languages.
private CognitiveServiceClient _client; publicIndexModel(CognitiveServiceClient Client) { _client = Client; } [BindProperty] public User user { get; set; } public SelectList LanguageSL { get; set; } publicasync Task OnGetAsync() { await GetLanguages(); } privateasync Task GetLanguages() { LanguageSL = new SelectList(await _client.GetSupportedLanguages(),nameof(Language.Code),nameof(Language.Name)); }
Conclusion
Finally, this can be tested by running the application in multiple window with different username and languages are selected so that both window can send and receives the message in their selected language in realtime. The same application can be hosted in Azure as a web app with our local signalR hub or use the Azure SignalR service.
In future, it is very much possible to see this realtime translation feature in every apps including the most popular messaging apps like whatsapp when the group chat is having people who speak different region languages and enabling automatic translation settings would help a lot.
I have posted entire source code in my github library. Happy Coding!!!
]]>
<p>In this article, I will discuss about how to do real-time translation chat using any language of choice in two way communication using SignalR and Cognitive Services Translate API and one of the new feature .Net Core 2.1 <strong>HttpClientFactory – TypedHttpClient</strong> to make API calls. </p>
<p>This is a simple chat application for user to login with name and choice of language to send and receive the message. When the user sends the message, signalR hub receives the message and send the API request to Azure Cognitive Translate API Library and receives the translated text and send it back to user in real time. SignalR Hub creates the group of users based on language so that when the translated text comes back from API, it broadcast back to the group based on the language. </p>
Parser API using .Net Core Web API 2.1 and Hosting in Raspberry PIhttps://jeevasubburaj.com/2018/05/21/parser-api-using-net-core-web-api-21/2018-05-21T21:12:00.001Z2019-08-26T19:14:28.365ZThis article explains how to create generic parser API to parse video feeds from various sites that supports RSS/Atom feed or scraping the content from DOM element and return the custom XML / JSON output based on requested streaming box supported format. The core parsing logic will be implemented in base class and then custom formatting logic will be implemented in the appropriate child classes. Later in the article, we will also deploy this application into Raspian based Raspberry PI. We are using the latest .Net Core SDk 2.1 RC release for developing the web API. In my earlier article , i developed the similar application using NodeJS and Express and deployed in Raspberry PI.
Design
The below diagram depicts the architecture of Model and Service Components. In this article, i have added only for feed based service and i will be adding to support DOM based extraction later and publish it into github.
RokuParserModel – This is the root class for Roku which holds all the properties and subclasses that are expected for Roku Streaming Box. I will be adding AndroidParserModel and IOSParserModel in future to support other streaming boxes. The RokuParserModel also have sub classes to hold other properties such video URL and ThumbnailURL. This can be customized in whatever way our streaming box expects the model to be.
public interface IParserService<t> where T : IParserModel
    {
        Task<t> ParseContent();
    }
BaseParserSerivce - Abstract Layer for Paser Service Class. This will have empty virtual method for now.
public abstract class BaseParserService<t> : IParserService<t> where T : IParserModel, new() { publicasyncvirtual Task<t> ParseContent() { returnawait Task.FromResult(new T()); } }
RokuFeedParserService – This is the service class for the Roku Format that holds all the core logic extract the content items from the feed. It takes the feedURL in constructor and override the parseContent method to implement Feed Based Parsing Service. I used the SyndicationFeed library from .net to parse RSS and atom feed. The base RokuFeedParserService will parse the feed and populate the list of items in SyndicationItems Property. Later, the child class that will be inhertiing from RokuFeedParserService will use the SyndicationItems values to create custom formatted the xml / json output based on the streaming format requested.
public class RokuFeedParserService : BaseParserService<rokufeedparsermodel> { publicstring FeedURL { get; set; } publicRokuFeedParserService(string _feedURL) { FeedURL = _feedURL; } publicasyncoverride Task<rokufeedparsermodel> ParseContent() { RokuFeedParserModel parserModel = new RokuFeedParserModel() { SyndicationItems = new List<isyndicationitem>() }; using (XmlReader xmlReader = XmlReader.Create(FeedURL, new XmlReaderSettings() { Async = true })) { var reader = new RssFeedReader(xmlReader); while (await reader.Read()) { switch (reader.ElementType) { case SyndicationElementType.Item: parserModel.SyndicationItems.Add(await reader.ReadItem()); break; } } } return parserModel; } }
Ch9RokuParserService – This is the child service class for Channel9 feed and it will override the parseContent method to populate RokuFeedParserModel object based on SyndicateItems values. This will return the final output of Roku based parser model object. We will be adding additional service classes for supporting other formats here.
publicasyncoverride Task<rokufeedparsermodel> ParseContent() { var parserModel = awaitbase.ParseContent(); parserModel.ParserItems = new List<rokuparseritem>(); int currIndex = 0; foreach(var syndicationItem in parserModel.SyndicationItems) { RokuParserItem parserItem = new RokuParserItem(); parserItem.Title = syndicationItem.Title; parserItem.ContentId = currIndex; parserItem.StreamFormat = "mp4"; parserItem.MediaItem = new RokuMediaItem(); parserItem.MediaItem.StreamUrl = syndicationItem.Links.FirstOrDefault(i => i.RelationshipType == "enclosure")?.Uri.ToString(); parserModel.ParserItems.Add(parserItem); currIndex++; } parserModel.ResultLength = currIndex; parserModel.EndIndex = currIndex; return parserModel; }
}
Controllers
BaseAPIController – This is the base API controller and it will have the default annotationattributes for APIController and Route Actions. Note that i am using APIController Attribute that denotes a Web API controller class and it provides some useful methods and properties by coupling with ControllerBase method such as automatic 400 responses and more. I have also defined the default route [Route(“api/[controller]“)] at base class level so that i dont have to redefine this on every other controller.
Ch9Controller – This controller will have all the GET methods for various streaming boxes and produces the xml or json output. Note that, i am using HttpGet(“Roku”) so that it allows me to have multiple GET methods on single controller. you can also define your Routing by action like [HttpGet(“[action]”)] and then you can call the API with the method name like /API/Ch9/GetRokuFormat
publicclassCh9Controller : BaseAPIController { [HttpGet("Roku")] [Produces("application/xml")] public RokuFeedParserModel GetRokuFormat() { var parserService = new Ch9RokuParserService("https://s.ch9.ms/Feeds/RSS"); return parserService.ParseContent().Result; } }
Startup.cs - In my startup class, i have enabled both XML and JSON formatter to support both format based on the request. You can also create custom formatter if you need other than XML / Json. Note that i have enabled RespectBrowserAcceptHeader = true to support the XML output. Also, i have used the XML Annotation to change the element name and added the XMLIgnore Attribute to ignore from serialization.
publicclassStartup { publicStartup(IConfiguration configuration) { Configuration = configuration; } public IConfiguration Configuration { get; } // This method gets called by the runtime. Use this method to add services to the container. publicvoidConfigureServices(IServiceCollection services) { services.AddMvc(options => { options.RespectBrowserAcceptHeader = true; }) //support application/xml .AddXmlSerializerFormatters() //support application/json .AddJsonOptions(options => { // Force Camel Case to JSON options.SerializerSettings.ContractResolver = new CamelCasePropertyNamesContractResolver(); }); } // This method gets called by the runtime. Use this method to configure the HTTP request pipeline. publicvoidConfigure(IApplicationBuilder app, IHostingEnvironment env) { if (env.IsDevelopment()) { app.UseDeveloperExceptionPage(); } app.UseMvcWithDefaultRoute(); } }
Program.cs - I used the default settings to start the kestrel web server and configured to the use the 5000 port for hosted application to listening on that port. This will be used when we deploy the application Raspberry PI later.
Now that we have done the coding for our channel9 feed Web API to support Roku XML format, let us run the application first using IIS express to make sure it works.
Deploying .Net Core Web API on Raspberry PI
Now, that our application produced the xml output as expected, we will deploy this latest .Net Core 2.1 Web API in our Raspberry PI. Please note that .Net Core runs only on Raspberry PI 2 / 3. It does not run on Pi Zero. The Raspberry PI that i have is currently running on Raspian OS.
Before we deploy our application, As a first step, we have to install the .Net Core SDK and Runtime on Raspberry PI. In order to install the SDK, we will be executing the below commands on PI terminal window. I already have remote connection enabled from my laptop for my PI. I have also enabled network share from my PI so that i can publish the code later using windows file share. If you want to know how to enable to remote connection and file sharing for your Raspberry PI , visit the daveJ article about Beginner’s Guide to Installing Node.js on a Raspberry Pi and he explained all the steps in details. Launch the remote connection and connect to the PI Server. Launch the terminal window and run the following commands.
The first two commands are required for Raspbian for deploying .Net Core SDK and Runtime. These are some dependencies modules that has to be added manually. For more details, you can check the official documentation here.
The next two WGET commands will download the latest DotNet SDK and Runtime (2.1 RC1) and then the following commands will be used to extract the output to /opt/dotnet folder and a symbolic link created for dotnet.
If all the above steps are done with no errors, .Net Core SDK is installed on PI. Just run the command dotnet –info to display the information about DotNet SDK and Runtime details.
Now, that we have installed the .Net Core SDK and Runtime on PI, its time to build and deploy the published code on PI. As I mentioned earlier, I have the network shared drive enabled on my PI to copy the files. You can also transfer to PI via other methods like FTP.
As a first step, Lets publish the application in Linux ARM architecture since Raspbian is based on Linux. Navigate to the project folder and execute the following command to publish the output.
dotnet publish . -r linux-arm
if you want to publish in release mode, you can add -c release attribute.
The code is published in Linux-arm\Publish folder. Now, I will create a folder in PI server called VideoParserAPI and copy all the files from linux-arm\publish folder and paste into VideoParserAPI folder in PI Server.
Now the code is published in to PI, we will just the run the application to start the service listening on port 5000. Remember in my startup class, i used the Port No 5000 to listen for network connection. Remember, this is my personal project and i will be using it only in my internal network and i have no intention to publish it on internet. If you have the application that needs to be published on internet, you may have to use reverse proxy like nginx to configure port 80 and reroute to kestrel web server for best practices.
Lets run the application to start the services. Open the Terminal Window on PI Server and execute the ./VideoParserAPI to run the application. It a few seconds, the service will start and listening on Port 5000.
Lets call the web API from my system to see the output.
There you go. Web API Application developed in Latest .Net Core 2.1 is running on Raspberry PI.
Conclusion
I have created design pattern to handle all the core parsing logic in the base classes so that we don’t have to rewrite the logic for every other streaming boxes. however, we can customize the logic to change the output xml / json content based on the streaming box in appropriate child class.
In future, I will be developing an android app to consume these web api to play the content in my mobile with chromecast support. We can also extend this library to any other streaming box (Apple TV, Fire TV) . I also planned to deploy this web API app inside the docker in my Raspberry PI later.
I hope this will help you to get going with your crazy ideas.
]]>
<p>This article explains how to create generic parser API to parse video feeds from various sites that supports RSS/Atom feed or scraping the content from DOM element and return the custom XML / JSON output based on requested streaming box supported format. The core parsing logic will be implemented in base class and then custom formatting logic will be implemented in the appropriate child classes. Later in the article, we will also deploy this application into Raspian based Raspberry PI. We are using the latest .Net Core SDk 2.1 RC release for developing the web API. In my earlier <a href="http://www.jeevasubburaj.com/2018/03/how-to-build-personal-web-server-using.html" target="_blank" rel="noopener">article</a> , i developed the similar application using NodeJS and Express and deployed in Raspberry PI. </p>
Simultaneous Data Queue Polling Request Processing in SQL Serverhttps://jeevasubburaj.com/2018/05/01/simultaneous-data-queue-polling-request/2018-05-01T02:22:00.000Z2019-08-26T19:14:28.366ZIn My last post, we learned how to use the SQL server paging effectively in real word application. This post is another SQL Server tip to implement simultaneous data queue processing in SQL Server. In many of our enterprise applications, we have the design to handle incoming request comes from the multiple sources by putting into queue (MSMQ or SQL Server table) and process it later by processing engine.
This article explains about how to process the stored requests from SQL table by mutiple engine simultaneously running in app farm. We need an way to process those requests by multiple engine simultaneously but if one engine is picked the request, other engine should not be picking it and at the same time, table should not be locked for reading other records. In SQL Server, we have the concept called Table Hints which are specified in the FROM clause of the DML statement and affect only the table or view referenced in that clause. There are various types of table hints are available but we are going to look into UPDLOCK, READPAST for this scenario.
UPDLOCK
Specifies that update locks are to be taken and held until the transaction completes. UPDLOCK takes update locks for read operations only at the row-level or page-level.
READPAST
Specifies that the Database Engine not read rows that are locked by other transactions. When READPAST is specified, row-level locks are skipped but page-level locks are not skipped.
So, by combining UPDLOCK, READPAST in our DML statement, it provides the locking for thes rows selected by the first engine and not to return those rows to other engine even if the request comes simultaneously.
In this example query below, we are performing the data queue operations to select 10 records at a time by each engine and once its picked, it need to update the record status to PICKED and also other engine should be able read the other records in parallel.
In SQL Server, we have OUTPUT clause which returns the information based on each row affected by an INSERT, UPDATE, DELETE, or MERGE statement. So, we will use the output clause logic to return the rows that we are updating to PICKED status and we use UPDLOCK,READPAST table hints to select the rows so that it locks those rows and it wont be available for other engine as well.
The below query will return 10 unprocessed rows for each request from engine and also updates those record status to PICKED. This also takes care of handling requests simultaneously.
UPDATE incoming_request SET status_value = 'PICK'OUTPUT INSERTED.* WHERE request_id in (SELECT top 10 request_id FROM incoming_request WITH (updlock, readpast) WHERE status_value = 'UNPC' ORDERBY request_id ASC)
Happy Coding!
]]>
<p>In My <a href="http://www.jeevasubburaj.com/2018/04/sql-server-tips-sql-server-paging-made.html" target="_blank" rel="noopener">last post</a>, we learned how to use the SQL server paging effectively in real word application. This post is another SQL Server tip to implement simultaneous data queue processing in SQL Server. In many of our enterprise applications, we have the design to handle incoming request comes from the multiple sources by putting into queue (MSMQ or SQL Server table) and process it later by processing engine. </p>
<p>This article explains about how to process the stored requests from SQL table by mutiple engine simultaneously running in app farm. We need an way to process those requests by multiple engine simultaneously but if one engine is picked the request, other engine should not be picking it and at the same time, table should not be locked for reading other records.<br>
SQL Server Tips : SQL Server Paging made easy with OFFSET and FETCH Keywordhttps://jeevasubburaj.com/2018/04/27/sql-server-tips-sql-server-paging-made/2018-04-27T19:42:00.000Z2019-08-26T19:14:28.366ZIn Real world enterprise applications, we often perform long running batch operations for huge number of records. Typically, we load the data upfront from database one time and load it into memory via datatable or in some other forms (main table and other supported tables) and then loop through individual records in Parallel For Each for better performance. However, in some cases, if the data load is huge, we may end up having memory issues loading all the records upfront so we load each individual records inside the loop in sql which could potentially affects the performance of the job.
In order to handle this scenario,we have to address avoiding memory exceptions and also not to read the data for each record in sql. The SQL paging concept comes in handy to address this issues by fetching rows in slice with some limit (eg: 20K rows at a time) and perform the parrellel operations in the loop.
In SQL Server 2012, Microsoft introduced OFFSET and FETCH keyword.aspx) to apply the paging in SQL query results. We will loop for every 20k records and perform the parrellel operations instead of individual records.
This will skip the first 10 rows and return the next 5 rows.
Limitations in Using OFFSET-FETCH
ORDER BY is mandatory to use OFFSET and FETCH clause.
OFFSET clause is mandatory with FETCH. You can never use, ORDER BY … FETCH.
TOP cannot be combined with OFFSET and FETCH in the same query expression.
The OFFSET/FETCH rowcount expression can be any arithmetic, constant, or parameter expression that will return an integer value. The rowcount expression does not support scalar sub-queries.
In the real world application, i will be using it like
int startIndex = 0
int offset = 20000
while (true)
{
 //Execute the SQL query to load the data by passing the startIndex and Offset.
 //SELECT * FROM PERSON order by PERSON_ID OFFSET @STARTINDEX ROWS
        //FETCH          NEXT @OFFSET ROWS ONLY
 if(no rows) break; // Break the loop since no rows to process
   System.Threading.Tasks.ParallelOptions po = new System.Threading.Tasks.ParallelOptions();
          po.MaxDegreeOfParallelism = MAX_THREAD_LIMIT
  System.Threading.Tasks.Parallel.ForEach(queryData, po, row =>
 {

 }
 startIndex = startIndex + offset + 1;
}
Happy coding!
]]>
<p>In Real world enterprise applications, we often perform long running batch operations for huge number of records. Typically, we load the data upfront from database one time and load it into memory via datatable or in some other forms (main table and other supported tables) and then loop through individual records in Parallel For Each for better performance. However, in some cases, if the data load is huge, we may end up having memory issues loading all the records upfront so we load each individual records inside the loop in sql which could potentially affects the performance of the job. </p>
Android App - Free PacktPub Ebook Notifier (Weekend Project)https://jeevasubburaj.com/2018/04/19/android-app-free-packtpub-ebook/2018-04-19T22:35:00.001Z2019-08-26T19:14:28.364ZPacktPub is one of the great ebook and videos site for tech users and they offer one free ebook everyday. Most of the time, i forget to visit the site so i missed lot of free good ebooks and regret it later. So, i decided to create a weekend side project to explore kotlin language and also to refresh my android skills by understanding latest andriod O background processing limitations. It took some time to understand the basic kotlin language concepts (like companion objects, null safety) but its a good oppertunity for .Net developers to explore this language rather than coding in java for android apps. Kotlin also provides some real good extensions plugins to eliminate lot of boilerplate android code like findviewbyid.
Application Overview
This app launches the main activity with asynctask in background to parse the content to get the free ebook title, image url and render it on the main activity. It also check the site periodically (based on settings) and notify the user.
I have created AlarmManagerHelper class to set the repeating alarm based on the sync frequency settings. The Sync Frequency Settings are stored in SharedPreferences.
internalclassAlarmManagerHelper(ctx: Context) : ContextWrapper(ctx) { funsetBroadCastAlert(argRefreshAlarm: Boolean) { var refreshAlarm = argRefreshAlarm val alarmManager = this.getSystemService(Activity.ALARM_SERVICE) as AlarmManager val notificationIntent = Intent(Constants.ALARM_RECEIVER_INTENT_TRIGGER) notificationIntent.setClass(this, NotificationReceiver::class.java) var pendingIntent = PendingIntent.getBroadcast(this, 0, notificationIntent, PendingIntent.FLAG_NO_CREATE) if (pendingIntent == null) { pendingIntent = PendingIntent.getBroadcast(this, 0, notificationIntent, PendingIntent.FLAG_UPDATE_CURRENT) refreshAlarm = true } if (refreshAlarm) { val syncFrequency: String by DelegatesExt.preference(this, Constants.SYNC_FREQUENCY_NAME, Constants.SYNC_FREQUENCY_DEFAULT_VALUE) val syncFrequencyLong = syncFrequency.toLong() var finalCalInMillis: Long = System.currentTimeMillis() + (syncFrequencyLong * AlarmManager.INTERVAL_HOUR) alarmManager.setRepeating(AlarmManager.RTC_WAKEUP, finalCalInMillis, (syncFrequencyLong * AlarmManager.INTERVAL_HOUR) , pendingIntent) } } }
From Android O, there are lot of limitations on background execution limits and you can read all those details in android developer guide. For this project, i need a background job that should run periodically based on frequency settings defined in the app and send the notification to user with the book title. I used JobIntentService to do the background work and send the notification to user
I used Jsoup Library to parse the HTML content. Jsoup is a Java library for working with real-world HTML. It provides a very convenient API for extracting and manipulating data, using the best of DOM, CSS, and jquery-like methods.
internalclassParserHelper(ctx: Context) : ContextWrapper(ctx) { privateval tag: String = "ParserHelper" dataclassParserEntity(val title: String, val imageURL: String?) funparsePacktPubFreeBook(): ParserEntity { var title = "Internet access not available" var imageURL: String? = null if (isInternetConnected()) { try { val htmlContent = Jsoup.connect(getString(R.string.FREE_BOOK_URL)).get() title = htmlContent.select("div[class=dotd-title]").text() imageURL = "http:" + htmlContent.select("img[class=bookimage imagecache imagecache-dotd_main_image]").attr("src") } catch (e: Exception) { Log.e(tag, "Error in fetching the content " + e.printStackTrace()) } } return ParserEntity(title, imageURL) } privatefunisInternetConnected(): Boolean { val cm = this.getSystemService(Context.CONNECTIVITY_SERVICE) as ConnectivityManager val activeNetwork = cm.activeNetworkInfo return activeNetwork != null && activeNetwork.isConnectedOrConnecting } }
So, overall this project will give you the idea of how to develop an android app in kotlin including running the background job and send the notitfication to users. I have uploaded the entire source code in github.
Happy Coding
]]>
<p><a href="https://www.packtpub.com/" target="_blank" rel="noopener">PacktPub</a> is one of the great ebook and videos site for tech users and they offer one <a href="https://www.packtpub.com/packt/offers/free-learning" target="_blank" rel="noopener">free ebook</a> everyday. Most of the time, i forget to visit the site so i missed lot of free good ebooks and regret it later. So, i decided to create a weekend side project to explore <a href="https://kotlinlang.org/docs/reference/" target="_blank" rel="noopener">kotlin language</a> and also to refresh my android skills by understanding latest <a href="https://developer.android.com/about/versions/oreo/background.html" target="_blank" rel="noopener">andriod O background processing limitations.</a><br>
.Net Hidden Gems - Web.Debug.Config and Web.Release.Confighttps://jeevasubburaj.com/2018/04/05/net-hidden-gems-webdebugconfig-and/2018-04-05T18:52:00.000Z2019-08-26T19:14:28.365ZI am planning to post some of interesting .Net tips or hidden gems in this part of series which mostly covers only the topics / areas / features that we might have overlooked as part of our .Net development.
Today, i am going to cover the purpose of web.debug.config and web.release.config files that are present in every web development project in addition to web.config. Usually, we ignore these two files when we deploy the code.
These are called web.config transformation model and it allows you to modify your web.config file in an automated fashion during deployment of your applications to various server environments. So, you can create various config file like Web.Stage.Config, Web.UAT.Config file and modify your configuration settings accordingly.
By default, it allows you to do the following transformation.
]]>
<p>I am planning to post some of interesting .Net tips or hidden gems in this part of series which mostly covers only the topics / areas / features that we might have overlooked as part of our .Net development. </p>
<p>Today, i am going to cover the purpose of web.debug.config and web.release.config files that are present in every web development project in addition to web.config. Usually, we ignore these two files when we deploy the code. </p>
How to build Personal Web API Server using Raspberry PI and NodeJshttps://jeevasubburaj.com/2018/03/27/how-to-build-personal-web-server-using/2018-03-27T18:38:00.001Z2019-08-26T19:14:28.365ZI have a various streaming box (Apple TV, Roku, Fire TV, Nexus Player) because i prefer to watch video tutorials on TV rather than watching in laptop. However, we don’t have app for all the sites that provides video tutorials. For example, MSDN channel9 dont have app for any streaming boxes. So, i decided to use roku sample video player app to play channel 9 videos on my roku. This app expects the video content defined in certain XML format.So, I just have to build the web APIs to return the XML output dynamically. I also prefer not to host the Web APIs on the internet. I just want to host it in my home network. So, i need a web server that will be always on so, decided to use my existing Raspberry PI 3 as a web server.
I initially thought of using .Net Core on Windows IOT but then later decided to use Raspian OS and NodeJS becuase i wanted to try NodeJS with some real world application.
Setting up Raspian OS on Raspberry PI was pretty simple. I just followed this excellent article on how to setup Raspian on Raspberry PI. Also, configured the remote connection and shared the work folder to deploy the files so i no longer need my Raspberry PI connected to my TV. I just placed the raspberry PI along with my other stream boxes and connected through my laptop using remote desktop.
I started the Node JS Web API with the following Node Packages to parse the channel 9 feeds.
Express is one of the most famous nodejs web application framework to create Web APIs quick and easy. Cheerio is used for parsing the DOM elements. XMLBuilder is used for construct the xml output in easy way.
To start with, i created the web server with routing as follows
var express = require('express') , app = express() , server = require('http').createServer(app) , path = require('path')
app.get('/Ch9/:topic/List', function (req, res) { var topic = req.params.topic; parser.Ch9List(topic, function (result) { res.set('Content-Type', 'text/xml') res.send(200, result) }); });
app.get('/Ch9/:topic/:title/View', function (req, res) { var topic = req.params.topic; var title = req.params.title; parser.Ch9View(topic, title, function (result) { res.set('Content-Type', 'text/xml') res.send(200, result) }); });
i created the parser library class and added the following code to parse the channel 9 RSS content to fetch the video URLs
const topicLists = ["Shows", "Events", "Series", "Blogs"];
 const ch9BaseURL = "http://channel9.msdn.com/Browse/";
 exports.Ch9 = function (callback) {
   var xml = builder.create('categories');
   var cIndex;
   for (cIndex in topicLists) {
     var category = xml.ele("category");
     category.att("title", topicLists[cIndex]);
     category.att("description", topicLists[cIndex]);

     var catLeaf = category.ele("categoryLeaf");
     catLeaf.att("title", topicLists[cIndex]);
     catLeaf.att("description", topicLists[cIndex]);
     catLeaf.att("feed", appBaseURL + "Ch9/" + topicLists[cIndex] + "/List/");
   }
   xml.end({ pretty: true });
   callback(xml.toString());
 }

 exports.Ch9List = function (topic, callback) {
   var xml;
   request(ch9BaseURL + topic + '/rss?sort=recent', function (error, response, html) {
     if (!error && response.statusCode == 200) {
       var $ = cheerio.load(html, { ignoreWhitespace: true, xmlMode: true });
       xml = builder.create('categories');
       var currIndex = 0;
       $('item').each(function (i, element) {
         var category = xml.ele("category");
         category.att("title", $(element).find('title').text());
         category.att("description", $(element).find('description').text());

         var catLeaf = category.ele("categoryLeaf");
         catLeaf.att("title", $(element).find('title').text());
         catLeaf.att("description", $(element).find('description').text());
         catLeaf.att("feed", appBaseURL + "Ch9/" + topic + "/" + encodeURIComponent($(element).find('title').text()) + "/View/");
         currIndex++;
       });

       xml.end({ pretty: true });
       callback(xml.toString());
     }
   });
 }

 exports.Ch9View = function (topic, title, callback) {
   var xml;
   request(ch9BaseURL + topic + '/rss?sort=recent', function (error, response, html) {
     if (!error && response.statusCode == 200) {
       var $ = cheerio.load(html, { ignoreWhitespace: true, xmlMode: true });
       var curElement = $('item').filter(function (i, el) {
         return $(this).find('title').text() === title;
       });
       var feedURL = $(curElement).find('c9\\:feed').text();
       if (!feedURL)
         feedURL = $(curElement).find('c9\\:feed').text() + "/Rss";

       request(feedURL, function (error, response, html) {
         var $ = cheerio.load(html, { ignoreWhitespace: true, xmlMode: true });
         xml = builder.create('feed');
         var loopIndex = 0;
         $('item').each(function (i, element) {
           var url = $(element).find('media\\:content').filter(function (i, el) {
             return $(this).attr('url').includes("_high");
           }).attr("url");

           var item = xml.ele('item');
           item.att('sdImg', $(this).children('media\\:thumbnail').attr('url'));
           item.att('hdImg', $(this).children('media\\:thumbnail').attr('url'));
           item.att('thumbnailURL', $(this).children('media\\:thumbnail').attr('url'));
           item.ele('title', $(this).children('title').text());
           item.ele('contentId', loopIndex);
           item.ele('streamFormat', 'mp4');
           var media = item.ele('media');
           media.ele('streamUrl', url);
           media.ele('thumbnailURL', $(this).children('media\\:thumbnail').attr('url'));
           loopIndex++;
         });
         xml.end({ pretty: true });
         callback(xml.toString());
       });
     }
   });
 }
Thats it. We have just implemented the web API using NodeJS with just few lines of code. if i run my application using http://localhost:4567/ch9, it responds back with xml output.
The deployment is super easy too. Just copy the folder excluding Node_Modules folder. You dont have to deploy the node_modules folder. You can run the NPM Update command to get the node_modules folder from PI Server after deploying it to save some deployment time.
To run the App Server, just open the terminal from Raspian and run using the following command Node APP.js and your personal web server is ready to serve.
I have modified the UrlCategoryFeed in categoryFeed.brs in the roku app before i deploy it. In order to deploy the roku dev app, just follow the roku official guide . Make sure You enable the development mode in roku before deploying it.
Update : Roku recently updated their video channel sample app and the new app can be found here.
]]>
<p>I have a various streaming box (Apple TV, Roku, Fire TV, Nexus Player) because i prefer to watch video tutorials on TV rather than watching in laptop. However, we don’t have app for all the sites that provides video tutorials. For example, <a href="https://channel9.msdn.com/" target="_blank" rel="noopener">MSDN channel9</a> dont have app for any streaming boxes. So, i decided to use roku <a href="https://sourceforge.net/p/rokusdkexamples/code/HEAD/tree/trunk/rokusdkexamples-code/videoplayer/" target="_blank" rel="noopener">sample video player app</a> to play channel 9 videos on my roku. This app expects the video content defined in certain XML format.So, I just have to build the web APIs to return the XML output dynamically. I also prefer not to host the Web APIs on the internet. I just want to host it in my home network. So, i need a web server that will be always on so, decided to use my existing Raspberry PI 3 as a web server. </p>
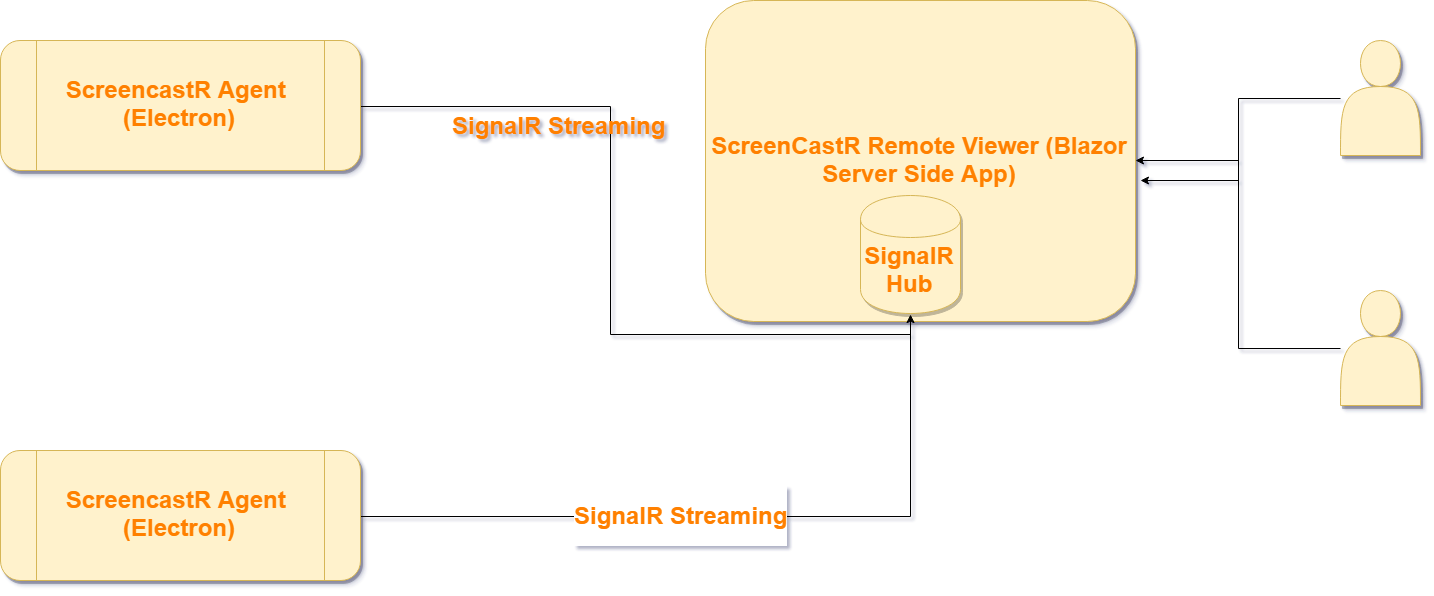
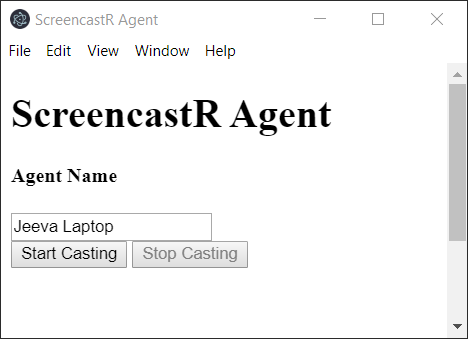
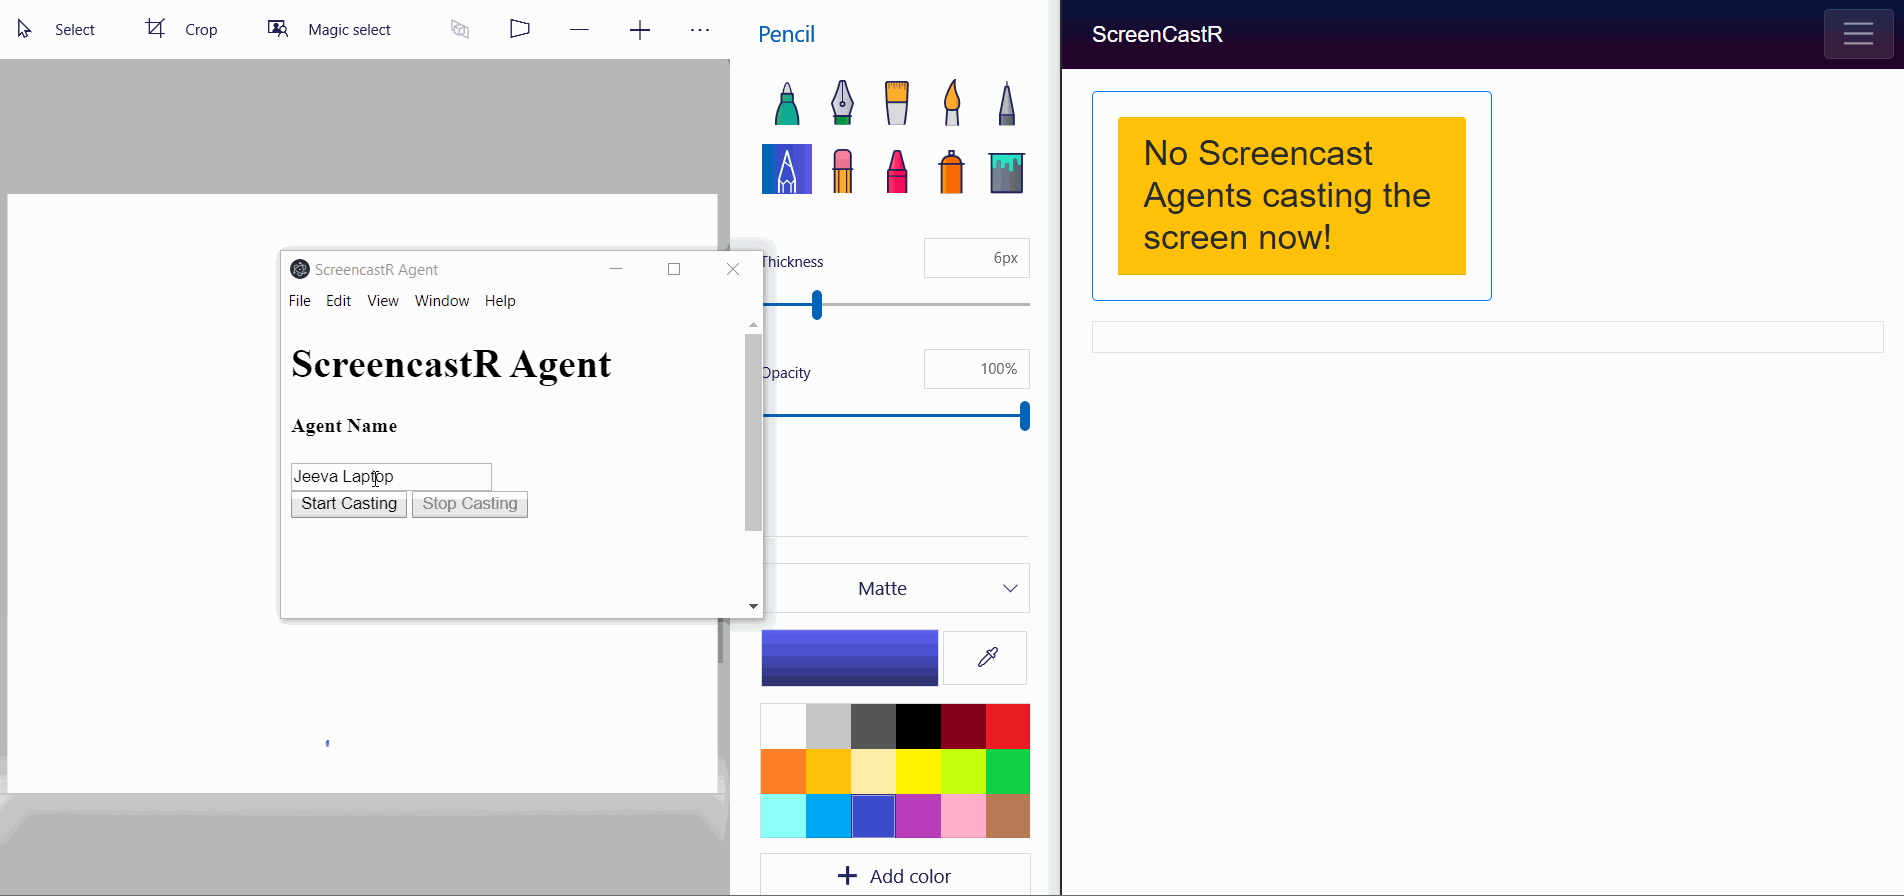
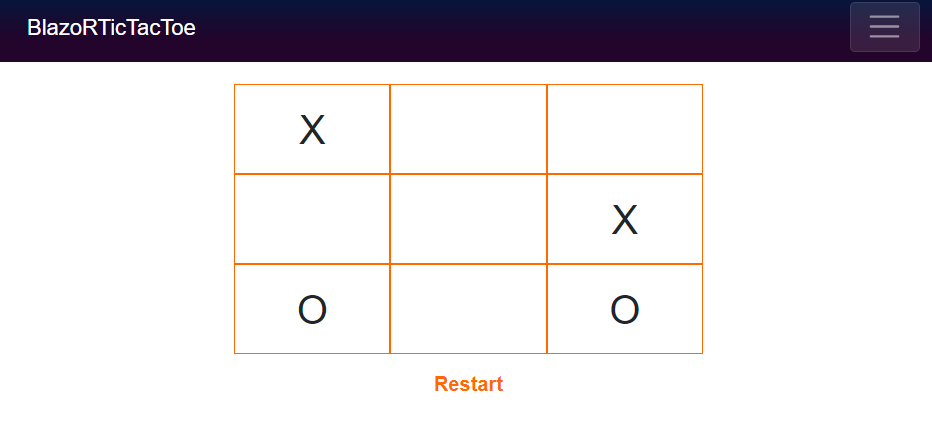
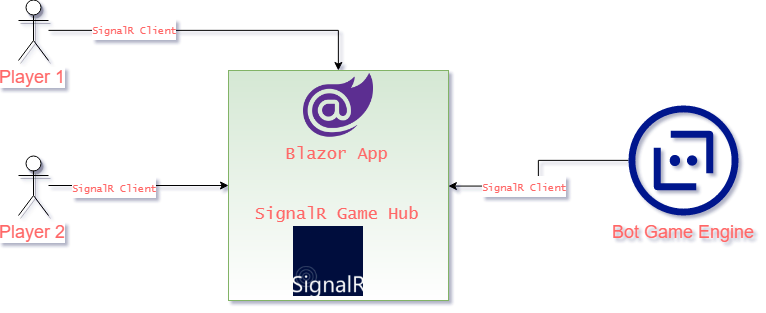

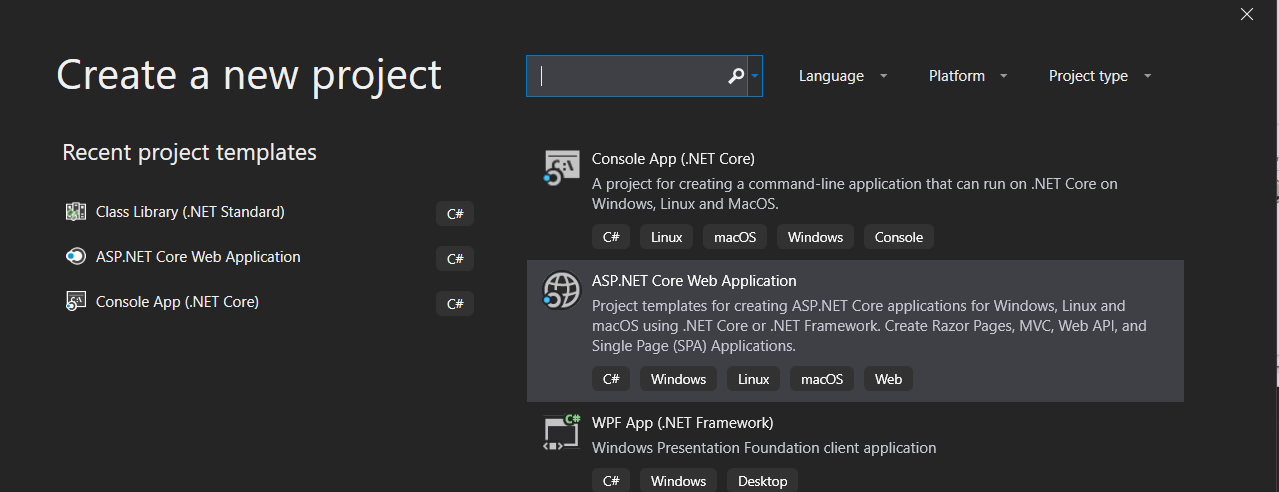
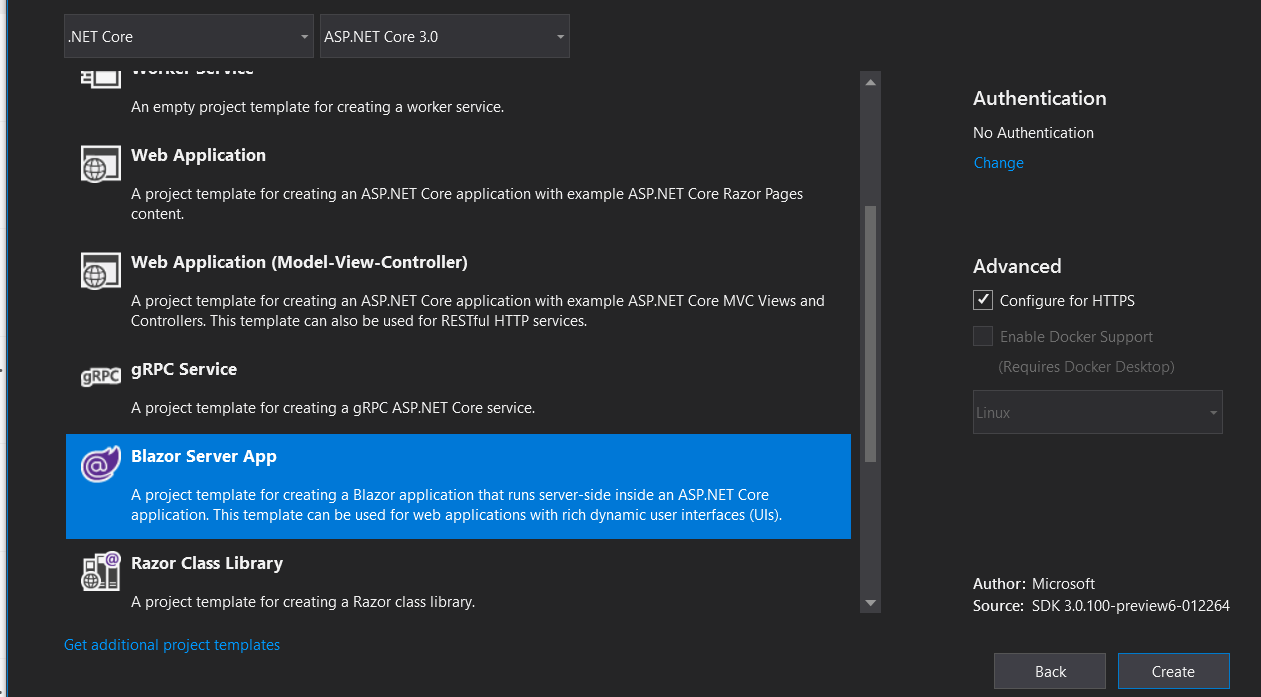
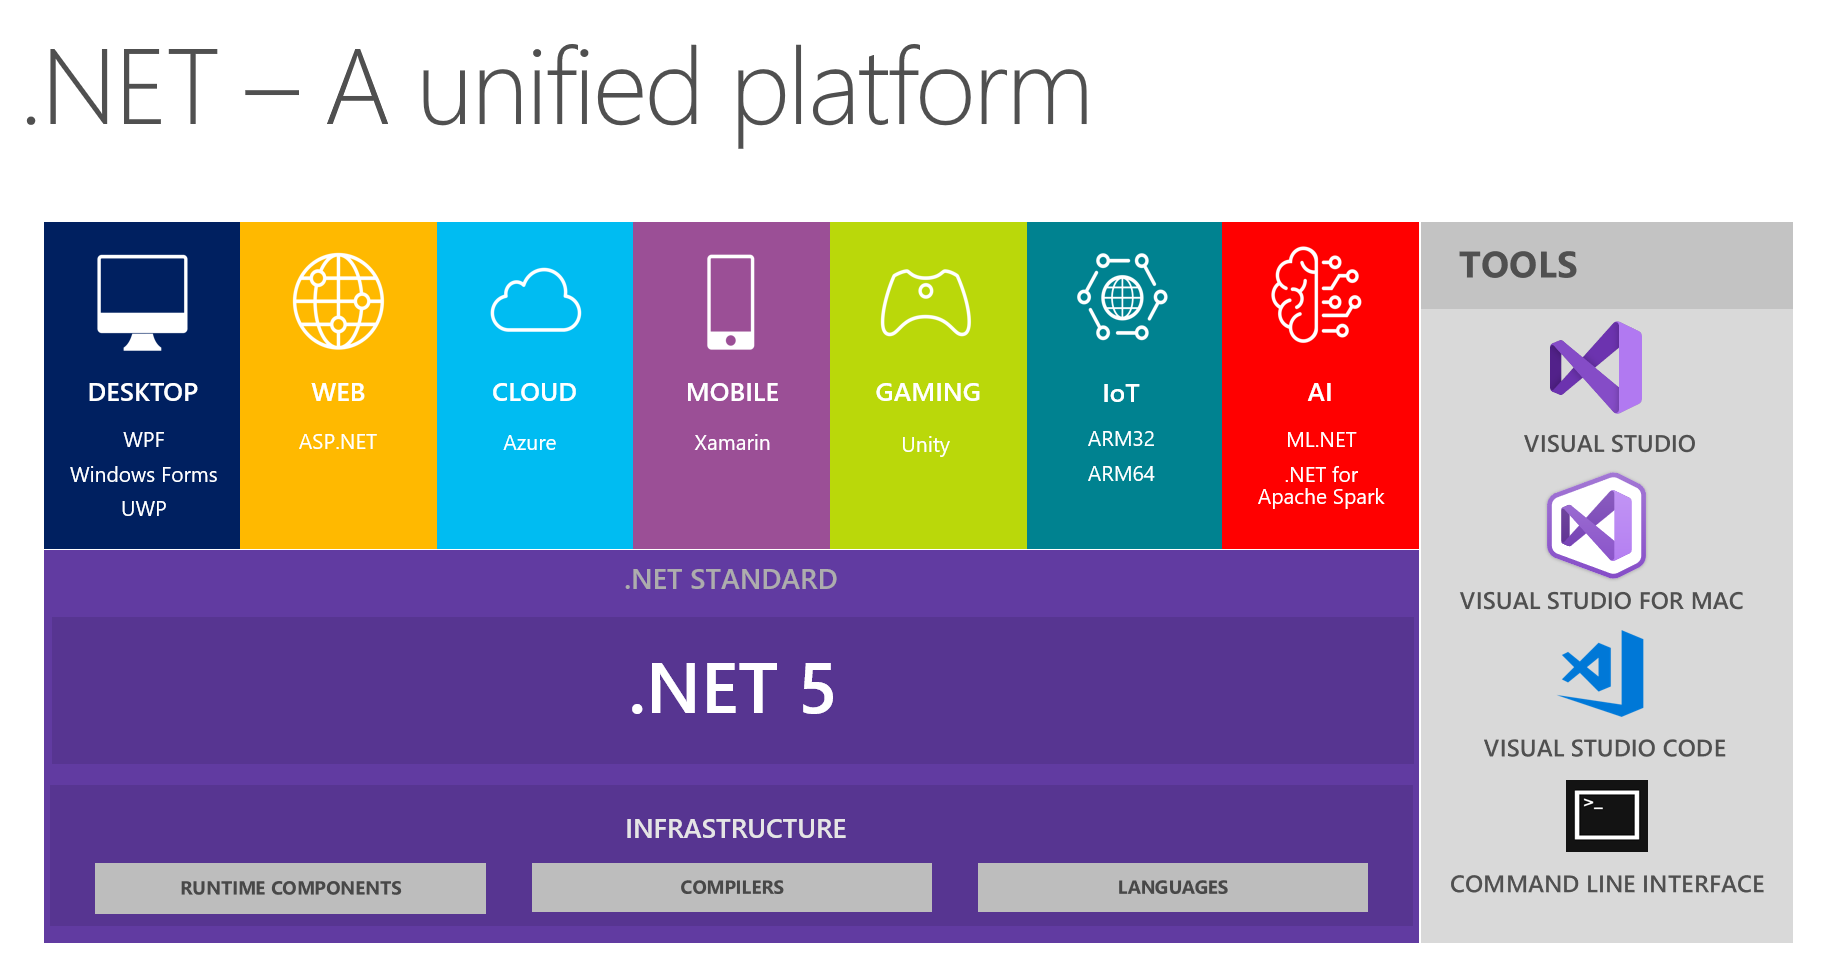
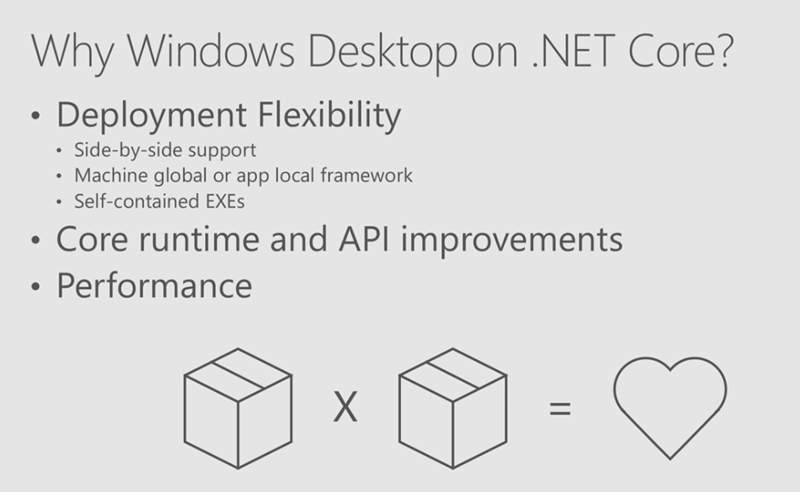

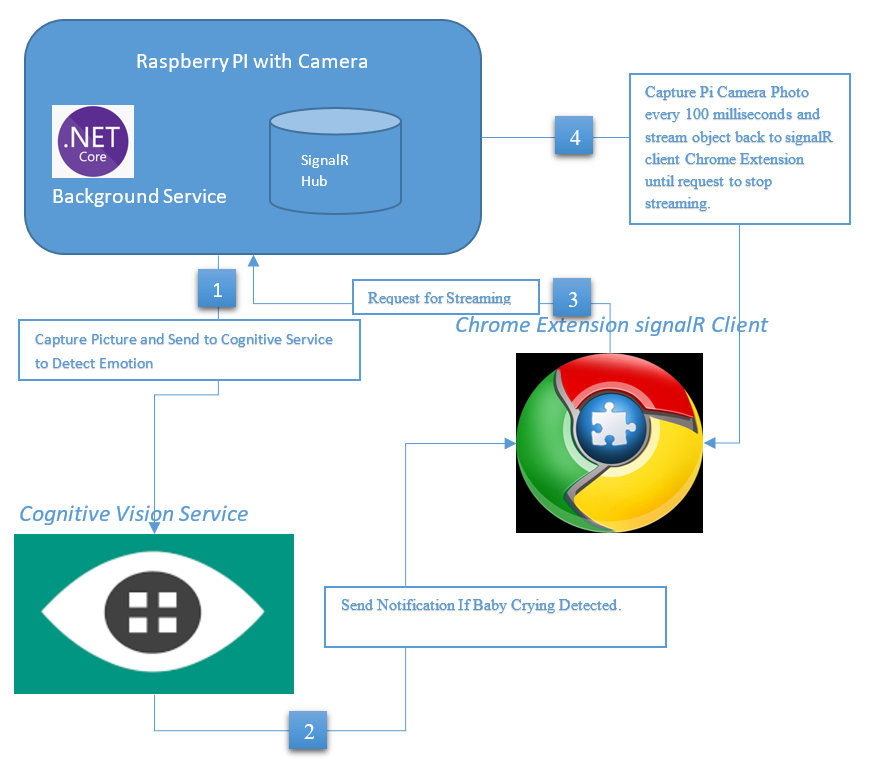
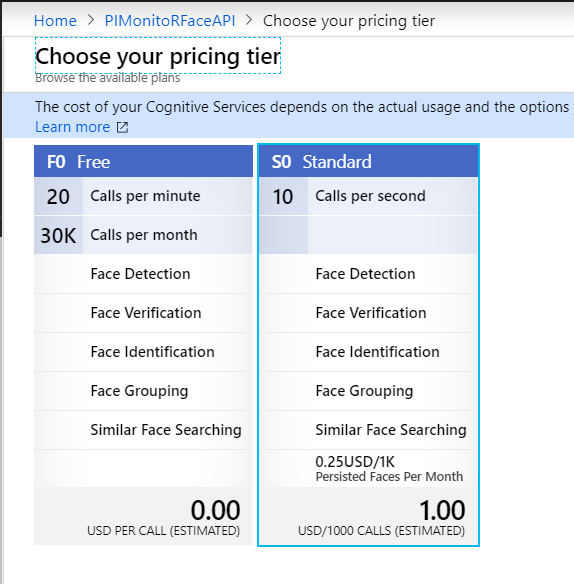

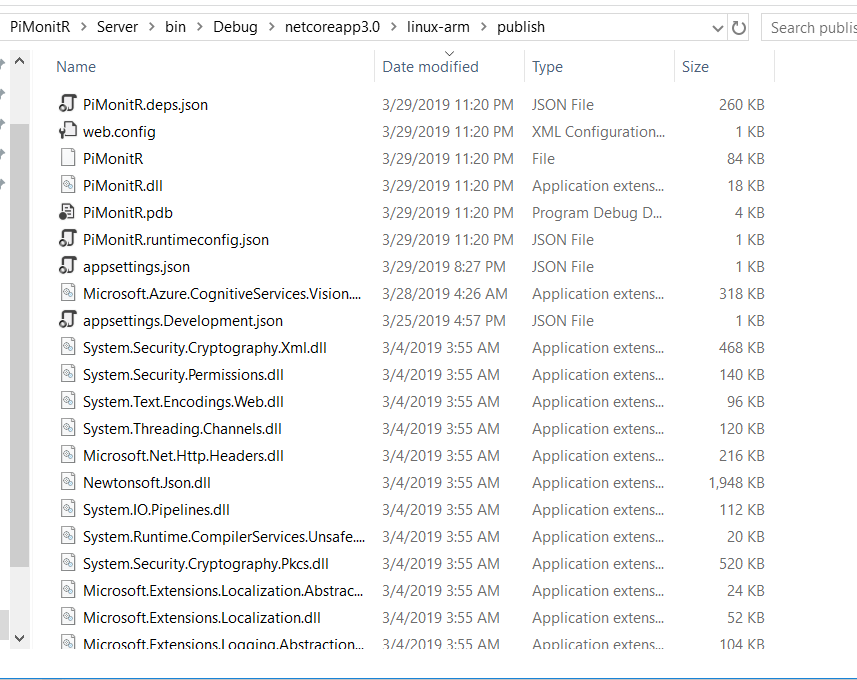
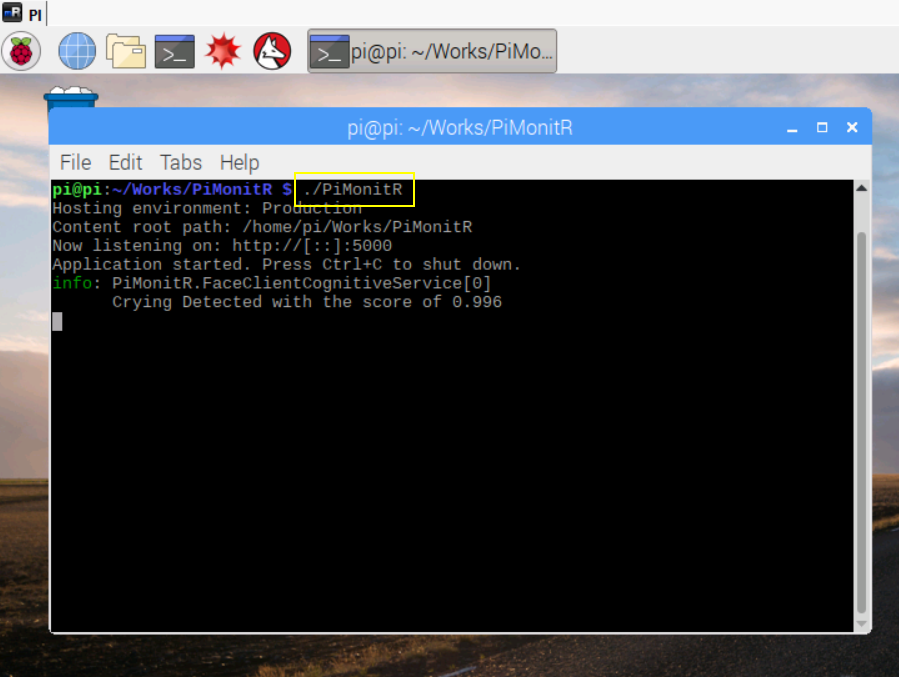
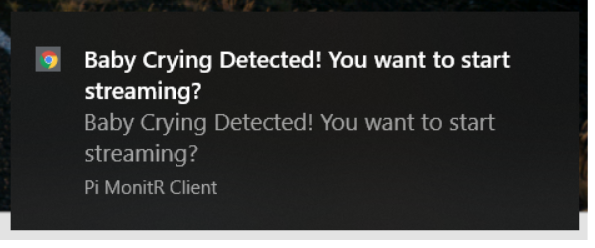
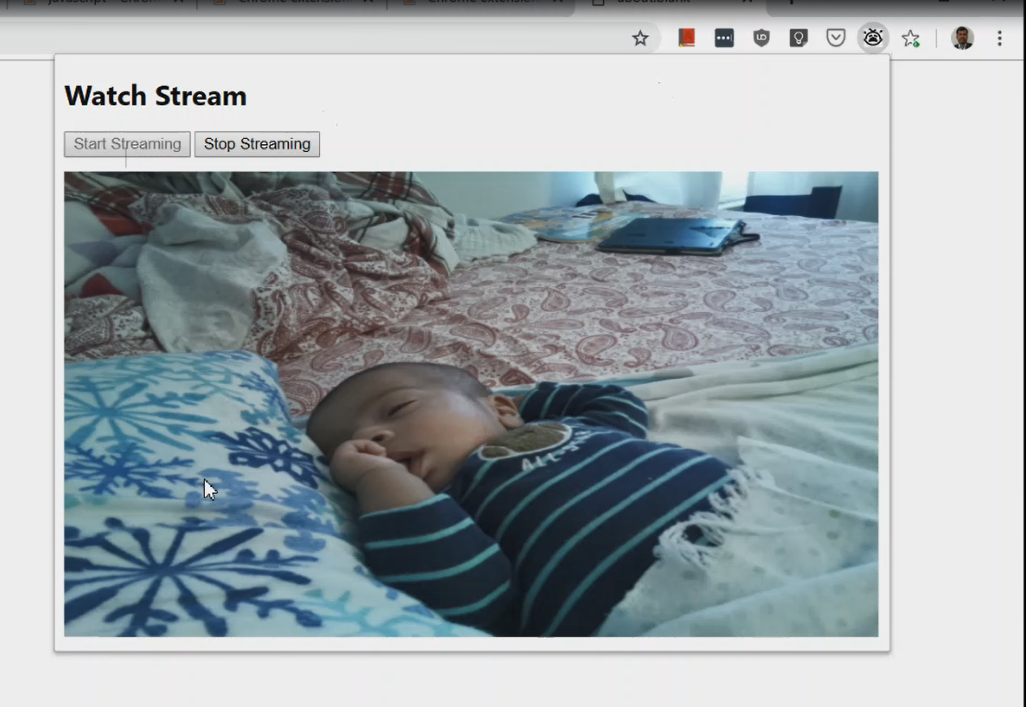
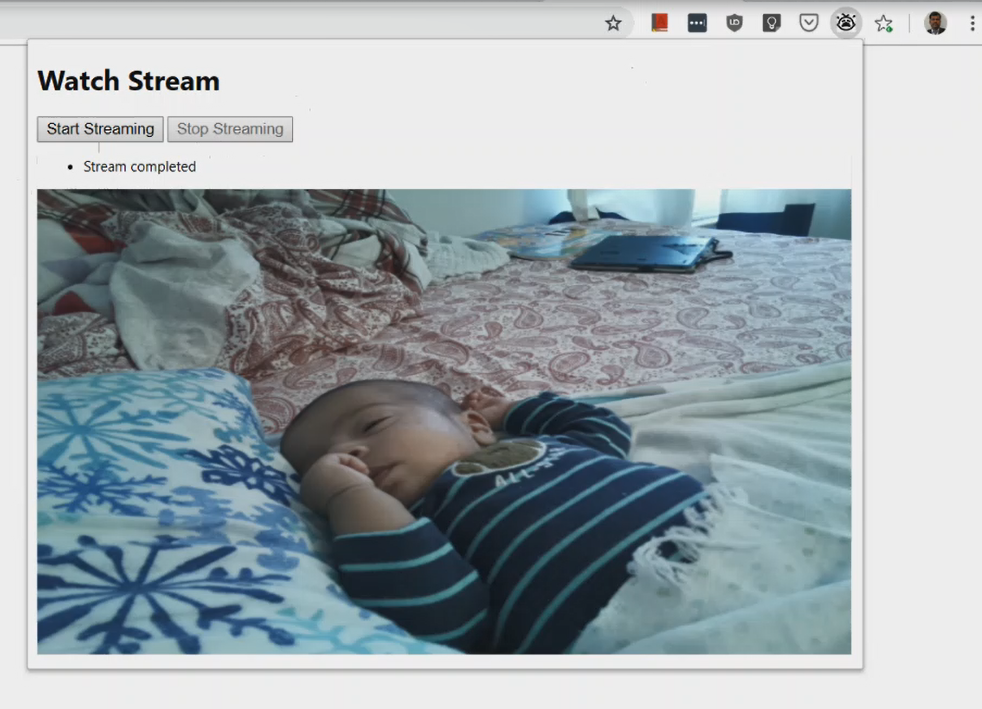


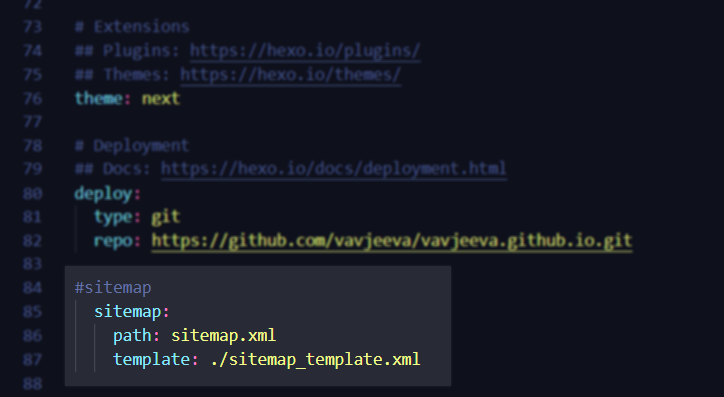
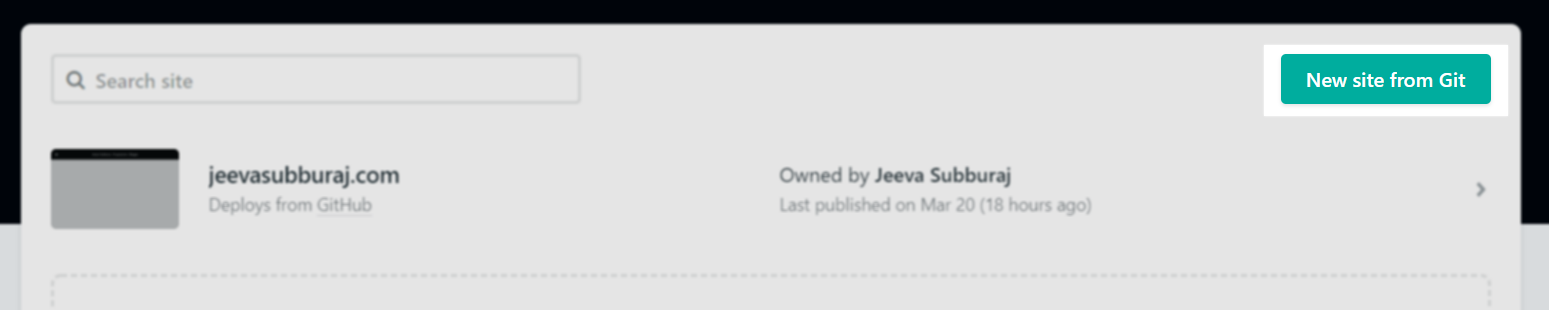

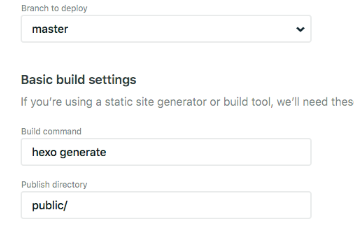
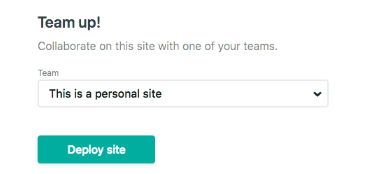
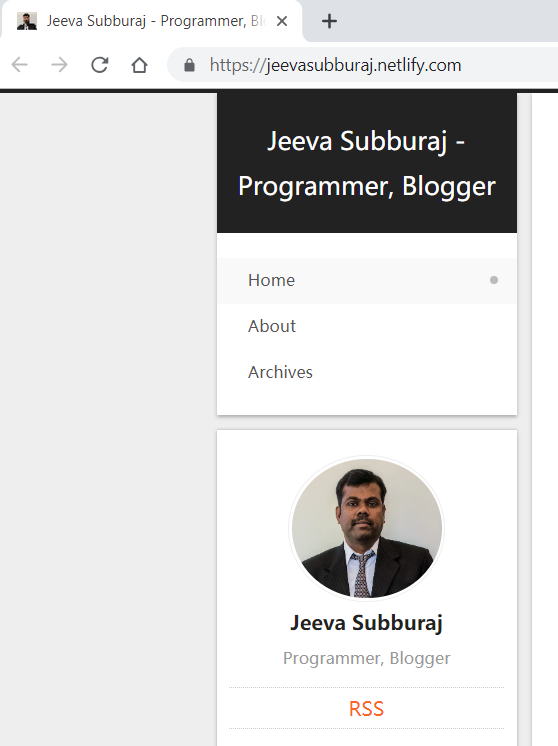
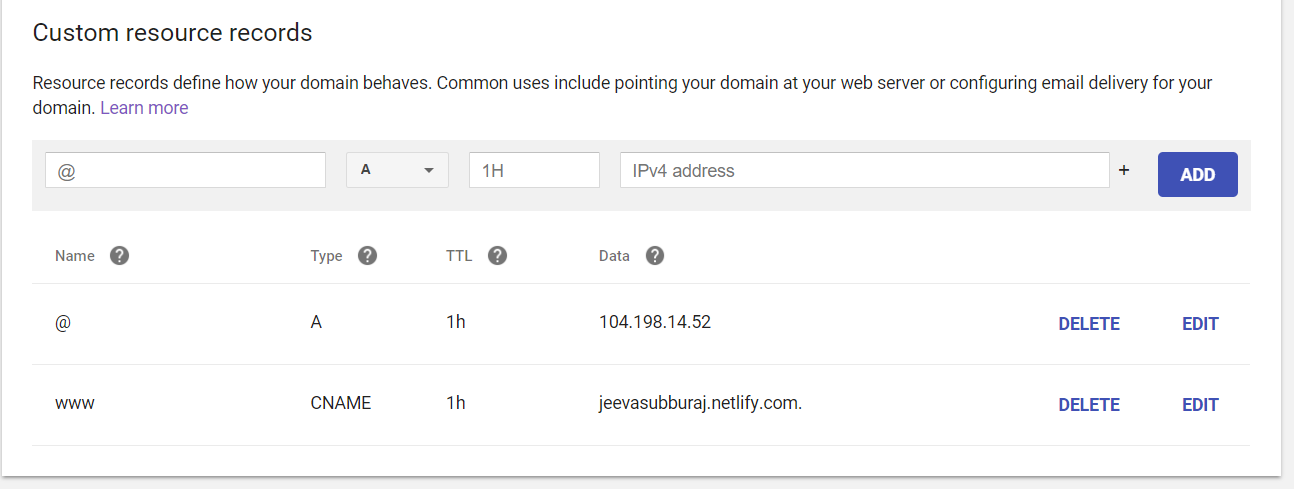


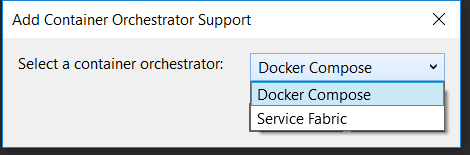


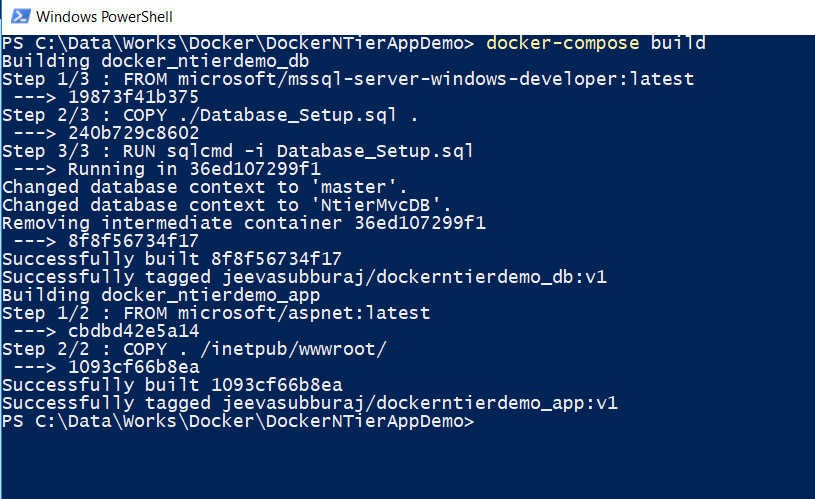

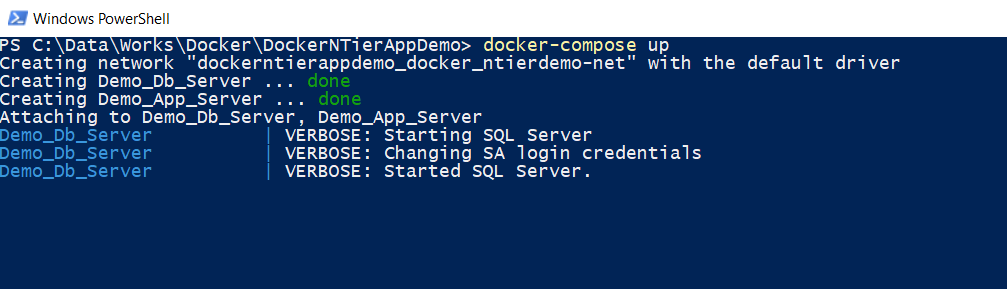


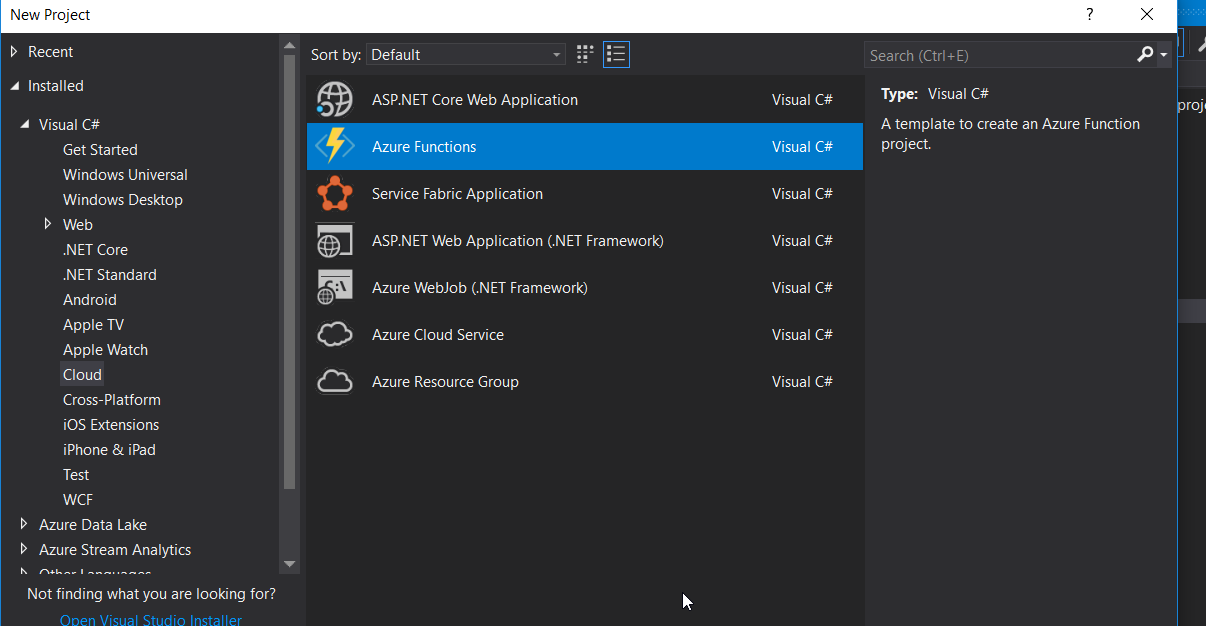
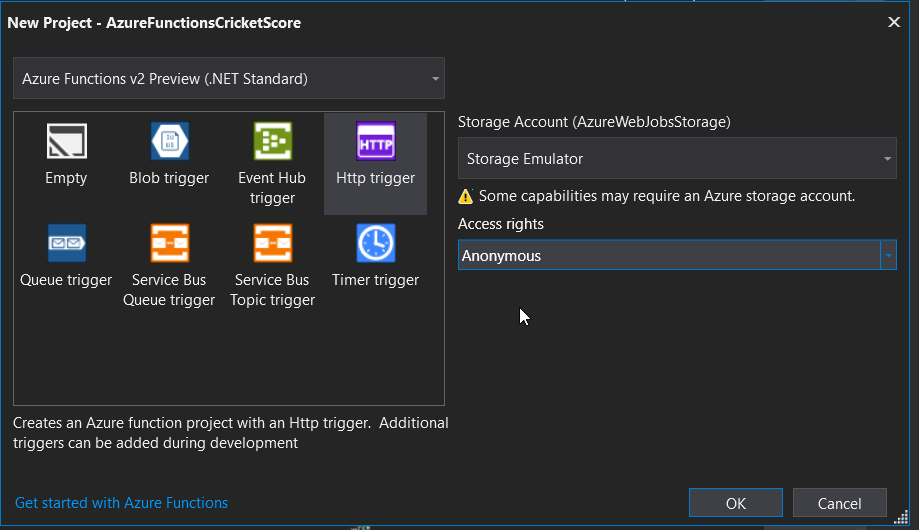

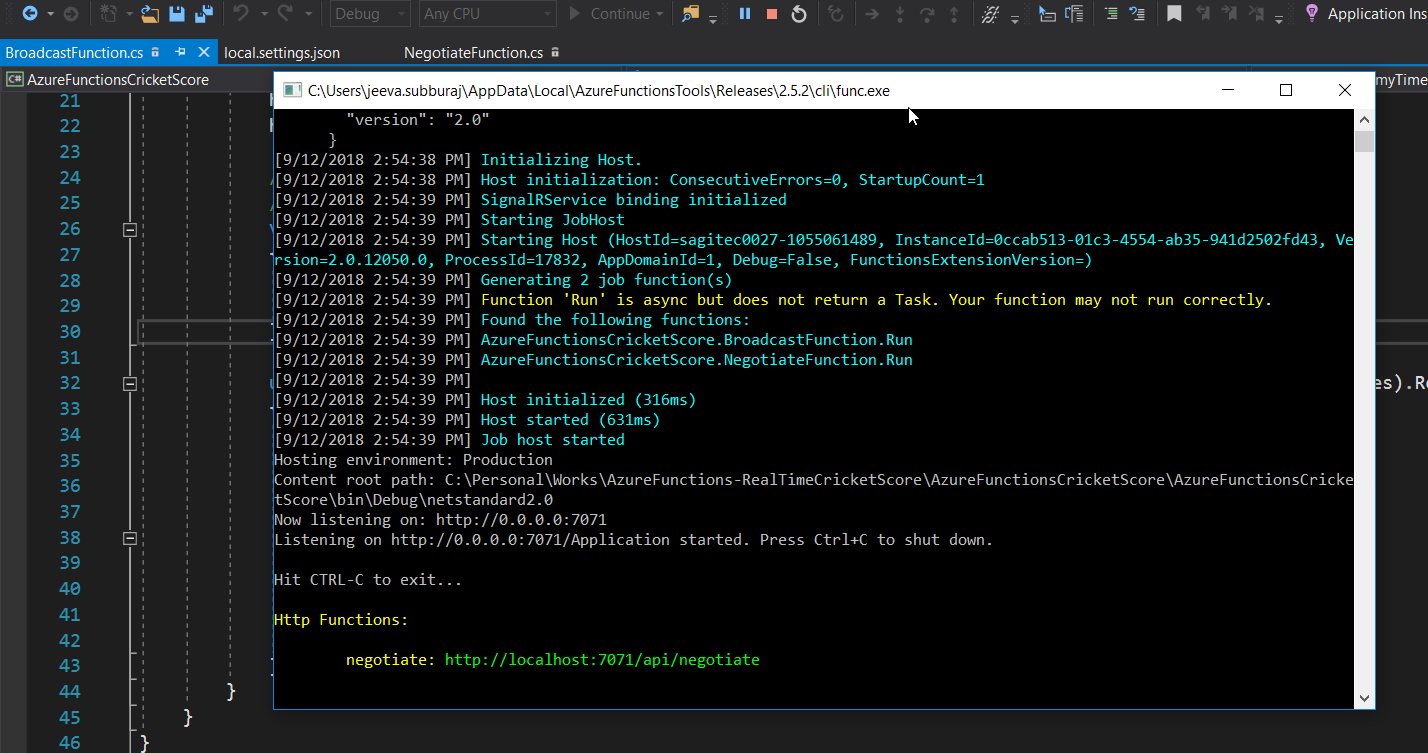

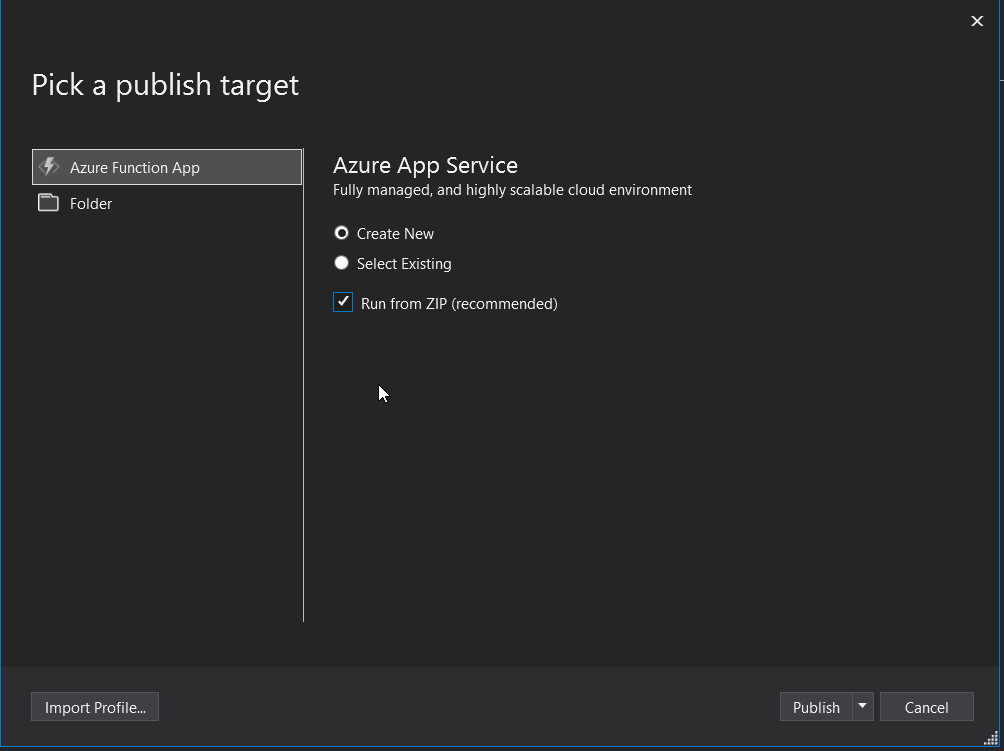

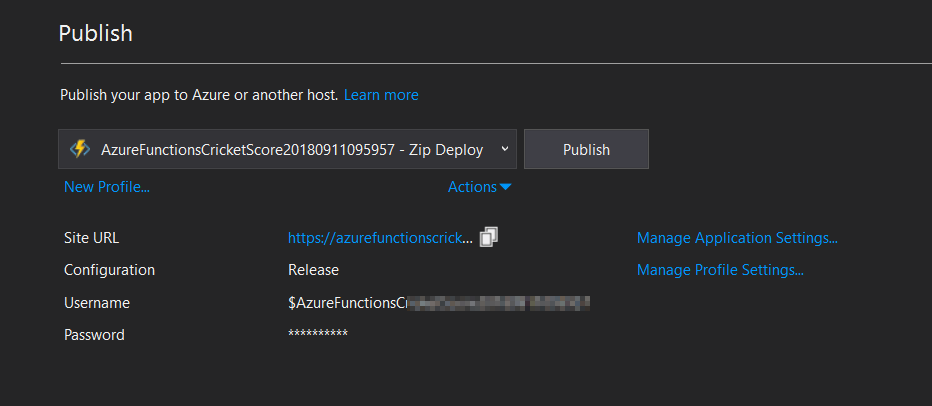
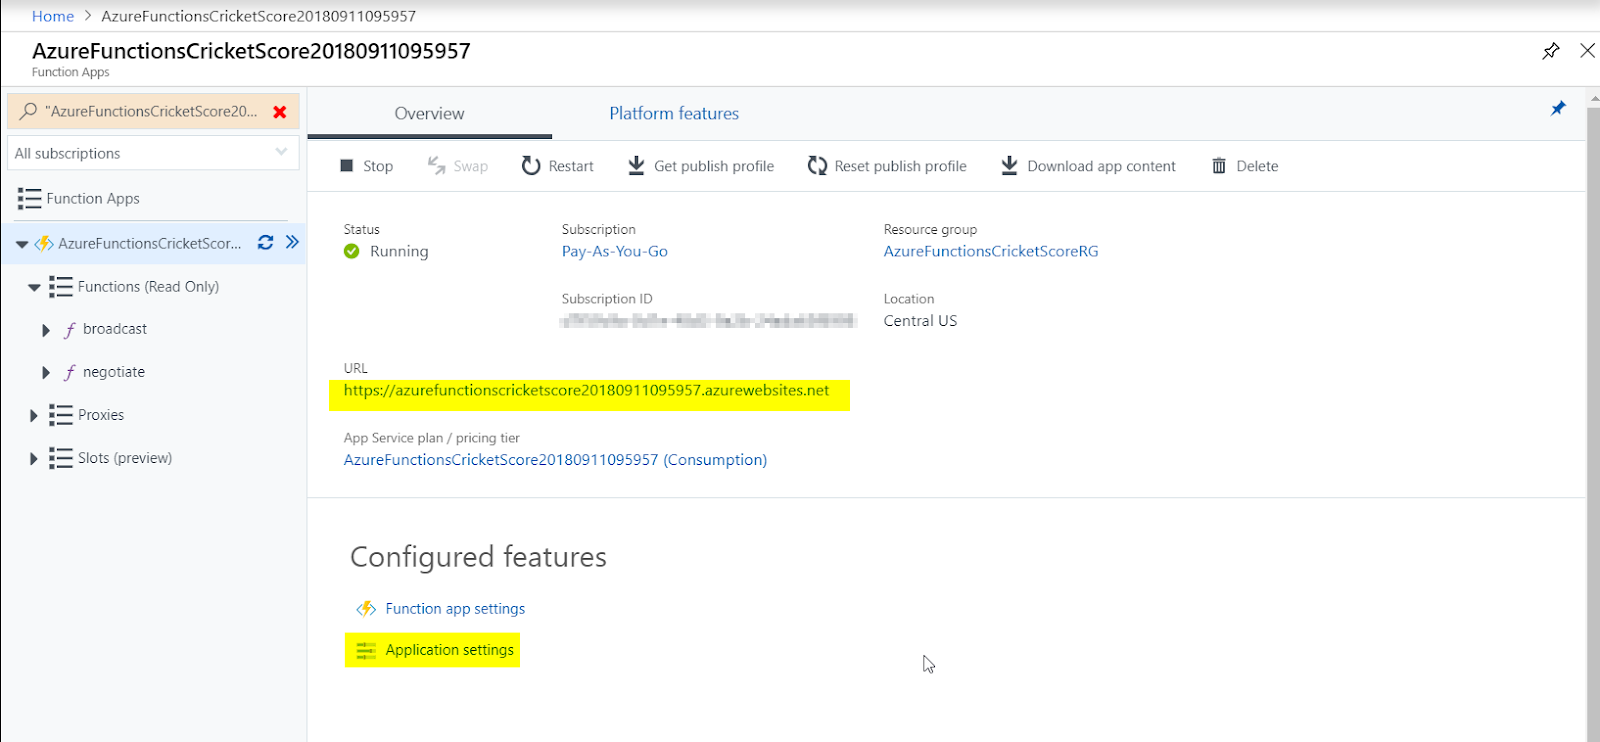


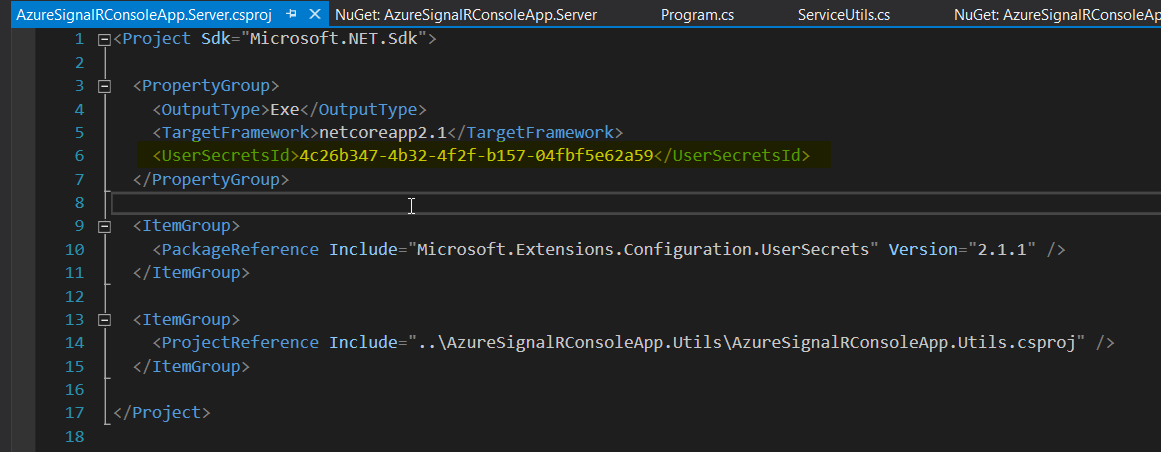


 In older Asp.Net Version, we typically store the configuration settings in web.config and access it using ConfigurationManager Class. This worked well in the past however it is not good enough for modern technologies like hosting in cloud or container based solutions. Moreover, storing the sensitive data in web.config poses security risk if the file is check in to source control by accident.


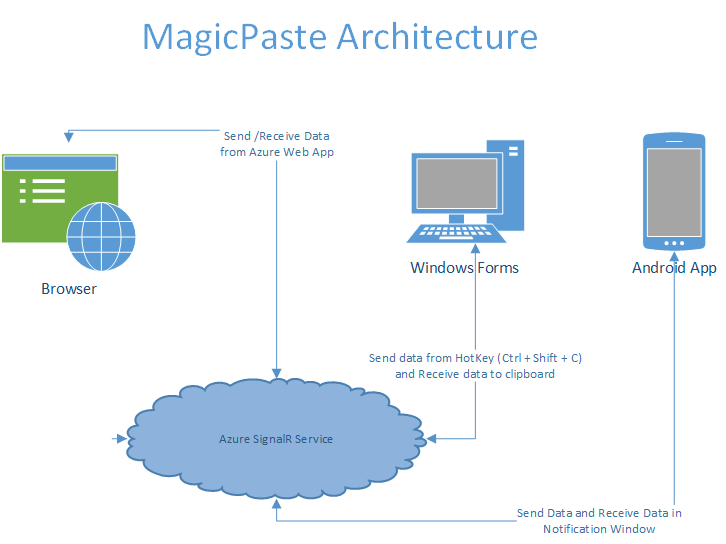


 ](
](


